Category: Uncategorized

  • How to automate repetitive tasks: Boost productivity with practical automation

    How to automate repetitive tasks: Boost productivity with practical automation

    Ready to automate those mind-numbing tasks? The first step is figuring out which manual chores are secretly eating up your time and money. From there, you can use software or a bit of code to handle them for you. It’s all about mapping out the process, grabbing the right tools (like a no-code platform or an API), and building a workflow that just runs.

    The key is to start small. Pick one high-impact, rule-based task to see some quick wins.

    The True Cost of Doing Things by Hand

    A stressed person at a desk surrounded by charts, calendars, a clock, and dollar signs, illustrating task management overwhelm.

    Let's be honest—nobody gets a thrill from manually resizing hundreds of images or copy-pasting data between spreadsheets. Beyond the sheer boredom, these repetitive jobs are silent assassins, killing your team's creativity and drive. They don't just feel like a waste of time; they are a real, measurable drain on your bottom line.

    The hidden price tag on manual work is staggering when you actually do the math. Every minute an employee spends on a mundane, repeatable task is a minute they aren't spending on big-picture thinking, talking to customers, or coming up with your next great idea.

    The Ripple Effect of Manual Work

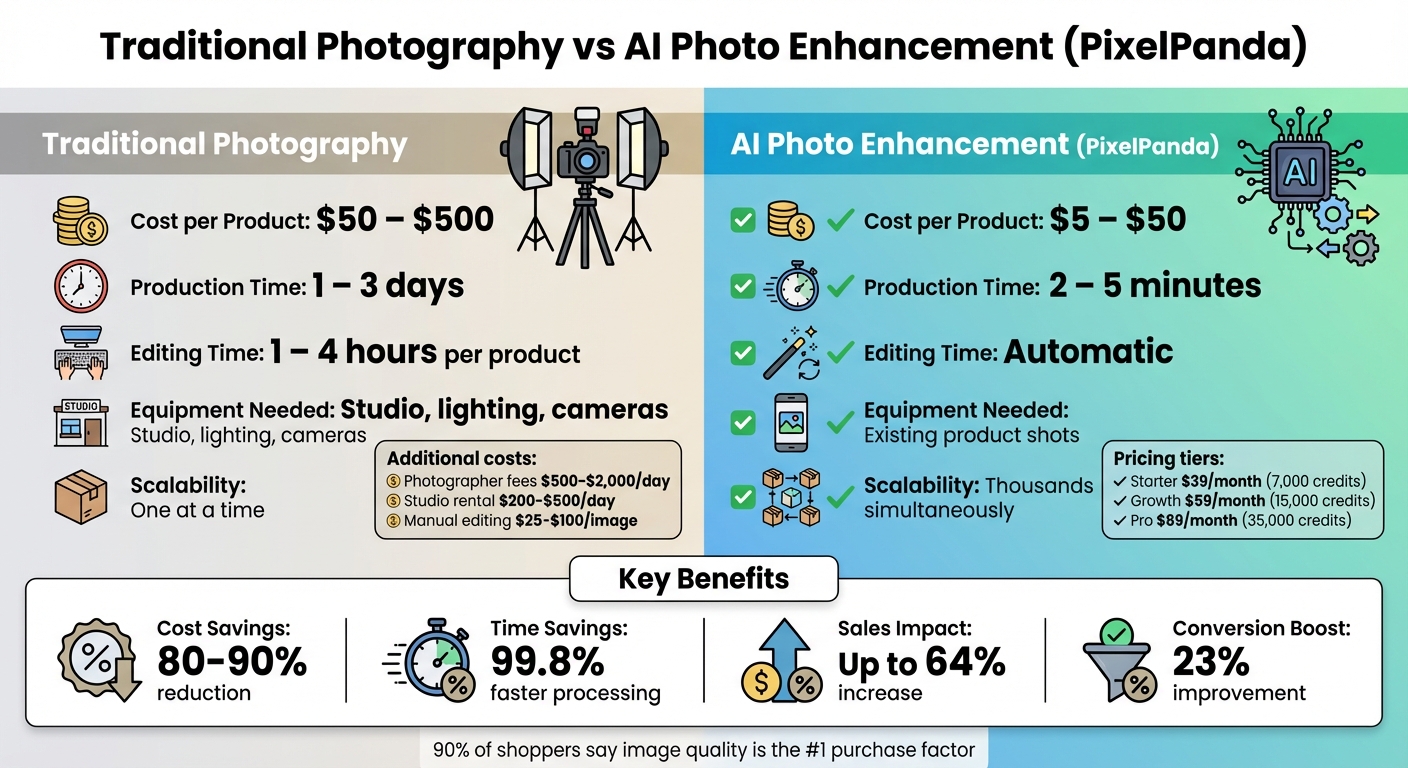
    Picture this: an e-commerce team spends a full day every single week just getting product photos ready. They're removing backgrounds, resizing for different platforms, and double-checking quality. That’s 20% of their workweek gone before they even think about marketing or sales.

    Or how about a marketing specialist stuck creating endless variations of the same social media graphic? They're trapped in a production loop, not a creative one. This isn't just inefficient; it’s a morale killer. It leads to burnout, opens the door for human error, and creates bottlenecks that slow down entire projects.

    The real "cost" of manual labor isn't just the salary you pay for that time. It's the opportunity cost—what your talented team could have been achieving instead. It's the cost of delayed launches, inconsistent branding, and frustrated employees.

    More Than Just a Minor Annoyance

    Seeing these daily chores for what they are is the first step. They aren't just minor annoyances to power through; they are serious business problems holding you back. Making the transition from manual updates to autonomous workflows is about more than just efficiency; it's a strategic move to combat rising operational costs.

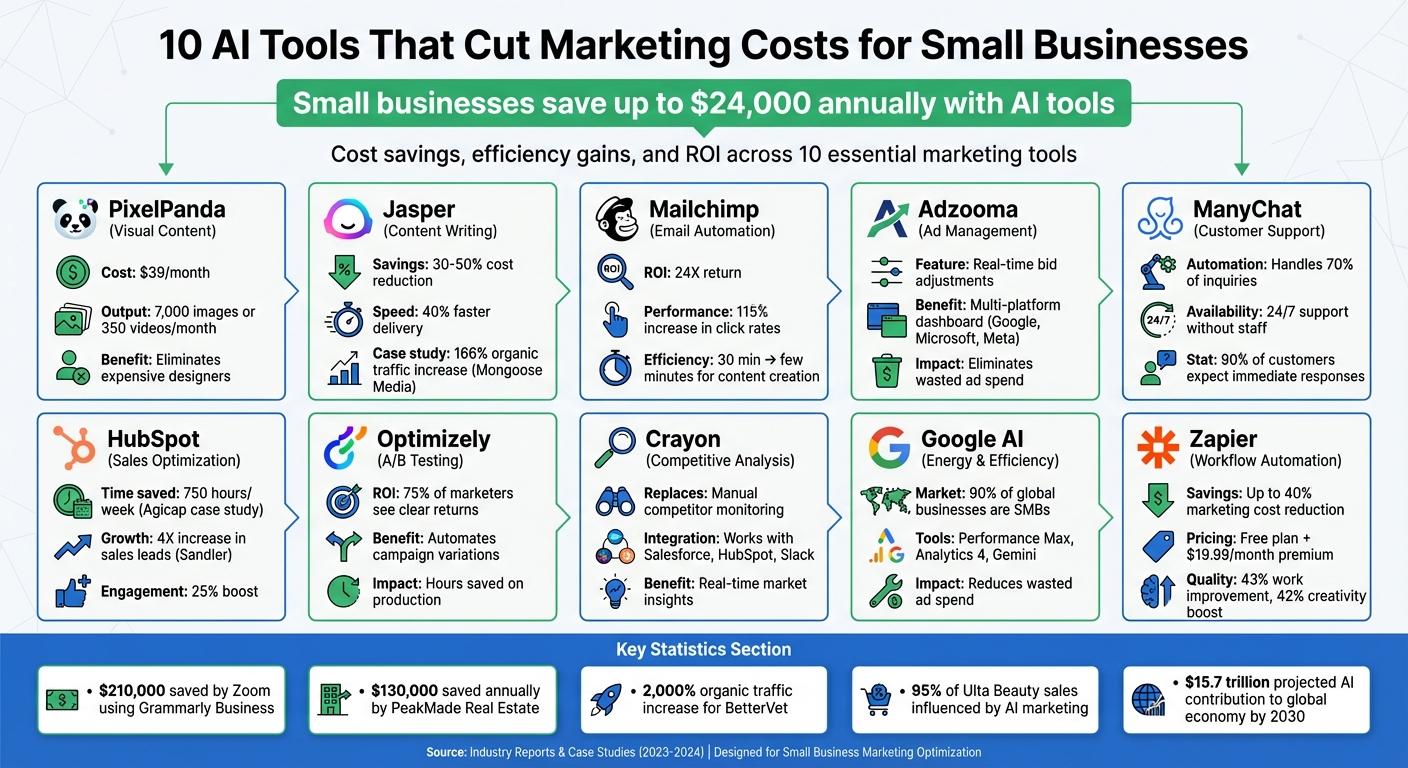
    Once you start adding up the lost hours, the financial hit is hard to ignore. A few hours a week per employee quickly snowballs into thousands of dollars in lost productivity every month. When you check out the different https://pixelpanda.ai/pricing plans, for instance, you'll probably find that an automated solution costs a tiny fraction of the manual labor it replaces.

    By the end of this guide, you’ll see that automating repetitive tasks isn’t just about making life easier. It’s a crucial strategy for staying competitive, keeping your team sane, and focusing on the work that actually moves the needle.

    Pinpointing Your Best Automation Opportunities

    Illustration showing a checklist, magnifying glass, calendar rules, and a tree with 'Automate' for low-hanging automation targets.

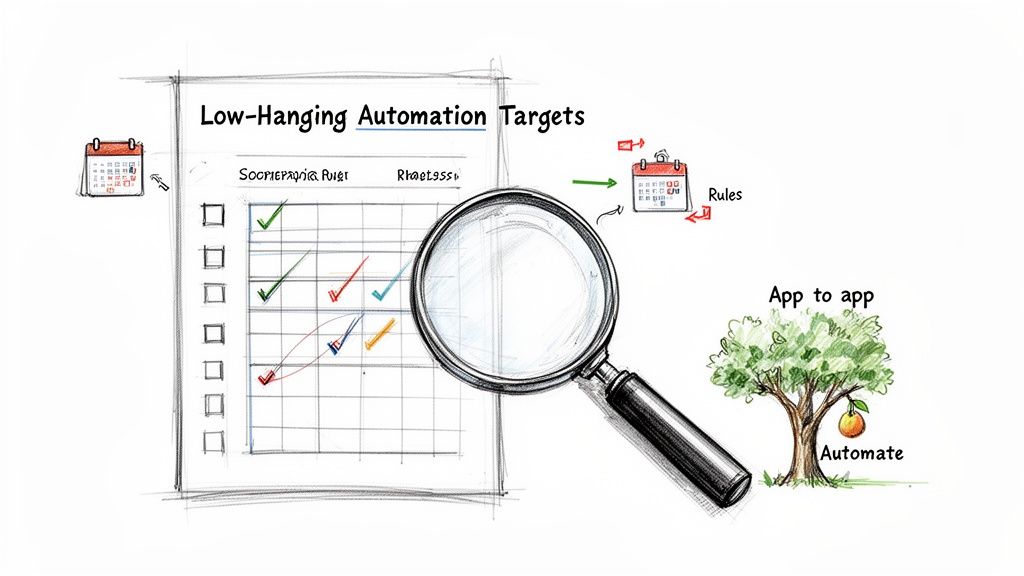
    Before you can unleash the robots, you need a battle plan. Knowing what to automate is every bit as important as knowing how. The goal isn't to automate everything that moves; it's to zero in on the tasks that give you the biggest wins with the least amount of fuss.

    Think of this as your field guide to finding the low-hanging fruit in your daily grind.

    You're hunting for the silent time-thieves—those little tasks you do so often you barely register them anymore. These are your prime candidates. It's wild, but research shows that over half of employees burn a good two hours every single day on these mind-numbing activities. That adds up to more than 500 hours per employee every year!

    Companies that get smart about this and adopt automation tools often slash these manual chores by up to 70%.

    Time to Conduct a Task Audit

    First things first: you need to become an observer of your own workday. For just one week, keep a simple log of what you're doing. Seriously, don't overthink it—just jot it down. You'll be amazed at the patterns that jump out at you.

    Keep your eyes peeled for tasks with these three tell-tale signs:

    • They happen all the time. If you do it daily, or even multiple times a week, it's a solid contender.
    • They follow clear rules. The process is basically a game of "if this, then that," with very little creativity or guesswork needed.
    • They involve shuffling data around. This is a classic automation signal. Think copy-pasting from an email to a CRM or downloading files just to re-upload them somewhere else. One of the most common and impactful areas to start is learning how to automate data entry, which can turn tedious manual processes into slick, efficient workflows.

    Don't just trust your memory. Actively tracking your time for a few days will reveal the tasks that are costing you far more time than you realize. It's often the small, five-minute jobs done 20 times a day that add up to the biggest drains.

    Prioritizing With an Automation Scorecard

    Okay, so you have a list of potential tasks. Now what? You have to prioritize. Not all automation opportunities are created equal. Automating something you do once a year is probably not a great use of your setup time.

    To take the guesswork out of it, let's build a simple matrix to score each task. This will help you focus your energy where it actually counts.

    Automation Priority Matrix

    Use this matrix to score and prioritize tasks. High scores indicate the best candidates for automation.

    Task Description Frequency (1-5) Time Consumed (1-5) Rule-Based (1-5) Automation Potential Score
    e.g., Manually watermarking 50 user-submitted photos daily 5 4 5 14
    e.g., Removing backgrounds for new product listings 5 5 5 15
    e.g., Answering complex customer support emails 4 5 1 10
    e.g., Updating the company's annual report slide deck 1 3 2 6

    Just add up the scores. The tasks with the highest totals are your VIPs (Very Important Processes). Tackle those first.

    Let's Look at a Real-World Scenario

    Imagine you run an online marketplace that gets absolutely swamped with user-submitted photos for new listings. Your team is burning hours every single day just trying to make them look presentable. It's a classic bottleneck.

    Using our framework, here’s what you’d likely pinpoint:

    1. Background Removal: Every single photo needs a clean, white background. This is a perfect storm: highly repetitive, completely rule-based (always remove the background), and a massive time sink. High score.
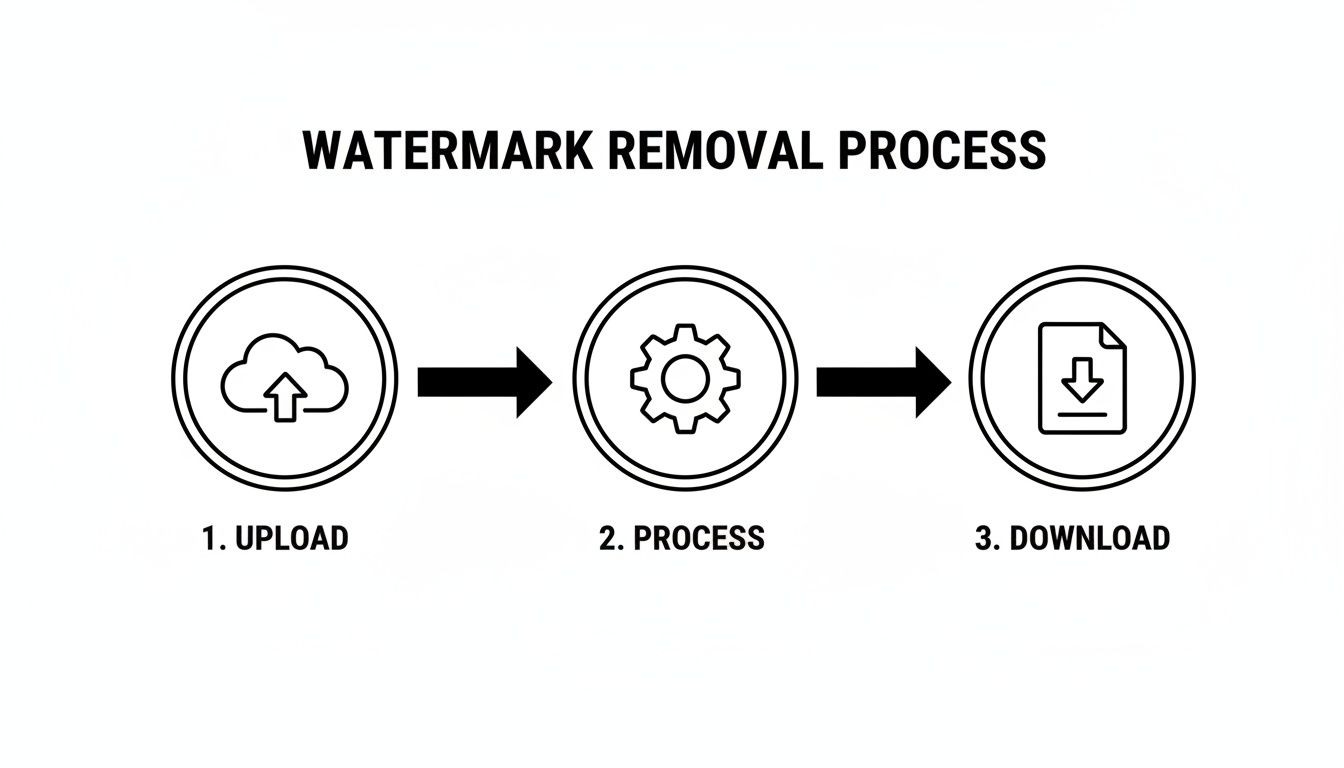
    2. Watermarking: Each approved image needs the company logo stamped in the corner. Again, it’s frequent, follows a simple rule, and is a perfect job for an API. High score.
    3. Quality Checks: Images need to meet a minimum resolution before they can go live. A simple script can check this in a split second. Medium score.

    By breaking it down like this, you've gone from a vague goal of "saving time" to a concrete action plan. You know exactly which manual tasks are holding you back, and you're ready to find the right tools to build your first workflow.

    Choosing Your Automation Toolkit

    Alright, you’ve identified the enemy—those soul-crushing, repetitive tasks sucking the life out of your workday. Now it's time to gear up. Stepping into the world of automation can feel like walking into a massive hardware store with a vague idea of needing "a tool." Let's cut through the noise and find the right weapon for your specific job.

    The modern automation toolkit isn't a one-size-fits-all deal. Your choice really boils down to a simple trade-off: convenience versus control. The easier a tool is to use, the less flexible it might be. The more power and customization you need, the more technical you might have to get.

    The No-Code and Low-Code Champions

    For most people, the journey starts here. No-code and low-code platforms are the user-friendly powerhouses of the automation world, built for folks who want results without writing a single line of code.

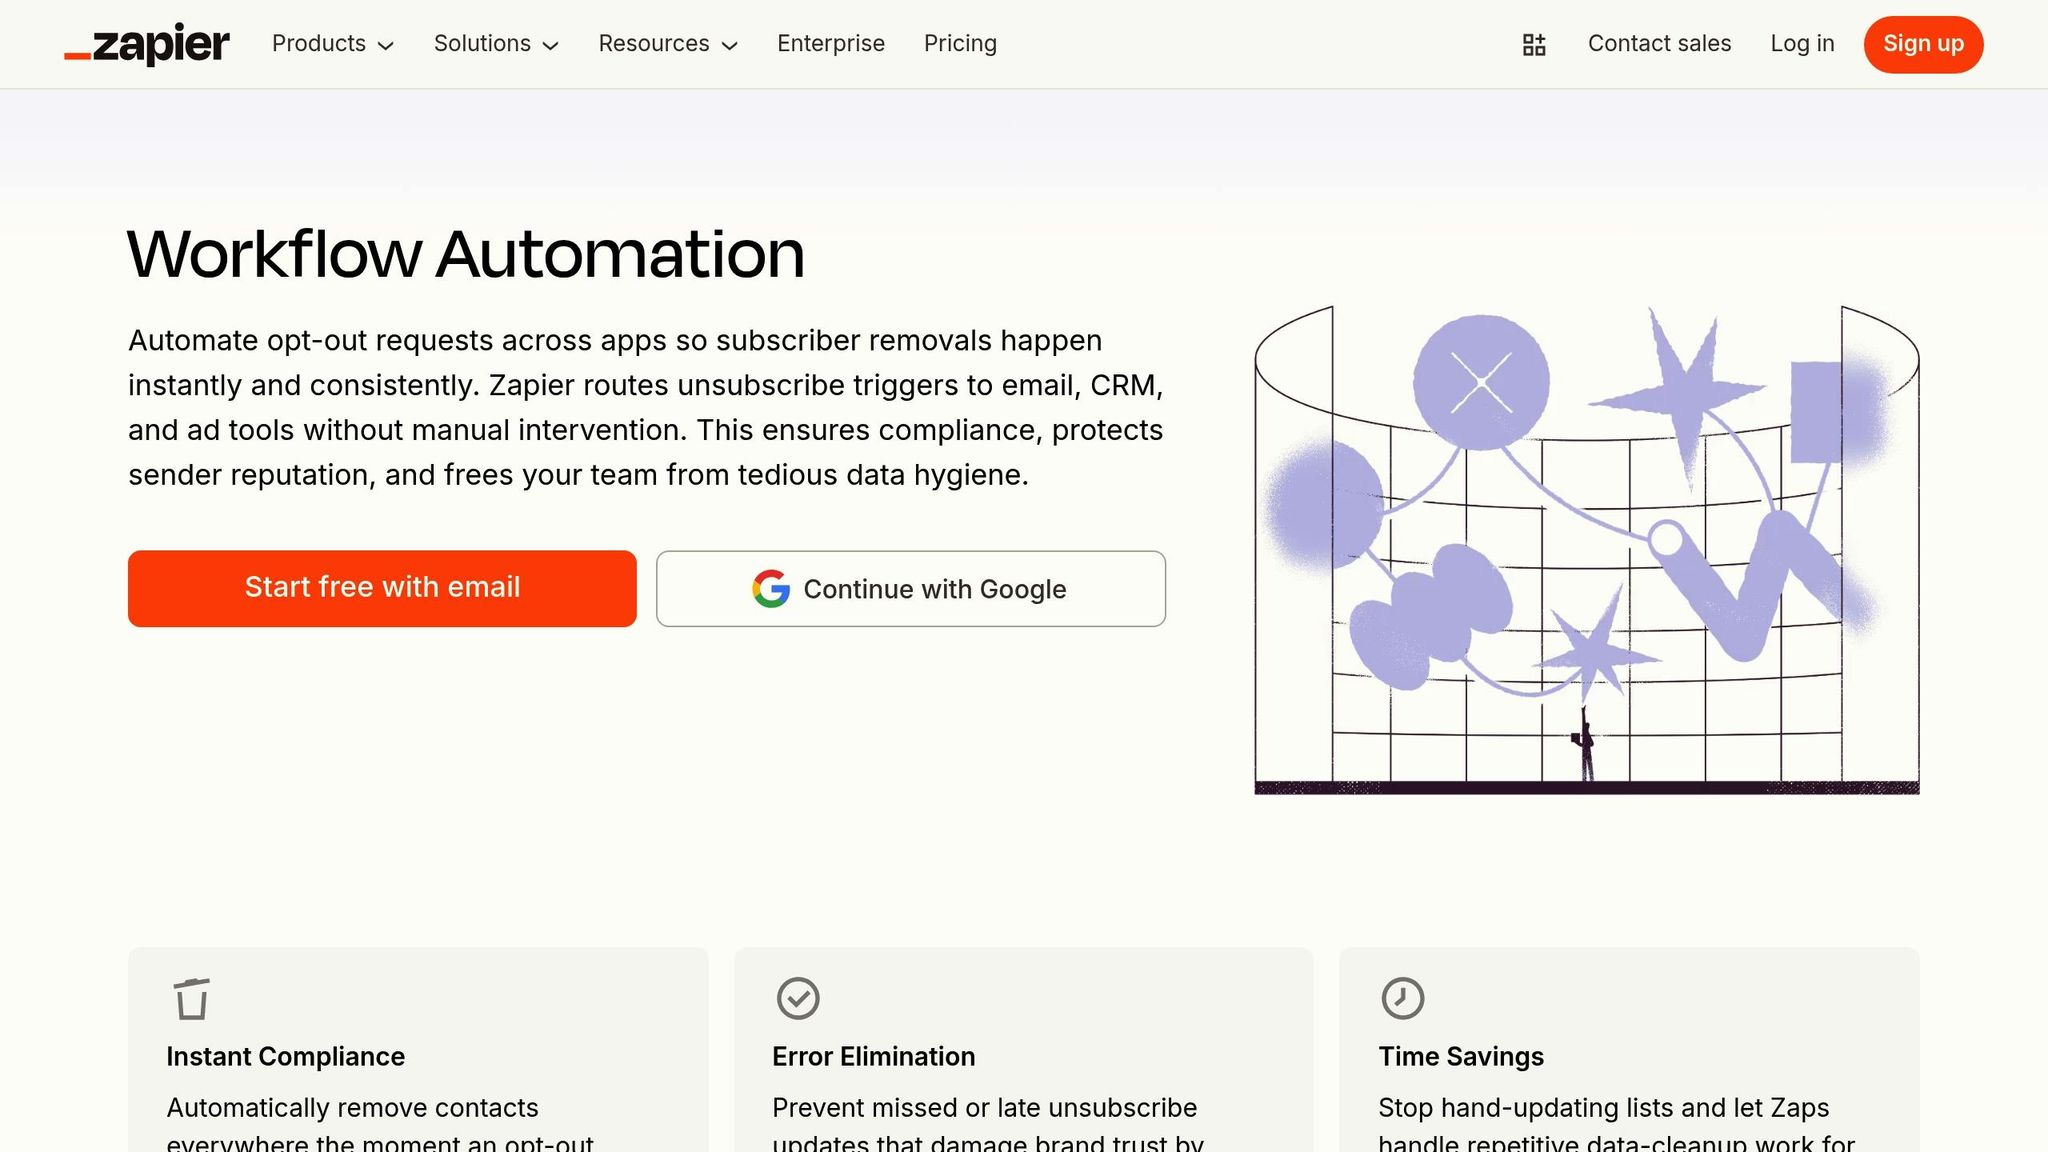
    Think of platforms like Zapier or Make (which used to be Integromat). They operate on a brilliantly simple "if this happens, then do that" logic, acting as the glue between all the apps you already use.

    • When to reach for them: They're perfect for stitching together popular cloud-based apps. For instance, you could automatically create a Trello card whenever a customer submits a Typeform. Or maybe post a celebratory message in Slack when a new sale hits your e-commerce store.
    • The good stuff: They are ridiculously fast to set up. Everything is visual, intuitive, and they have a massive library of pre-built connections. You can genuinely build a surprisingly complex workflow in under an hour.
    • The catch: They can get pricey as you scale up the number of tasks you run. You're also at the mercy of the specific triggers and actions each app integration offers. If you need to do something highly custom, you might hit a brick wall.

    The Custom Scripting Route

    The next rung up the ladder is writing your own scripts. This is your go-to when you need more bespoke logic than a no-code tool can handle, but you aren't trying to build a full-blown application.

    Using a language like Python or JavaScript, you can cook up small, targeted programs that perform a very specific function. For example, you could write a Python script that scans a specific email inbox for invoices, yanks out the PDF attachments, renames them according to your company’s naming convention, and then uploads them neatly to a cloud storage folder.

    It's a precise solution to a precise problem. This approach gives you a ton of flexibility, but it does require some comfort with coding and figuring out where the script will live and run.

    Automation tools exist on a spectrum. The right choice depends entirely on your team's technical comfort, the complexity of the task, and your budget. Don't over-engineer a solution when a simple no-code tool will do the job perfectly.

    The API Integration Powerhouse

    When you need the big guns—serious muscle, scalability, and the ultimate level of control—you turn to Application Programming Interfaces (APIs). Think of an API as a direct line of communication to a specialized service, letting you plug its power directly into your own systems. This is how you automate repetitive tasks that require a level of sophistication you can't build yourself.

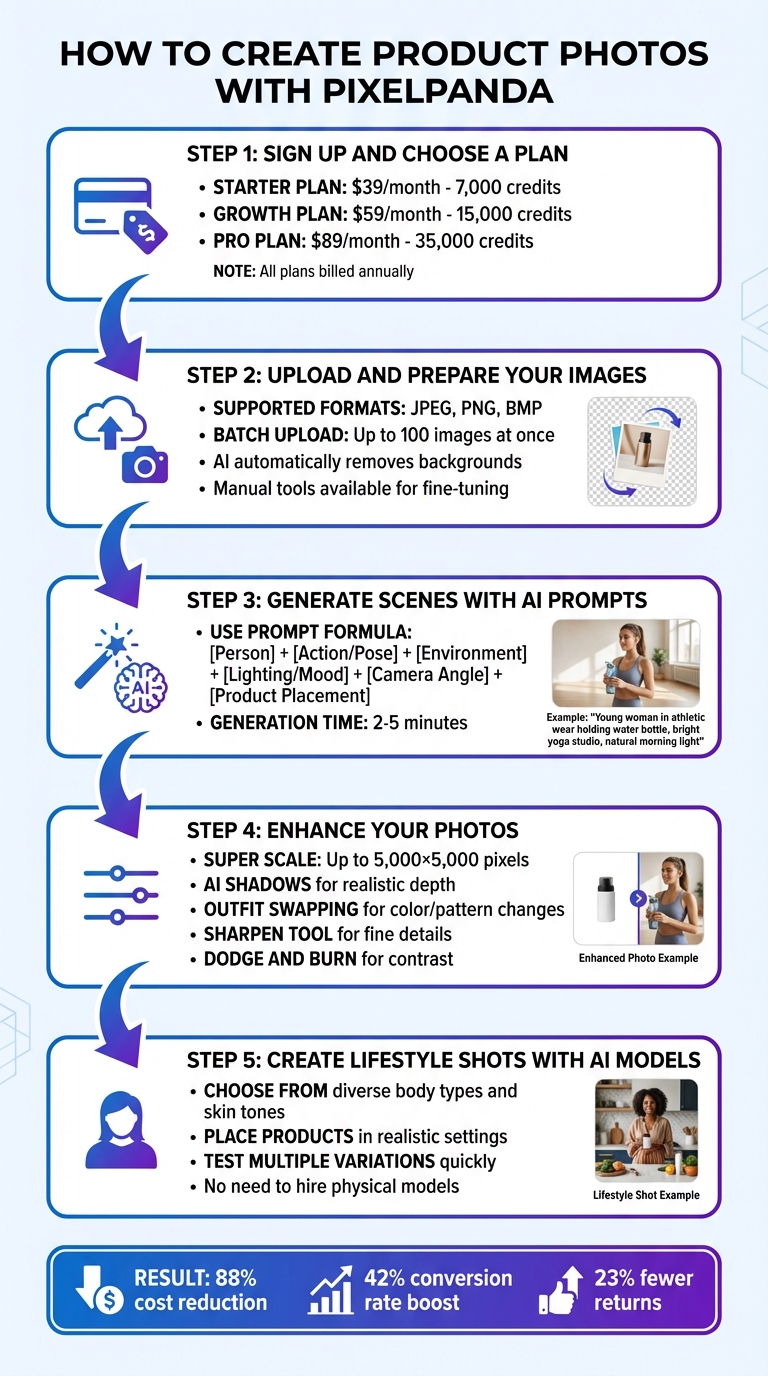
    Let's talk about a classic e-commerce headache: image processing. Manually removing backgrounds or upscaling hundreds of product photos is a nightmare. It's tedious, mind-numbing work. This is a perfect job to hand off to a specialized API.

    A service like PixelPanda offers a developer-friendly REST API that chews through complex visual tasks with just a few lines of code. Instead of trying to build your own complicated image processing pipeline from scratch (trust me, you don't want to), you can simply send an image to the API and tell it what to do.

    Here’s how the different approaches stack up:

    Approach Best For Technical Skill Flexibility
    No-Code Platforms Connecting popular web apps and simple, linear workflows. None Low-Medium
    Custom Scripts Specific, unique tasks that need custom logic. Basic Coding Medium-High
    API Integration Complex, specialized processing and deep system integration. Coding Very High

    By integrating an API, you can automate tasks like AI background removal, image upscaling, or watermarking directly inside your own application or workflow. You aren't just connecting two apps; you're embedding an expert system right into your process.

    Developers can explore the full range of possibilities by checking out the comprehensive PixelPanda API documentation and SDKs. This method gives you unmatched power and ensures the results are perfectly tailored to your needs, making it the go-to choice for businesses looking to automate core operations at scale.

    Alright, theory is great, but let's be honest—the real fun begins when you roll up your sleeves and actually build something. I want to walk you through creating a genuinely useful workflow from scratch, one that solves a common, soul-crushing headache for anyone in e-commerce or marketing: prepping new product images.

    Imagine this: your team drops new product photos into a shared cloud folder. That's it. From there, an invisible machine takes over. Our goal is to build that machine—a system that watches the folder, grabs any new image, and transforms it into a perfect, ready-to-use asset without a single human click.

    This is where you see the magic of automation. We're going to connect a few services to create a seamless, "set-it-and-forget-it" process that works for you, even when you’re not.

    Designing the Image Processing Flow

    Before we write a single line of code, we need a plan. The best automations are built on a clear, logical sequence of events. You have to ask: what needs to happen, and in what order?

    For our image processor, the game plan is straightforward:

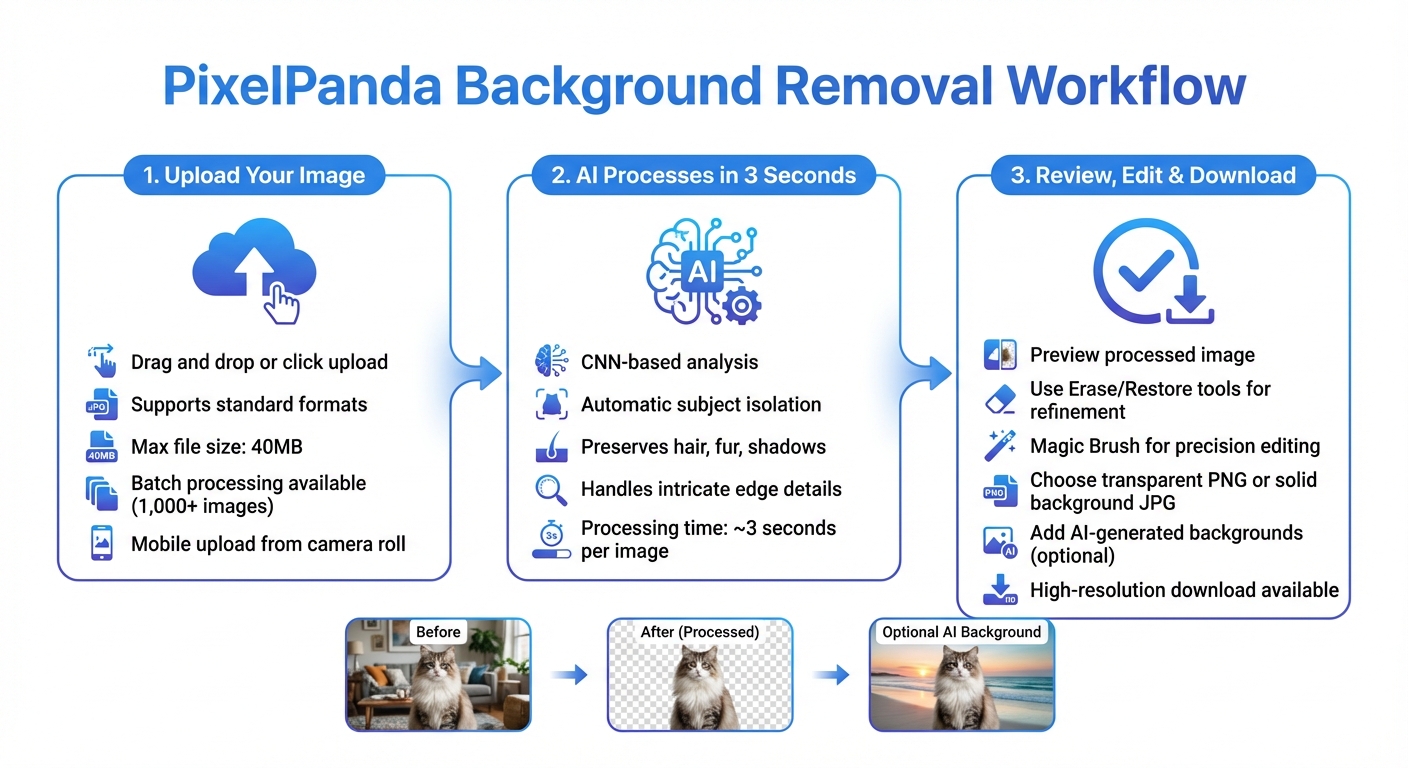
    1. The Spark (Trigger): It all starts when a new image, say new-product.jpg, gets uploaded to a specific "Incoming" folder in Google Drive or Dropbox.
    2. First Move (Action 1): The system snags that new file and immediately ships it off to the PixelPanda API with one simple instruction: remove the background, flawlessly.
    3. Second Move (Action 2): With the background gone, we send the clean image right back to the API for another pass—this time to enhance it, making the details pop.
    4. The Payoff (Final Steps): Now that we have the perfect image, we save two versions into "Outgoing" folders: one optimized for the web and a high-resolution copy for print.

    Just like that, a tedious, multi-step chore becomes a completely hands-off operation.

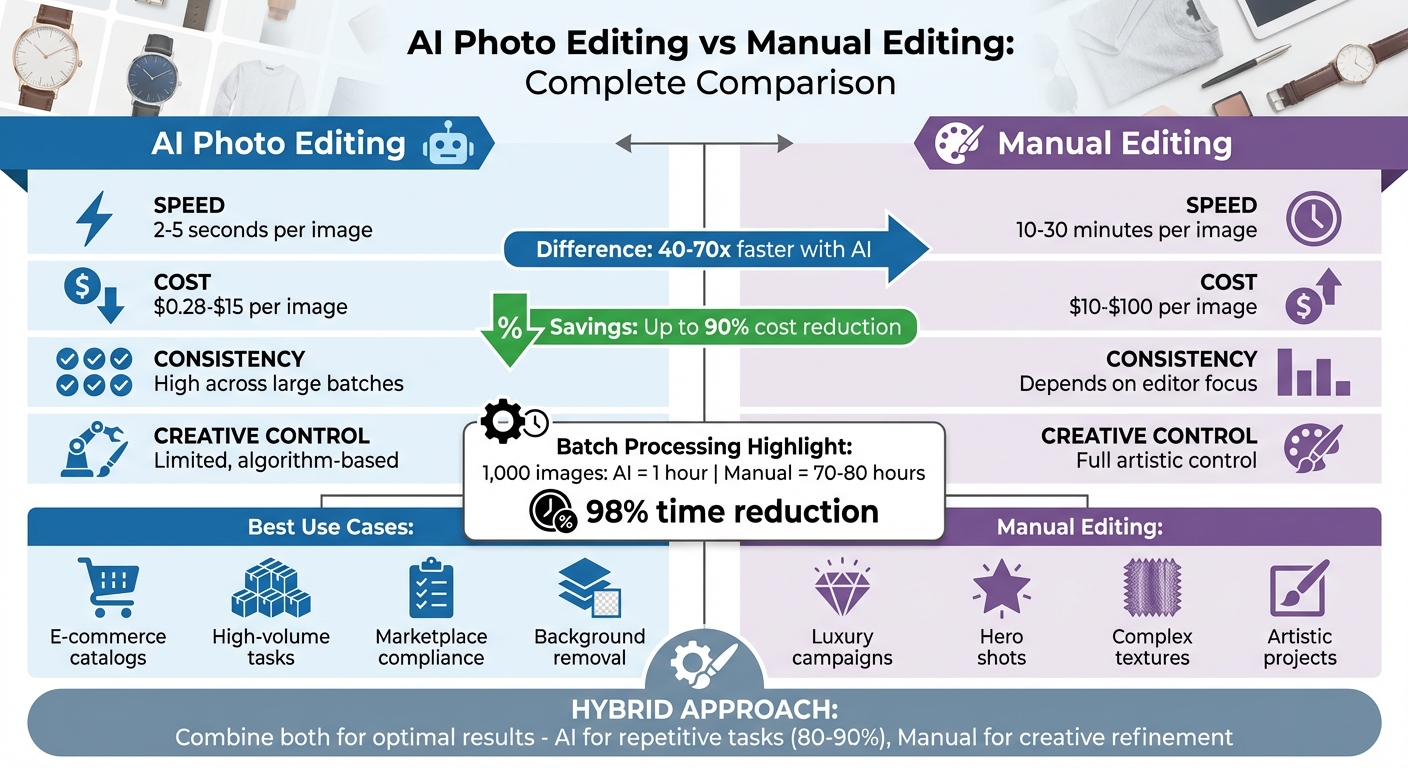
    This diagram shows how you can progress from simple tools to more powerful solutions.

    A diagram illustrates the automation tools process flow: 1. No-code (mouse icon), 2. Scripts (code icon), 3. API (cloud icon).

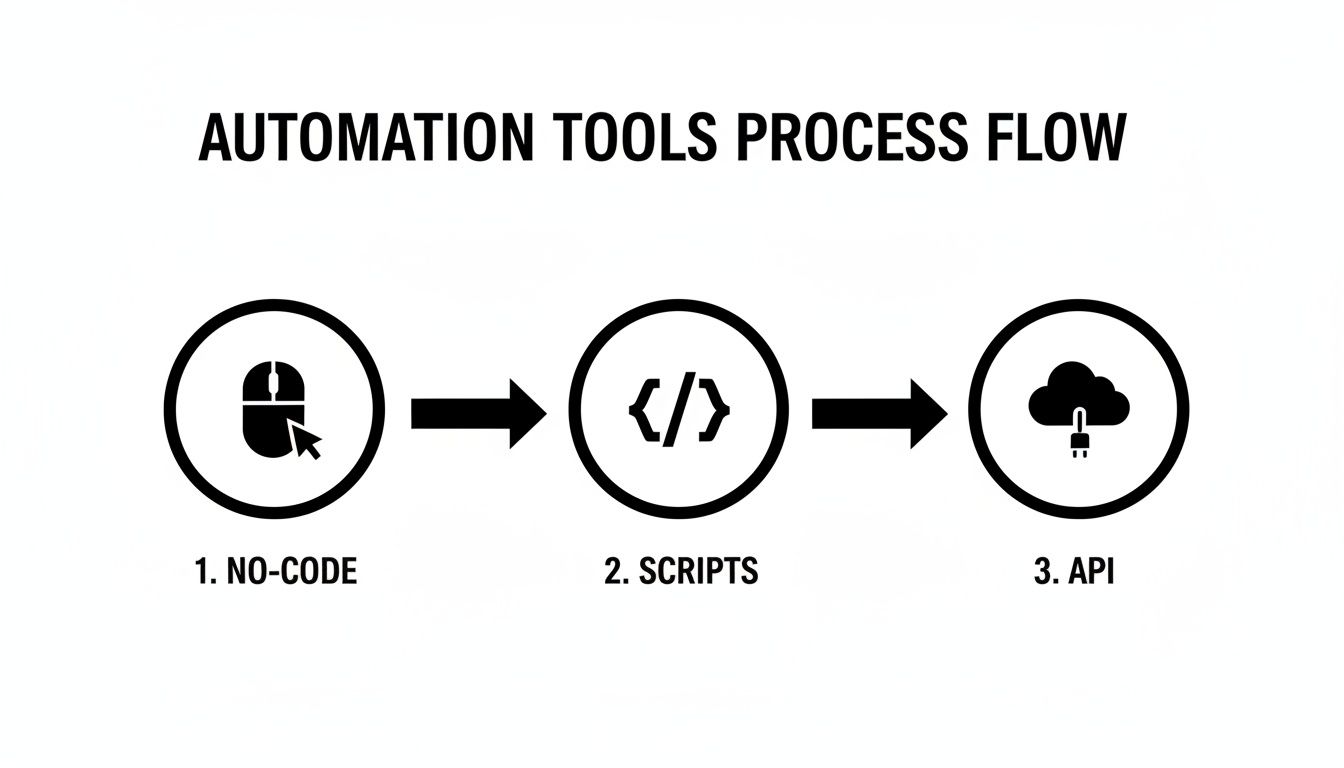
    As you move from no-code platforms to custom scripts and APIs, you gain an incredible amount of control and flexibility.

    Talking to the API with Python

    Now for the really cool part. We’ll use a little Python to show just how easy it is to communicate with an API like PixelPanda. These snippets are ready to copy and paste, giving you the core logic for our workflow.

    First up, let's get rid of that background. This is the real workhorse of our process.

    import requests

    Your unique API key from your PixelPanda account

    API_KEY = 'YOUR_PIXELPANDA_API_KEY'
    IMAGE_FILE_PATH = 'path/to/your/new-product.jpg'

    response = requests.post(
    'https://api.pixelpanda.ai/v1/remove-background',
    files={'image': open(IMAGE_FILE_PATH, 'rb')},
    headers={'Authorization': f'Bearer {API_KEY}'}
    )

    if response.status_code == 200:
    # Save the background-free image
    with open('processed-image.png', 'wb') as f:
    f.write(response.content)
    print("Background removed successfully!")
    else:
    print(f"Error: {response.status_code} – {response.text}")

    In just a handful of lines, you've sent an image to a powerful AI and gotten back a clean PNG with a transparent background. No more tedious hours in Photoshop. The PixelPanda API handles all the heavy lifting, preserving tricky details like hair and fur automatically.

    This kind of API-driven automation isn't just a neat trick; it's a financial game-changer. Business process automation can slash errors by over 70%. And get this—a remarkable 61% of companies see a return on their investment in just six months, with average yearly savings hitting $46,000. These small scripts pay for themselves, fast.

    Chaining Actions for a Complete Workflow

    We're not done yet. Removing the background was just step one. Now we need to enhance the image and save out our different versions. This is where you start "chaining" API calls together, creating a true multi-step workflow.

    The output from our first step (processed-image.png) becomes the input for our next one.

    Assuming 'processed-image.png' is the output from the previous step

    PROCESSED_IMAGE_PATH = 'processed-image.png'

    Let's upscale the image for high-quality print versions

    response_upscale = requests.post(
    'https://api.pixelpanda.ai/v1/upscale',
    files={'image': open(PROCESSED_IMAGE_PATH, 'rb')},
    headers={'Authorization': f'Bearer {API_KEY}'},
    data={'scale': 4} # Upscale to 4x the original size
    )

    if response_upscale.status_code == 200:
    # Save the high-resolution, print-ready version
    with open('final-print-version.png', 'wb') as f:
    f.write(response_upscale.content)
    print("Image upscaled for print!")

    From here, you could easily add another step to resize the original processed-image.png down to a web-friendly size and save it to a different folder. By linking these simple, targeted API calls, you've built a robust production pipeline that runs itself.

    To see what's possible when you take this to the next level, check out the PixelPanda Content Studio, where you can use automated outputs like these to generate stunning marketing assets at scale. Hopefully, this example pulls back the curtain and shows that you absolutely can turn a boring manual job into a powerful automated system.

    Launching and Monitoring Your New Automation

    Alright, you’ve built your masterpiece. The code is clean, the logic is tight, and your workflow is ready to rescue you from a world of manual drudgery. But here’s the thing: building the machine is only half the battle. Now you have to flip the switch and make sure it keeps humming along.

    This is the final, crucial step that separates a cool side project from a dependable business asset. It’s time to launch your automation into the wild and give it the senses it needs to tell you if it’s healthy, struggling, or has fallen over completely. The goal is to go from a mysterious "black box" to a transparent system you can actually trust.

    Without a smart launch and monitoring plan, you’re just flying blind. You’ve created a silent worker, but now you need to give it a voice.

    Smart Deployment Strategies for Your Workflow

    So, where is this automation going to live? It can't just run on your laptop forever, right?

    For event-driven tasks like our image processor—which only needs to kick into gear when a new file appears—a serverless approach is your secret weapon. Platforms like AWS Lambda or Google Cloud Functions are absolutely perfect for this.

    Think of them as tiny, on-demand computers that spring to life, run your code, and then vanish into thin air. This is incredibly cost-effective because you literally only pay for the few seconds your code is actually running. No more paying for an idle server 24/7.

    Here's why serverless is a game-changer for this kind of work:

    • It's Cheap: You're not paying for downtime. If no images get uploaded for hours, your cost is zero. Simple as that.
    • It Scales on Its Own: If 100 images are uploaded at once, the platform can spin up 100 instances of your function to chew through them all in parallel. You don't have to lift a finger.
    • It's Low-Maintenance: Forget about managing operating systems, security patches, or server hardware. You just upload the code and you're done.

    This deployment model transforms your script from a program you have to manually trigger into a true automated service that responds instantly to whatever the world throws at it.

    Keeping an Eye on Your Automation

    Once your workflow is live, you need to be able to answer one simple but vital question: "Is it working?" And let me tell you, hope is not a strategy. You need a monitoring system that gives you clear visibility into how your automation is performing.

    This doesn't have to be some overly complicated setup. Good monitoring really just boils down to three things: logging, alerting, and tracking key metrics.

    Implementing Basic Logging

    Your first line of defense is logging. At its most basic, this just means telling your script to write down what it’s doing as it runs. This creates a diary of its actions, successes, and, most importantly, its failures.

    A good log entry should always tell you three things:

    1. When did it happen? (A timestamp is a must.)
    2. What happened? (A clear message like "Successfully removed background from image_123.jpg.")
    3. How severe is it? (Use INFO for routine stuff, WARNING for potential snags, and ERROR for outright failures.)

    When something inevitably goes wrong, these logs are the very first place you'll look. They turn a vague "it broke" into a specific "it failed at the upscaling step because the API returned a 401 Unauthorized error."

    Without logs, you're trying to solve a mystery with no clues. A few simple print() statements or a proper logging library can save you hours of frustrated debugging down the line.

    Setting Up Proactive Alerts

    Logging is fantastic for digging into problems after they happen, but alerting is what tells you a problem is happening right now. A good alert is a simple notification—sent via email, Slack, or whatever you use—that fires off the moment something goes wrong.

    You don't need to be alerted for everything; that just creates noise. Focus on the mission-critical failures:

    • API Errors: If the PixelPanda API kicks back an error code, you need to know immediately.
    • Unexpected Crashes: Your script just stopped. For any reason. That’s an alert.
    • Long Runtimes: If a process that normally takes 5 seconds suddenly takes 5 minutes, something is probably stuck in a loop or waiting for a response that will never come.

    These alerts transform you from a reactive troubleshooter into a proactive operator, letting you jump on issues before your users or teammates even notice them. By combining a smart serverless deployment with clear monitoring, you can confidently automate repetitive tasks and build systems that are not just clever, but truly reliable.

    Got Questions About Workflow Automation? We’ve Got Answers.

    Diving into the world of automation is exciting, but let's be real—it can kick up a few questions. If you’re wondering about the fine print, you're not alone. Let’s tackle some of the most common curiosities head-on so you can start to automate repetitive tasks with total confidence.

    Think of this as our little fireside chat to clear the air before you build your first robotic helper.

    Is Automation the Same as AI?

    This is a big one, and it’s easy to see why they get mixed up. The simplest way I explain it is this: automation is the muscle, and AI is the brain.

    • Traditional automation is a master at following strict, pre-set rules. It’s the ultimate order-taker: "If X happens, do Y." It’s perfect for predictable jobs like transferring files from one folder to another or pulling data from a form into a spreadsheet. It doesn't think; it just does.

    • Artificial Intelligence (AI), on the other hand, brings judgment and decision-making into the mix. It can understand context, spot patterns, and handle tasks that require a bit of "thinking."

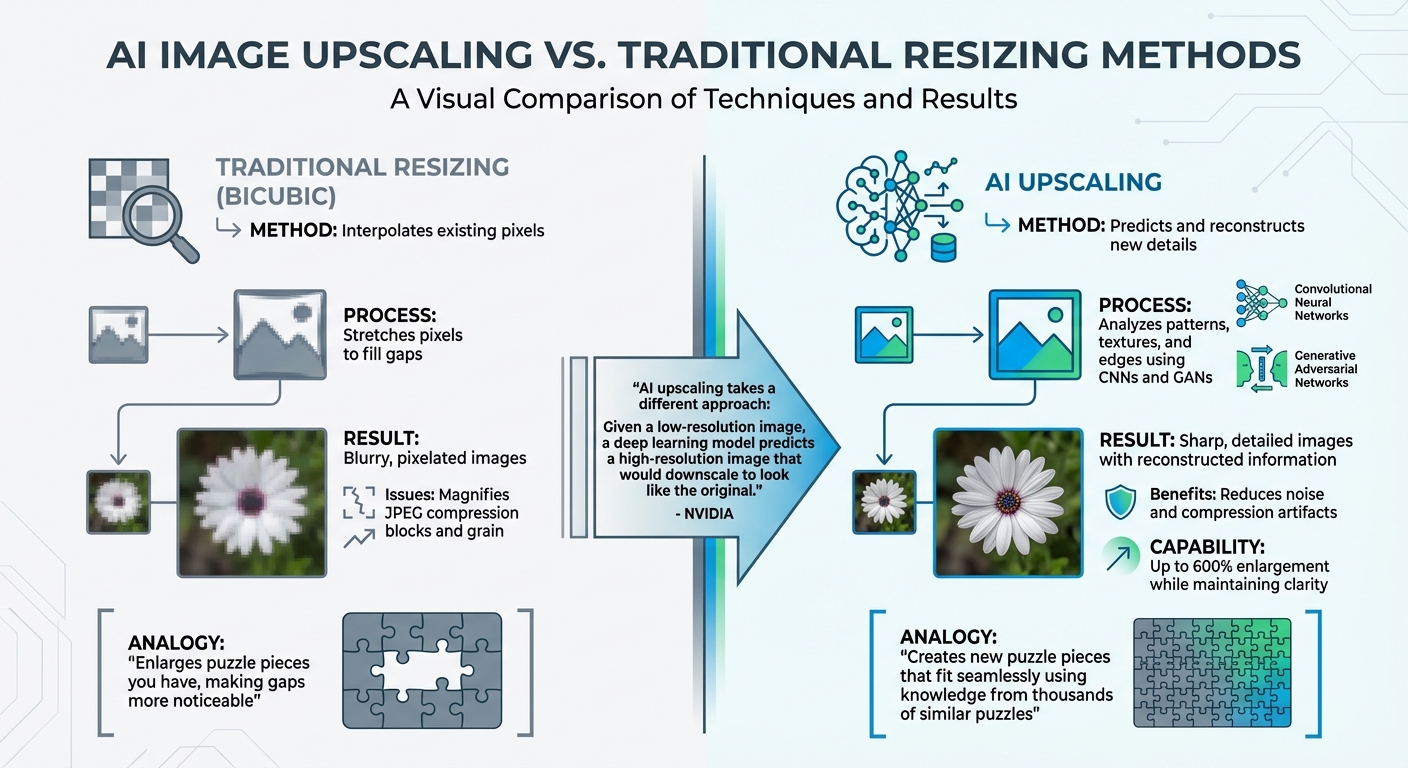
    For example, a basic automation script can resize any image you feed it to 500×500 pixels. An AI-powered automation, like one you'd build with the PixelPanda API, can analyze that same image, intelligently identify a person's hair against a busy background, and remove it flawlessly—a feat simple rules could never dream of achieving.

    How Do I Convince My Team to Invest in Automation?

    Ah, the classic "show me the money" conversation. I’ve learned the hard way that leading with "it'll be so much more convenient!" rarely gets you very far. You need to speak the language of business: time and money.

    Start by being a detective. For one week, track the hours your team spends on a single, soul-crushing repetitive task. Let’s say it's manually prepping product photos.

    1. Calculate the Time: Find the total hours spent per month. Maybe it's 10 hours a week, so 40 hours a month.
    2. Calculate the Cost: Multiply those hours by your team's average loaded hourly rate. If that’s $50/hour, that one task is costing you $2,000 every single month.
    3. Present the Solution: Now you can walk into that meeting and frame it as a clear-cut investment. "We're currently spending $2,000 a month for our team to manually prep photos. This tool costs a fraction of that and can reduce that time by 95%."

    When you present automation as a direct solution to a measurable financial drain, it stops being a "nice-to-have" and becomes a smart business decision. Don't forget to mention the soft benefits, too—fewer mistakes, consistent brand quality, and happier, more creative employees.

    What Are the Biggest Mistakes to Avoid When Starting?

    Jumping in with both feet is tempting, but a little strategy goes a long way. After years of doing this, I've seen a few common traps people fall into when they first start to automate repetitive tasks.

    The biggest mistake by far is trying to automate everything at once. This is a one-way ticket to burnout and a pile of half-finished, buggy workflows. Don't do it. Instead, pick one high-impact, low-complexity task. Get a quick win on the board, learn the ropes, and build some momentum.

    Another major pitfall is automating a broken process. If your manual workflow is a clunky, inefficient mess, automating it just creates a faster mess. Take a moment to streamline and simplify the process before you hand it over to the bots.

    Finally, don't skip the documentation. I know, I know—it sounds boring. But writing down what your automation does, what systems it touches, and how it handles errors is a gift to your future self (and your teammates). When it's time to update or troubleshoot it six months from now, you’ll be incredibly grateful you did.


    Ready to stop the manual madness and start building smart, automated workflows? With PixelPanda, you can integrate powerful AI image processing directly into your systems, turning tedious visual tasks into a thing of the past. Start your free trial and see what you can build at https://pixelpanda.ai.

  • Low-Quality Product Photos? Here’s How AI Fixes Them

    Low-Quality Product Photos? Here’s How AI Fixes Them

    AI tools are transforming product photography by turning low-quality images into polished visuals without the need for expensive photoshoots or professional equipment. Poor lighting, blurry resolution, and cluttered backgrounds can hurt your sales, but AI can fix these issues quickly and affordably. Here’s what you need to know:

    • Blurry Photos: AI upscalers can sharpen and enhance resolution, making details like textures and stitching clear.
    • Bad Lighting: AI adjusts shadows and colors for balanced, true-to-life visuals.
    • Cluttered Backgrounds: Tools remove distractions and replace backgrounds with clean, professional settings using AI background remover tools.

    For as little as $39/month, platforms like PixelPanda can process thousands of images in minutes, saving time and cutting costs by up to 90%. Businesses have seen sales jump by 20%-64% using high-quality AI-processed photos. Whether you’re managing a small catalog or thousands of products, AI makes it easy to improve your visuals and boost customer trust.

    How to Create Stunning Product Images for Your Ecommerce Store Using AI

    Product Photo Problems AI Can Fix

    Blurry images, poor lighting, and cluttered backgrounds can make products look less appealing, potentially costing sales in the competitive world of e-commerce. Let’s break down these common issues and how they impact customer trust.

    Low Resolution and Pixelation

    Blurry, pixelated images can instantly make shoppers second-guess a purchase. If customers can’t clearly see details – like the stitching on a handbag or the texture of a fabric – they may question the product’s quality. This often happens when photos are taken quickly on smartphones or provided by suppliers without proper settings. The result? A lack of trust in your product that can lead to abandoned shopping carts.

    Poor Lighting and Color Accuracy

    Bad lighting and inaccurate colors can completely misrepresent a product. Imagine ordering a red dress that arrives looking orange because of poor photo lighting. Uneven lighting, harsh shadows, or washed-out colors not only confuse buyers but can also hurt your brand’s reputation. When customers receive items that don’t match their expectations, it often leads to negative reviews and more returns.

    Distracting Backgrounds and Clutter

    Messy or unprofessional backgrounds pull attention away from your product. Whether it’s a cluttered room or décor that doesn’t match your brand, these distractions can make your listing appear less credible. Clean, consistent backgrounds keep the focus on your product and are often required by marketplaces, which typically prefer plain white backdrops. Ignoring these guidelines can delay your listing approval and reduce its visibility.

    AI Tools for Fixing Product Photos

    Modern AI tools for photo editing have revolutionized the way we handle product photography, automating tasks that once required professional editing skills. These tools analyze your images and apply precise corrections, saving both time and resources. Let’s break down how they tackle key areas of photo enhancement.

    Image Upscaling and Resolution Improvement

    AI upscalers go beyond simply stretching pixels like older software – they predict and generate new ones based on learned patterns. For example, when you upload a blurry supplier photo, the algorithm identifies textures, edges, and details that should exist and reconstructs the image at a higher resolution.

    "An AI image upscaler predicts the extra pixels needed to enlarge an image. Instead of just stretching, it uses learned patterns to rebuild edges, textures, and sometimes remove noise and compression artifacts." – Claid.ai

    These tools can upscale images by 2x, 4x, or even up to 16x. For instance, an image as small as 64×64 pixels can be enhanced to a 4-megapixel output. During this process, the AI removes JPEG compression artifacts and grain, delivering cleaner and sharper results. Some tools even offer specialized models, such as "Face Recovery" for portraits or "Text & Shapes" for crisp product labels [20,21].

    If you’re working with large catalogs, batch processing is your best friend. It allows you to apply the same upscaling settings across hundreds of images, ensuring consistency. However, keep in mind that AI performs best on clear, well-lit originals. Images that are heavily blurred or damaged may lead to artifacts or "hallucinations", where the AI invents non-existent details [21,6].

    Next up, let’s explore how AI handles lighting and color adjustments for polished product images.

    Color Correction and Lighting Fixes

    AI-powered lighting tools identify shadows and highlights in your photos, smoothing them out to create a balanced, professional look. These algorithms automatically correct uneven lighting and color shifts, ensuring your products appear vibrant and true to life across your gallery.

    In 2025, the secondhand marketplace GoodBuy Gear used Photoroom to standardize over 42,000 product images, which resulted in a 23% boost in conversion rates.

    "AI-powered lighting correction bridges the gap by detecting shadows and highlights and smoothing them out, helping every image feel evenly lit and visually coherent." – Photoroom

    Advanced tools also use Convolutional Neural Networks (CNNs) to eliminate "chroma noise" (colored specks in shadows) and "luminance noise" (graininess), which can distort colors in low-light photos. Some platforms even let you adjust the mood of your shots using text prompts like "bright natural light" or "warm amber lighting". For larger projects, batch editors can handle brightness, clarity, and color balance adjustments across hundreds of images, ensuring your brand’s visual consistency.

    Background Removal and Replacement

    AI background removal tools make isolating your product from its surroundings a one-click process. These tools meet marketplace standards – such as Amazon’s white background requirement – without the need for manual masking.

    Once the background is removed, generative AI can create custom backdrops based on text prompts. For instance, typing "minimalist kitchen counter" or "vintage record store" generates a professional setting without requiring a physical photoshoot. The system even adjusts the product’s lighting to match the new background, adding realistic shadows to prevent the image from looking flat.

    For businesses managing extensive product catalogs, batch processing applies uniform background styles, framing, and padding across all images. Additionally, AI inpainting tools can remove unwanted elements like props, wires, or dust while preserving the overall integrity of the image. This eliminates the need for costly reshoots, which can range from $15 to $300 per product.

    Why PixelPanda Works for E-Commerce Photo Enhancement

    PixelPanda

    Traditional Product Photography vs AI Photo Enhancement: Cost and Time Comparison

    Traditional Product Photography vs AI Photo Enhancement: Cost and Time Comparison

    PixelPanda streamlines the process of enhancing product photos – handling background removal, lighting adjustments, and resizing – all in just minutes. What used to take days can now be completed almost instantly. This is a game-changer for businesses managing large inventories, enabling them to get products online faster than ever. Let’s dive into the features and top AI tools for photo editing that make PixelPanda stand out.

    AI Automation for Batch Processing

    When it comes to saving time, PixelPanda’s batch processing capabilities are a standout feature. Instead of painstakingly editing each image individually, you can apply uniform adjustments – like brand-specific padding, centering, color corrections, and shadow placement – across your entire product catalog in one go.

    For example, in 2025, Decathlon used AI automation to process a staggering 35,000 images across eight countries. What could have taken two years manually was completed in just three months, reducing editing time by 99.8% and saving an estimated $165,000 in costs. Similarly, Valuence Japan processes 24,000 photos each month, cutting 600 hours of manual labor and saving $80,000 annually.

    "We wanted a long-term partnership that would grow with our business… It’s the easiest and smoothest API integration we’ve ever built."

    Customizable AI Models for Brand Consistency

    PixelPanda allows businesses to maintain a cohesive brand identity by embedding elements like HEX codes, logos, and background styles directly into their image adjustments. Custom templates ensure consistent lighting, framing, and padding across entire product categories, eliminating the inconsistencies that often come with manual editing.

    This attention to detail pays off. Brands using AI-enhanced photography have reported up to a 73% boost in click-through rates and a 23% increase in conversions. Moreover, 90% of online shoppers say that high-quality images are the most critical factor in their purchasing decisions. Consistent lighting and uniform shadows not only build trust but also present a polished, professional product catalog. And all of this comes with a significant reduction in costs.

    Affordable Pricing vs. Traditional Photography

    Traditional product photography can be expensive. Professional photographers charge between $500 and $2,000 per day, studio rentals range from $200 to $500 daily, and manual editing costs anywhere from $25 to $100 per image. For a catalog of just 100 products, the expenses can skyrocket before you’ve even published a single photo.

    PixelPanda flips the script with its budget-friendly pricing. The Starter plan offers 7,000 credits for $39 per month, while the Growth plan provides 15,000 credits for $59 per month. For businesses with larger needs, the Pro plan delivers 35,000 credits for $89 per month. This pricing structure slashes costs by 80% to 90% compared to traditional methods.

    Factor Traditional Photography PixelPanda
    Cost per Product $50 – $500 $5 – $50
    Production Time 1 – 3 days 2 – 5 minutes
    Editing Time 1 – 4 hours per product Automatic
    Equipment Needed Studio, lighting, cameras Existing product shots
    Scalability One at a time Thousands simultaneously

    "It effectively resolved the problem my business had been struggling with for many years… It allows me to create stunning model shots without the cost of hiring professionals."

    • Roberta Lacey, Founder of Lacey & Bohème

    How to Add AI Photo Enhancement to Your Workflow

    Adding AI photo enhancement to your workflow is easier than you might think. You don’t need a major system overhaul – just a few steps to seamlessly integrate tools like PixelPanda and start seeing results.

    Getting Started with PixelPanda: Step-by-Step

    First, connect PixelPanda to your e-commerce platform, whether you’re using Shopify, DAM, or PIM. This allows you to bulk import your product catalog effortlessly.

    Next, set up your brand parameters. Define your preferred background styles, lighting settings, aspect ratios, and padding. These settings will act as your custom templates, ensuring a polished, uniform appearance across all your images. You can even create multiple presets to match specific marketplace requirements – like a clean white background for one platform or a lifestyle-themed look for another.

    Once your presets are ready, upload a batch of 100–250 images. PixelPanda will automatically apply your template, handling tasks like background removal, upscaling, and resizing. After processing, review a sample batch to ensure product colors, textures, and details are accurate.

    When everything looks good, push the enhanced images directly to your product pages, marketplace listings, or internal systems. This automated process is much faster than traditional manual editing and delivers consistent results.

    Using Automation to Save Time

    For larger catalogs with over 500 SKUs, automation can make an even bigger difference. PixelPanda’s API lets technical teams link the tool directly to your DAM or PIM system, automating the entire image workflow. Non-technical users can still process smaller batches of up to 250 images with ease.

    Once you’ve set your HEX codes, shadow preferences, and padding presets, you can apply them across thousands of images instantly. This eliminates the inconsistencies that come with manual editing and ensures all your product photos meet marketplace standards.

    Consider the results: In 2025, the secondhand marketplace GoodBuy Gear standardized over 42,000 product images using AI automation. The result? A 23% increase in conversion rates. Similarly, Selency, an e-commerce brand managing a catalog of over 700,000 items, sped up product listings by 200 times while slashing image processing costs by 89%.

    Once automation is in place, the next step is evaluating how these enhancements impact your business.

    Tracking Results: Visual Quality and Sales Impact

    After streamlining your image workflow, it’s time to measure the results. Start by looking at both visual quality and business metrics. Keep an eye on conversion rates, click-through rates, and dwell time to assess how enhanced images are performing [5,23].

    A/B testing is a great way to see what works best. For example, you can test different background colors or lighting styles to find out which changes drive more engagement and sales [1,23]. Also, track return rates – accurate, high-quality images often lead to fewer returns.

    On the operational side, calculate how much time and money you’re saving. Compare AI processing costs – which can be as low as a few cents per image – with traditional photography, which can cost anywhere from $50 to $500 per product [1,7]. Businesses using AI automation have reported saving up to 50,000 hours annually.

    Finally, remember the power of great visuals. Over 85% of shoppers say product photos are the most important factor in their buying decisions. High-quality images can boost sales by as much as 64% compared to lower-quality visuals. By tracking these metrics, you’ll see how AI photo enhancement directly contributes to your bottom line.

    Conclusion

    AI-powered tools like PixelPanda turn blurry, low-quality, or cluttered product photos into polished, professional-grade visuals – no expensive equipment or studio time needed. This technology can upscale low-resolution images by up to 10x, remove distracting backgrounds, and fix lighting issues effortlessly.

    With nearly 90% of shoppers prioritizing image quality, having superior visuals can boost sales by as much as 64%. Case studies reveal that standardized, high-quality images can increase conversions by over 20%. Plus, AI automation slashes costs significantly, offering 90%–95% savings compared to traditional photography, which can cost anywhere from $50 to $500 per product.

    For small businesses, the benefits go beyond just saving money. AI tools allow you to process hundreds – or even thousands – of images at once, ensuring consistent branding across your entire catalog. This consistency not only strengthens your brand identity but also builds trust with your customers. High-quality images also help reduce return rates by 20%–25%, as customers get a clearer idea of what to expect.

    Switching from manual editing to AI-powered image editing saves time and scales effortlessly. AI workflows ensure consistent results across large product catalogs, whether you’re managing 50 SKUs or 50,000. Even a single smartphone photo can be transformed into multiple variations for different platforms or campaigns – no reshoots required.

    Start with your lowest-performing images and watch as better visuals lead to improved engagement, higher conversions, and fewer returns. With tools like PixelPanda, professional product photography is no longer out of reach. It’s time to elevate your product presentation.

    FAQs

    How can AI enhance low-quality product images for e-commerce?

    When it comes to improving low-quality product images, AI steps in with super-resolution algorithms that upscale photos while adding missing details and sharpening edges. What starts as a blurry, pixelated image is transformed into a sharp, high-definition visual – perfect for showcasing products in online stores.

    But that’s not all. AI tools can also fine-tune lighting, tweak colors, and even remove distracting backgrounds. The result? Polished, professional-looking product photos that grab attention. These improvements don’t just make your images more appealing – they also build customer trust and can lead to higher conversion rates for your e-commerce business.

    Can AI improve color accuracy in product photos?

    AI-driven tools can fine-tune color accuracy by automatically tweaking hues and tones to align with a reference image or predefined standards. This is particularly useful for maintaining consistent, vibrant colors in product photos, which is crucial for showcasing items effectively.

    That said, while AI does a great job improving color representation, it isn’t flawless. Factors like lighting variations or the quality of the original image can sometimes affect results. Still, for e-commerce businesses aiming to level up their visuals, these tools offer a dependable and time-saving solution.

    How does using AI for product photo enhancement save money?

    AI-driven tools offer a game-changing solution for cutting down the hefty costs tied to traditional product photography. Think about it: hiring professional photographers, renting studio space, and paying for post-production edits can easily rack up hundreds – if not thousands – of dollars per product. By using AI, you can create or refine high-quality images right in-house, skipping many of these pricey steps.

    But the benefits go beyond just saving money. AI also speeds up the editing process, slashing labor hours and eliminating the need for expensive reshoots. This quicker workflow means you can roll out products or campaigns faster, giving your sales a head start while keeping expenses under control. For e-commerce businesses, it’s an efficient way to elevate product visuals without compromising on quality.

    Related Blog Posts

  • AI Image Upscaling: Complete Guide for Beginners

    AI Image Upscaling: Complete Guide for Beginners

    AI image upscaling transforms low-resolution images into sharper, high-quality versions by predicting and filling in missing details with advanced machine learning. Unlike older methods that stretch pixels, AI tools analyze patterns, textures, and edges to recreate details that were never in the original image. This makes it possible to enlarge photos by up to 600% while maintaining clarity.

    Key Takeaways:

    • What it is: AI predicts and reconstructs missing image details, improving sharpness and quality.
    • Why it’s useful: Perfect for e-commerce, social media, and restoring old photos.
    • Who benefits: Photographers, marketers, small businesses, and anyone working with visuals.
    • How it works: Tools use AI models like CNNs and GANs to rebuild textures and reduce noise.
    • Limitations: Over-processing can create unnatural textures, and results depend on the original image quality.

    AI upscaling tools like PixelPanda offer user-friendly features such as batch processing, noise reduction, and support for various formats. Whether you’re enhancing product photos or preparing images for print, AI upscaling can save time and improve visual quality.

    How To Upscale Images with AI (2025 Guide)

    How AI Image Upscaling Works

    AI vs Traditional Image Upscaling Methods Comparison

    AI vs Traditional Image Upscaling Methods Comparison

    Let’s dive deeper into how AI image upscaling operates and what sets it apart. At its core, AI upscaling relies on deep learning models trained on vast datasets of high-resolution images to intelligently predict and fill in missing details.

    The Role of AI Algorithms

    AI upscaling isn’t about simply stretching pixels. Instead, it analyzes patterns in textures, edges, and colors to reconstruct details intelligently. Convolutional Neural Networks (CNNs) play a key role in scanning image patches and rebuilding details, while Generative Adversarial Networks (GANs) take it a step further by refining textures to make the image appear more realistic.

    By identifying features in blurred or low-resolution areas, the AI uses its training to recreate details that might have been lost. This is why AI can upscale images by as much as 600%, adding details that traditional methods like bicubic resizing can’t achieve.

    AI vs. Traditional Resizing Methods

    AI takes a fundamentally different approach compared to traditional resizing techniques. Instead of simply interpolating existing pixels, it predicts and reconstructs new details.

    "Traditional upscaling starts with a low-resolution image and tries to improve its visual quality at higher resolutions. AI upscaling takes a different approach: Given a low-resolution image, a deep learning model predicts a high-resolution image that would downscale to look like the original, low-resolution image." – NVIDIA

    This predictive capability also allows AI to handle issues like noise and compression artifacts far better. For example, while bicubic resizing might magnify JPEG compression blocks or grain, AI models reduce these flaws during reconstruction. Imagine trying to complete a puzzle: traditional methods simply enlarge the pieces you already have, making the gaps more noticeable. AI, on the other hand, uses its knowledge from thousands of similar "puzzles" to create new pieces that fit seamlessly.

    However, AI upscaling isn’t without its challenges.

    Limitations of AI Image Upscaling

    AI upscaling has its shortcomings. One major issue is hallucination, where the AI fabricates details that weren’t in the original image. For instance, a blurry street sign might be rendered legible, but the AI could misinterpret and create incorrect characters. While this might work for artistic projects, it becomes problematic in scenarios where accuracy is critical.

    Another potential drawback is over-processing. Enlarging an image beyond what’s necessary can result in an unnatural, "plasticky" look. Additionally, AI upscaling requires significant computational power, often needing a dedicated GPU for smooth performance. And if the source image is heavily compressed or extremely low resolution, the AI might introduce distortions or artifacts rather than improving the quality.

    To get the best results, always start with the highest quality original file – preferably a RAW image – so the AI has more data to work with. Understanding these limitations is essential for making the most out of AI upscaling and integrating it effectively into your projects.

    Choosing an AI Upscaling Tool

    With so many options out there, picking the right AI upscaling tool means figuring out what features align with your specific needs and budget. Your decision will depend on factors like the number of images you’re working with, the quality of those images, and how much control you want over the process.

    Key Features to Look For

    Look for tools that use content-specific AI models. Why? Different types of images need different approaches. For instance, architectural photos might benefit from sharper edges, while compressed images require effective artifact removal. Tools offering tailored models for various scenarios can make a big difference.

    Another important feature is scale flexibility. Some tools allow fixed multipliers (like up to 6×) or let you set custom dimensions. If you’re just looking to clean up compression artifacts without resizing, a "1×" scale option might be all you need.

    Advanced tools also shine with detail recovery features. These include adjustable controls for noise reduction and deblurring, which help bring back fine details during the upscaling process.

    For beginners, comparison tools are incredibly helpful. Features like split-view or side-by-side comparisons let you see the original image next to the enhanced version, making it easier to evaluate results.

    If you’re handling multiple images, batch processing is a must-have. This feature lets you upscale dozens of photos at once, applying consistent settings across all of them. It’s a huge time-saver, especially when working with large collections.

    Lastly, consider tools that offer robust output customization options. Support for multiple file formats (like JPEG, PNG, and TIFF) and the ability to tweak color spaces or resolution (DPI/PPI) ensures your images are ready for both digital and print use. Some professional tools can even upscale images to as large as 32,000 pixels on the longest side – perfect for creating ultra-high-resolution visuals.

    Understanding Pricing and Accessibility

    AI upscaling tools come with a range of pricing models, so it’s worth taking a closer look to avoid paying for features you don’t need.

    One factor to consider is local versus cloud processing. Tools that run locally on your computer typically require a one-time license purchase but demand robust hardware – think 16–32 GB of RAM and a GPU with at least 6–8 GB of VRAM. On the other hand, cloud-based solutions operate on a subscription model, providing remote computing power and access from any device.

    Most tools offer free trials, though these often come with limitations like restricted export options. Testing a tool during its trial period can help you decide if it meets your quality standards before committing financially.

    For e-commerce or professional use, it’s essential to calculate your output needs. For example, a 20-inch print at 300 DPI requires 6,000 pixels in one dimension, so upscaling beyond that isn’t necessary.

    Next, let’s dive into how PixelPanda incorporates all these features into a streamlined upscaling experience.

    Using PixelPanda for AI Image Upscaling

    PixelPanda

    PixelPanda combines AI-powered upscaling with a suite of other visual tools, making it a versatile choice for users who need multiple image enhancement features in one place.

    The platform uses a credit-based system for flexibility. Plans start at $39/month for 7,000 credits, and these credits can be used across PixelPanda’s other features, like AI background remover tools, AI-generated product photos, and video creation. This setup allows you to handle a variety of tasks without juggling multiple tools.

    Another standout feature is its user-friendly interface. Designed with beginners in mind, PixelPanda delivers professional results without requiring you to master complex software. The upscaling process integrates smoothly into your existing workflows, letting you adjust resolution, remove backgrounds, and create product variations all within the same platform.

    For e-commerce businesses, PixelPanda offers commercial usage rights, so you can use upscaled images immediately in your store, ads, or marketing materials. The platform supports a wide range of output needs, from web-ready images to high-resolution files for print catalogs. With batch processing and consistent quality, it’s a practical choice whether you’re enhancing a single image or an entire product catalog.

    Step-by-Step Guide to AI Image Upscaling

    Preparing Your Image

    Start with the best-quality version of your image. Ideally, use the original RAW file or an uncompressed format instead of a copy that’s been compressed or downloaded. As noted by Topaz Labs, "Upscale from an original image whenever possible rather than a copy that has been compressed".

    Check your file format and note the image’s dimensions. PNG or high-quality JPEGs (90% quality or higher) are ideal. For example, if you have an image at 1,000 × 1,500 pixels and need it to be 4,000 × 6,000 pixels, you’ll need a 4× upscale.

    Before upscaling, clean up your image using photo editing software. Remove scratches, tears, or excessive noise, as AI tools can amplify these flaws. If you need to change the aspect ratio, crop the image at this stage. For images that are already the correct size but show compression artifacts, use a "1×" scale setting to improve quality without altering dimensions.

    Once your image is ready, you can upload it and begin the upscaling process.

    Running the Upscaling Process

    Upload your prepared image by dragging it into a tool like PixelPanda or selecting it manually. You’ll typically have two options for upscaling: choose a Scale Factor (e.g., 2×, 4×, or 6×) or set specific Dimensions. Keep in mind that most professional tools cap the longest side at 32,000 pixels.

    Next, select an AI model suited to your image type. Options often include "Standard" for general photos, "Graphics" for illustrations, or "High Fidelity" for detailed images. If your image is heavily compressed, look for models designed to handle compression artifacts. You can also enable noise reduction or deblurring, but use these features cautiously to avoid creating an unnatural appearance.

    Process the image and use the preview feature to compare the upscaled version with the original. For extremely low-resolution images, consider upscaling in smaller steps (e.g., 2× twice) instead of a single large jump like 6×.

    Reviewing and Exporting Your Results

    Once the upscaling is complete, carefully review the results. Use comparison tools to ensure the details have been enhanced without introducing artifacts. The quality of the final image depends heavily on the original file. As Topaz Labs explains, "The AI models rely heavily on existing image quality. They may generate unwanted artifacts if the resolution of the starting image is too low".

    Choose the appropriate export format based on how you’ll use the image. JPEG or PNG is suitable for web and social media, while TIFF is better for preserving detail in large files or for professional printing. If you’re unsure about color settings, select "Preserve input color space", or use sRGB for web content and ProPhoto RGB for high-quality printing.

    Finally, save the file to your computer’s internal drive to ensure faster processing and avoid potential errors during export. If you encounter issues, such as failed exports, double-check the image dimensions and file size limits.

    Applications of AI Image Upscaling

    Improving Product Images for E-commerce

    AI upscaling transforms low-resolution product photos into sharp, detailed visuals that meet the high standards of today’s online marketplaces. When shoppers zoom in on product images, they expect to see every detail clearly – and AI makes that possible, even with limited-quality source images.

    This technology is particularly effective at reconstructing fine details, like printed text on packaging, such as watch dials or product labels, ensuring they appear sharp and easy to read. It also excels at restoring intricate textures, like brushed steel, woven fabric, or leather patterns, giving products a polished and professional look. Some advanced models even include specialized modes, like "Architectural" or "Low Res", which enhance product edges and prevent the blurriness often caused by traditional resizing methods.

    Another useful feature is the ability to crop tightly into specific product features and then restore the resolution using a free AI image upscaler. This allows for creating close-ups that remain clear and detailed, even when working with compressed images from smartphones or social media. Some AI tools can enlarge images by as much as 600% while maintaining quality and adding back fine details.

    And it’s not just for online stores – AI upscaling enhances visuals across various digital platforms.

    Creating High-Quality Social Media Content

    Social media thrives on high-resolution visuals, and the numbers don’t lie – high-quality images can boost engagement by 120%. For marketers and influencers, this means standing out in crowded feeds and achieving better campaign results.

    AI upscaling is a game-changer for content that might otherwise be unusable. Marketing teams often work with images that are too small or compressed for professional use. By upscaling these files, they can meet the high standards required for modern social media campaigns.

    This technology is also a boon for creators working with AI-generated art, which often starts at lower resolutions. To achieve the best results, it’s essential to pair the right AI model with the content type – using "Face" or "Portrait" models for influencer headshots, for example, or "Architectural" models for text-heavy graphics.

    Restoring and Repurposing Old Images

    AI upscaling isn’t just about improving new content – it’s also a powerful tool for breathing new life into older images. Many businesses have valuable visual assets from years ago that no longer meet today’s quality expectations. With AI, these archived images can be enhanced and repurposed for modern e-commerce, even if the original high-resolution files are missing or were never created.

    The technology is adept at rebuilding textures like fabric, skin, and product details, which are often blurred by traditional resizing methods. This makes it possible to reuse older product photos on contemporary websites without the need for costly reshoots, helping businesses maintain a consistent visual identity while updating their digital presence.

    For restoration projects, it’s best to start with the highest-quality source file available and clean up any visible damage to avoid amplifying imperfections during the upscaling process.

    Best Practices for AI Image Upscaling

    Avoiding Over-Upscaling

    Upscaling too much can lead to unnatural, plasticky textures that ruin the image’s authenticity. Start by identifying your specific needs. For instance, if you’re printing a 20-inch photo, calculate the required resolution by multiplying the size by 300 DPI (the standard for high-quality prints). That means you’ll need 6,000 pixels – not 10,000. For most uses, a 2× to 4× upscaling factor strikes the right balance between improving quality and keeping the image looking natural. Going beyond that often just bloats the file size and increases processing time without adding any real visual benefit.

    Keep in mind that a 4× upscale increases the pixel count sixteenfold, potentially turning a 2MB file into a massive 30MB one. If you’re starting with a very low-resolution image, it’s better to upscale incrementally in 2× steps rather than jumping straight to 4×. This approach helps maintain better quality.

    Always review the results carefully to ensure the upscaling meets your expectations before finalizing your project.

    Testing for Quality Across Tools

    Once you’ve decided on the right scaling factor, take a close look at the results. Zoom in to 100% to catch subtle artifacts that might not be obvious at first glance. Pay special attention to details like eyes, hair, text, and foliage – these areas are particularly prone to issues like "demon eyes" or watercolor-like blurring when viewed at full resolution.

    Different AI tools and models handle content in unique ways. For example, using a general-purpose photo model on a logo can result in blurry edges or lost details. As professional photographer Chase Jarvis explains:

    "If you need to print a billboard from a crop… this is the tool. It respects the source material".

    But not all tools respect the source material equally, so it’s crucial to test and compare results.

    To counteract the overly smooth "AI look" that can sometimes appear, many professionals add a subtle layer of monochromatic noise at 3–5% opacity to the final image. This simple step restores texture and makes the image feel more natural.

    Maintaining Workflow Order

    The order in which you process your images matters. Start by ensuring your low-resolution original is preserved – use custom suffixes or prefixes when exporting to avoid accidental overwrites. Upscaling should be one of the first steps in your workflow, ideally done before making color corrections or heavy crops. As Chase Jarvis puts it:

    "Upscaling noise just gives you high-definition noise".

    To get the best results, make sure your image is free of noise before upscaling, and crop it beforehand to focus the AI’s processing on the subject.

    For large batch exports, save files directly to your computer’s internal drive rather than an external one. This reduces the risk of write errors and speeds up processing.

    Conclusion

    AI image upscaling has changed the game for transforming low-resolution images. Instead of simply stretching pixels, it rebuilds missing details by recognizing patterns like skin texture, hair, or even blades of grass. This approach avoids the blurry, pixelated results of traditional methods and delivers more natural-looking enhancements. Whether you’re restoring old family photos, prepping product images for e-commerce, or creating standout social media content, this technology ensures your images are enlarged while maintaining – or even improving – clarity.

    To get the best results, start with a high-quality source file and choose the right upscaling factor for your needs. For example, a 4× upscale increases your pixel count by sixteen times, so it’s crucial to only upscale to the resolution you actually require. If you’re working on professional-grade prints, remember that you’ll typically need 300 DPI. Planning your enlargement carefully ensures you achieve the perfect balance between quality and practicality.

    Tools like PixelPanda make this process simple, even for beginners. It offers free ai image upscaler online options – 2×, 4×, and 8× – along with batch processing for up to 10 images and built-in editing features. Anwesha Dasgupta, a digital marketing enthusiast, highlights its ease of use:

    "PixelPanda stood out for its speed, clarity, and affordability. It’s one of the simplest, fastest, and most user-friendly tools available."

    PixelPanda combines the benefits of AI upscaling into a seamless, user-friendly platform. With free 4× and 8× upscaling credits available when you sign up, you can test it out on your own images. Whether you’re a professional or a beginner, this tool makes it easy to turn low-resolution images into polished, professional-quality visuals in just seconds – no technical expertise or costly software required.

    FAQs

    What makes AI image upscaling different from traditional methods?

    AI image upscaling takes image enhancement to a whole new level, leaving traditional methods like bicubic or nearest-neighbor interpolation in the dust. Those older techniques work by enlarging an image through pixel duplication or stretching, which often results in blurry or pixelated visuals when the image is blown up.

    AI-driven upscaling, on the other hand, relies on deep learning to fill in the gaps. A trained neural network analyzes the image, predicts what’s missing, and enhances it by sharpening edges, adding texture, and restoring fine details that weren’t apparent in the original. The result? A crisp, high-resolution image that feels like it was captured in its original quality, with minimal blur or unwanted artifacts.

    What are the limitations of AI image upscaling?

    AI image upscaling is a game-changer for improving image resolution, but it’s not without its challenges. While it does a great job of enhancing resolution, it can’t magically recreate details that were never there. This can sometimes lead to minor quality issues, such as blurring, odd textures, or inconsistencies – especially when scaling images significantly beyond their original size.

    Another factor to consider is the hardware required. Producing high-resolution images, like 4K or 8K, can be demanding on your system. Without the right equipment, the process might slow down or become expensive. Plus, the effectiveness of the upscaling depends heavily on the AI model’s training data. In some cases, the AI might "fill in the blanks" with details that seem realistic but don’t accurately match the original, particularly with complex textures or patterns.

    Even with these limitations, AI upscaling is a fantastic tool for enhancing image quality – provided it’s used with care and realistic expectations.

    What should I consider when choosing an AI image upscaling tool?

    Choosing the best AI image upscaling tool comes down to your specific needs and goals. First, think about how you plan to use it – whether that’s improving e-commerce product photos, enhancing personal snapshots, or refining digital art. Different tools are tailored to excel in different tasks.

    Next, determine the resolution and quality you’re aiming for. Some tools can handle large-scale upscaling (up to 32,000 pixels) while preserving the original look and adding realistic details. If speed and ease of use are priorities, decide whether a desktop app with batch processing capabilities or an online service better suits your workflow.

    Lastly, consider the cost. Many tools offer free trials or basic tiers, but premium plans may be necessary for higher resolutions or faster processing times. Testing a few tools with sample images can help you compare their quality, speed, and pricing to find the best fit for your projects.

    Related Blog Posts

  • How to Create UGC Video Ads Without a Camera

    How to Create UGC Video Ads Without a Camera

    UGC (User-Generated Content) video ads are powerful for building trust and driving engagement, but traditional production can be costly and time-consuming – ranging from $500 to $5,000 per video and weeks of coordination. AI tools like PixelPanda now make it possible to create UGC-style ads quickly and affordably, without needing a camera, actors, or a large budget. Here’s how:

    • AI-Powered Avatars: Use lifelike avatars to simulate real people in your ads.
    • Text-to-Video Technology: Turn scripts into videos in minutes, cutting production time by 70%.
    • Cost Efficiency: Create up to 350 videos for as little as $39/month.
    • Global Reach: Translate ads into 35 languages with precise lip-syncing for international markets.
    • Proven Results: Achieve 70–85% of the engagement of real UGC at a fraction of the cost.

    From scriptwriting to avatar customization and platform-specific video exports, AI tools streamline every step, making it easy for businesses to test and scale ad campaigns effectively. These solutions are reshaping how brands create UGC ads, delivering high performance without breaking the bank.

    Traditional UGC vs AI-Powered UGC Video Ads: Cost and Performance Comparison

    Traditional UGC vs AI-Powered UGC Video Ads: Cost and Performance Comparison

    How to Make Viral AI UGC Ads in 2026 (Full Workflow)

    What Are UGC Video Ads and Why Do They Work?

    UGC (User-Generated Content) video ads are designed to look and feel like genuine customer testimonials. They often come across as unscripted and natural, typically filmed on mobile devices with simple setups like natural lighting. This makes them a perfect fit for platforms like TikTok, Instagram Reels, and YouTube Shorts.

    The real power of UGC ads lies in their ability to cut through the skepticism that polished corporate ads often face. When viewers see everyday people sharing what feels like honest reviews, it creates a stronger emotional connection. This authenticity drives results: UGC ads generate 7x more clicks and triple the on-page engagement compared to traditional ads. It’s no wonder that 56% of brands now prioritize UGC in their strategies, with 19% ranking it as their top marketing focus.

    Take Bloom Nutrition, for example. In December 2025, they teamed up with the agency Ubiquitous for a TikTok UGC campaign featuring creator Gabbie Eagen. By leaning into the casual "Get Ready With Me" (GRWM) style and giving creators creative freedom, the campaign racked up over 4 million views. It also brought down CPMs from $3.57 to $1.47 and helped Bloom Nutrition achieve the #1 Best Seller spot in Amazon Launchpad.

    These kinds of results highlight why UGC ads are reshaping how brands connect with audiences – and how AI is taking this transformation even further.

    How AI Tools Are Changing UGC Creation

    AI tools are revolutionizing how brands create UGC-style content. Forget cameras, actors, and complicated setups – now marketers can produce video ads in minutes using tools that leverage hyper-realistic avatars and text-to-video technology. This eliminates the need for lengthy coordination and slashes production time.

    Cost is another game-changer. Traditional UGC campaigns can run $500–$5,000 per video, but AI tools start at just $30–$110 per month. This affordability allows brands to scale their output significantly – from producing a handful of ads each week to creating 50 or more. For example, in 2025, stationery brand Papier partnered with Twirl to streamline their UGC production. They went from creating 8 videos per month to 10–14, with a turnaround time of just one week. This shift led to a 57% drop in TikTok CPAs, a 575% increase in ad spend, and double the click-through rates.

    AI also makes global expansion easier. Brands can now localize high-performing UGC ads for international markets by translating them into multiple languages with precise lip-syncing. This means reaching a worldwide audience without extra production costs. And while AI-generated UGC might not hit the exact engagement levels of authentic user content, it still achieves 70–85% of the same engagement. This makes it an incredibly effective way to test ideas and identify winning campaigns in just hours.

    Step 1: Write a Script That Sounds Natural

    Creating a convincing UGC ad starts with a script that feels like a genuine conversation, not a polished sales pitch. Think of it as describing a product to a friend. A reliable structure to follow is: Hook → Product Demo → Benefit → Social Proof → Call to Action. Start with something bold or relatable – like a "total hotel pillow hair disaster" – to grab attention in the first few seconds. Then, showcase the product in action, explain how it solves a problem, share how others love it, and end with a clear call to action. Keep it tight – around 150 words per minute – and limit each scene to three sentences. Add natural pauses, small stumbles, and varied pacing to make it feel authentic.

    For that extra touch of realism, include directions for "selfie-style" camera angles or handheld shots. Since 85% of social media videos are watched on mute, make sure your script works well with captions.

    Adapting Scripts for Different Platforms

    Different platforms have their own vibe. TikTok thrives on fast-paced, energetic content with hooks lasting about 6 to 12 seconds. Instagram Reels, on the other hand, allow for a bit more storytelling, but still under 60 seconds. For Meta Ads, it’s crucial to make your brand message clear right from the start to appeal to a broad audience. Testing various hooks can help you identify which emotional triggers resonate most with viewers.

    Using AI to Generate Scripts

    Tools like PixelPanda can help you craft or refine scripts that align with your brand’s voice. Just provide details like your topic, key points, tone (fun, bold, relatable), and the speaker’s personality, and the AI will generate multiple script options. Use these AI-generated scripts as a starting point – pick the best lines and tweak the pacing for a more natural delivery. You can also lean on proven copywriting frameworks like PAS (Problem-Agitate-Solution): highlight a pain point, explain why it’s frustrating, and position your product as the solution.

    In November 2025, Rosemary N. Conroy used AI-generated scripts for an Instagram campaign and made 21 sales within the first hour. That same month, Rebecca Hansen reported cutting her Cost Per Click by 27% after switching to AI-generated scripts.

    "The most effective ads are the ones that feel completely unscripted; purely authentic, like people sharing their honest experiences." – CapCut

    Once your script is polished, you’re ready to pair it with AI avatars that match your brand’s personality.

    Step 2: Choose and Customize AI Avatars

    With your script in hand, the next step is selecting an avatar that reflects your brand’s personality. PixelPanda offers a library of over 240 lifelike avatars, providing the visual realism needed to create engaging UGC video ads. The goal is to pick avatars that connect with your audience – avatars with expressive features and natural gestures tend to keep viewers engaged.

    You can browse the avatar library and filter options by age, style, or overall vibe. For example, if you’re working on a Gen Z skincare campaign, a casual and relatable avatar might be the best fit. On the other hand, for B2B software demos, a more polished and professional avatar could be more appropriate. Test out 2–3 voice options for each avatar to find the tone that aligns with your brand. If the avatar mispronounces anything, you can fix it using the IPA tool.

    To make the avatar even more aligned with your brand, customize their clothing colors to match your brand’s palette. You can also add your logo – PixelPanda allows you to place up to four logos that naturally fit the avatar’s 3D design. For the background, stick to simple and natural settings, like a cozy living room or a kitchen, to keep the content feeling authentic. You can either upload custom backgrounds or choose from AI-generated scenes.

    "AI actors replicate the natural feel of talking product videos. They make eye contact, use conversational voices, and feel real, delivering scroll-stopping content." – HeyGen

    Adjusting Avatars to Match Your Brand

    Once you’ve tailored your avatar, ensure it consistently represents your brand across all campaigns. Keeping the same avatar for multiple projects helps build brand recognition and creates a unified digital identity. PixelPanda’s Brand Kit feature can simplify this process by automatically applying your brand colors, fonts, and logos to every video, ensuring a cohesive look every time.

    When crafting your UGC video ads, pay attention to how you frame your shots. Waist-up angles work well for introductions, as they help establish a strong presence. For product demonstrations, chest-up framing is ideal, as it highlights facial expressions that convey important messages. Keep each scene concise – 2 to 4 sentences per scene work best for smooth transitions. Once you’ve nailed the perfect format, save it as a master template to streamline future video production, potentially cutting production time by up to 90%.

    Step 3: Create and Edit Your UGC Video

    With your avatar set up, it’s time to bring everything together – script, visuals, and AI tools – to craft a polished UGC video ad. Start by pasting your product URL into PixelPanda. The AI will automatically pull product details, images, and pricing to create a tailored script and visuals for you. This seamless integration connects your product information with engaging visual storytelling.

    Next, build your video scene by scene. Keep each scene concise, using 1–3 short sentences. Want to add more energy? Try speeding up the playback to 1.1x or 1.2x, or use the "Style Exaggeration" feature to add more dynamic delivery.

    Enhance the video by layering in B-roll footage, screen recordings, text overlays, and logos. Use "trigger markers" to sync animations with the spoken script for a cohesive look. Keep scenes brief – just 3 to 5 seconds each – to hold viewers’ attention in today’s fast-paced digital world. Once everything is in place, export your video in the right aspect ratio: 9:16 for TikTok or Instagram Reels, 16:9 for YouTube, or 1:1 for social feeds.

    Fine-tune the visuals, adjust the timing, and then take your video to the next level by adding voiceovers tailored to different markets.

    Adding Voiceovers in Multiple Languages

    PixelPanda makes localization simple, supporting 35 languages to adapt your UGC ads for global audiences. The platform even syncs the avatar’s lip movements with the translated script, ensuring the video feels natural no matter the language. This means you can create a single video and customize it for viewers in Spain, Brazil, or Japan – no need to reshoot.

    To ensure your message resonates, tweak the tone and pacing for each audience. For instance, an energetic, fast-paced delivery might connect better with U.S. viewers, while a slower, more deliberate tone could appeal to audiences in other regions. Use the "Speech Emotion" settings to avoid a robotic feel – adding energy and expression helps make the avatar more lifelike. Once everything feels just right, export your localized video and get ready to share it with the world.

    Step 4: Prepare and Launch Your UGC Video Ads

    After perfecting your UGC video, it’s time to get it ready for launch. Here’s how to do it right.

    First, export your video in the correct aspect ratios to suit different platforms: 9:16 for mobile-friendly formats like TikTok, Instagram Reels, and Stories, and 4:5 or 1:1 for Facebook and Instagram feeds. Use MP4 or MOV formats, keeping the file size under 4GB, with a frame rate of up to 30 fps. Don’t forget to include safe zones to ensure text and logos remain visible across all devices.

    Since many users watch videos without sound, captions are essential. Also, grab attention quickly by featuring your best hook or product shot within the first three seconds. For TikTok, stick to videos that are 15–30 seconds long (21 seconds is ideal), while Facebook ads perform well at 30–45 seconds.

    When launching, create 3–5 ad variations to test different hooks, avatars, or emotional angles. For example, Headway managed to generate 3.3 billion impressions and a 40% ROI increase, while Alembika saw their ROAS double to 6–8X.

    Platform Requirements and Best Practices

    To get the most out of your ads, tailor your videos to meet each platform’s technical requirements.

    • Instagram Reels: Use a 9:16 aspect ratio with 1080×1920 resolution, and keep videos between 90–180 seconds.
    • Instagram Stories: Opt for 1440×2560 resolution, with a maximum length of 60–120 seconds.
    • Instagram Feed: Stick to a 4:5 ratio (1440×1800 resolution) and keep videos under 60 seconds.
    • TikTok: Vertical videos in 9:16 format at 1080×1920 pixels work best, ideally under 60 seconds.
    • Facebook Feed: Use a 1:1 or 4:5 aspect ratio, while Facebook In-Stream ads perform better with a 16:9 ratio.

    Always export at the highest available resolution (minimum 1080×1080 pixels) to avoid quality loss due to platform compression.

    Finally, keep an eye on performance metrics. If you notice a drop in click-through rates (CTR) or a rise in cost per thousand impressions (CPM), run A/B tests with different hooks or avatars. UGC ads have been shown to achieve up to 4× higher CTR and 50% lower CPC.

    Conclusion

    Creating UGC video ads has never been faster or more affordable. What once took weeks and cost between $500 and $5,000 can now be done in minutes for as little as $6. With the tools available today, you can craft natural-sounding scripts, pick AI avatars that align with your brand, edit videos using built-in features, and launch them across multiple platforms with ease.

    PixelPanda simplifies the entire process by turning product URLs into fully-formed, AI-powered video ads that include scripts, captions, and hashtags. You can choose from hundreds of lifelike avatars, create multiple ad variations in just hours for A/B testing, and translate your content into 35 languages with a single click. This approach slashes production costs by up to 90% and reduces content creation time by 70%.

    These time and cost savings directly impact campaign performance. AI-powered UGC ads consistently achieve higher click-through rates and lower costs, all while significantly speeding up production.

    Whether you’re running a small e-commerce store or managing multiple campaigns, these tools eliminate the headaches of traditional production, enable weekly creative refreshes, and provide the flexibility to test and scale globally.

    Ready to upgrade your ad strategy? PixelPanda’s Starter plan, priced at $39/month, lets you create up to 350 videos. For larger needs, the Pro plan at $89/month offers up to 1,750 videos. Both plans empower you to produce high-quality UGC ads without breaking the bank.

    FAQs

    How does AI make UGC video ads feel authentic?

    AI plays a key role in crafting realistic UGC-style video ads by mimicking the natural feel of user-generated content. It leverages sophisticated tools to create lifelike avatars tailored to specific demographics, complete with expressive facial movements, natural eye gestures, and convincing body language. These details make the avatars feel more human and relatable.

    On top of that, AI transforms scripts into conversational, natural-sounding speech. It incorporates everyday language, including slang and casual intonations, so the dialogue feels authentic and approachable.

    AI also taps into massive datasets to fine-tune elements like backgrounds, props, and conversational nuances, ensuring the videos reflect real-life experiences. This technology allows marketers to produce multiple ad variations – featuring different accents, age groups, or settings – while keeping the content relatable and engaging. The result? Ads that connect with audiences on a personal level and build trust.

    What are the cost advantages of using AI to create UGC video ads?

    Using AI to produce UGC video ads can slash production costs dramatically compared to traditional approaches. Instead of shelling out tens of thousands for professional shoots, businesses can generate polished, natural-looking content for only a few hundred dollars.

    This affordability is especially attractive to small businesses or marketers aiming to stretch their budgets while still delivering engaging, professional-looking ads.

    How can AI tools help customize UGC video ads for different audiences worldwide?

    AI tools simplify the process of tailoring UGC video ads for international audiences by automating essential localization tasks. They can handle script translations into various languages, create natural-sounding voiceovers, and modify on-screen text, subtitles, and graphics to align with local standards – like using $ for currency in the U.S. or adjusting date formats. This eliminates the need for separate recordings or time-consuming manual edits.

    But localization isn’t just about language. AI can adapt content to match local preferences and cultural nuances. For instance, avatars can be styled with region-specific clothing, gestures, and slang. Dynamic editing can tweak elements like music, colors, and pacing to resonate with local tastes. Additionally, AI-powered tools allow for fast A/B testing, making it easier to determine which versions perform best. This empowers brands to scale localized UGC ads efficiently while preserving the authentic feel of user-generated content.

    Related Blog Posts

  • 7 Best AI Tools for E-Commerce Product Photography

    7 Best AI Tools for E-Commerce Product Photography

    When selling online, your product photos can make or break sales. AI tools are transforming e-commerce photography, saving time and cutting costs. Instead of spending $50–$500 per product and days on shoots, businesses now use AI to use AI background removers, adjust lighting, and upscale images in minutes – at $5–$50 per product. Some brands have cut budgets by 88%, boosted conversions by 42%, and reduced returns by 23%. Here’s a quick look at seven AI tools designed to simplify and improve your product photography:

    • PixelPanda: Offers background removal, upscaling, and lifestyle scene creation. Plans start at $39/month.
    • Claid.ai: Automates editing for large catalogs. Pricing begins at $9/month, with API options for scaling.
    • Photoroom: Processes bulk images for marketplace standards. Starts at $7.50/month.
    • Flair.ai: Adds AI-generated scenes and virtual models. Free tier available, Pro plan at $10/month.
    • WizStudio: Credit-based system for cost-effective lifestyle images and upscaling. Starter plan at $250 for 20 credits.
    • Snapshot: Shopify-integrated tool for quick background swaps and bulk editing. Plans start at $10 for 15 credits.
    • Pebblely: Automates background removal and lighting adjustments. Free plan available; Pro plan at $39/month.

    These tools save time, reduce costs, and deliver consistent, professional-quality visuals. Below is a quick comparison of their features and pricing.

    AI Product Photography Tools Comparison: Features, Pricing & Capabilities

    AI Product Photography Tools Comparison: Features, Pricing & Capabilities

    How to Create Product Photos with AI

    Quick Comparison

    Tool Key Features Starting Price Free Plan/Trial Bulk Editing API Integration
    PixelPanda Background removal, upscaling $39/month No Yes No
    Claid.ai Automated workflows, HDR filter $9/month Yes (50 credits) Yes Yes
    Photoroom Batch processing, AI shadows $7.50/month No Yes Yes
    Flair.ai Scene staging, 3D props $10/month Yes Yes Yes
    WizStudio Lifestyle images, upscaling $250/20 credits Yes (5 credits) Yes No
    Snapshot Shopify integration, themes $10/15 credits Yes (5 credits) Yes No
    Pebblely Lighting adjustments, upscaling $19/month Yes (40 photos) Yes Yes

    Choose the tool that fits your needs and start improving your product visuals today.

    1. PixelPanda

    PixelPanda

    PixelPanda specializes in creating high-quality product images and videos tailored for e-commerce businesses. Whether you’re managing a massive product catalog or running frequent marketing campaigns, this platform has tools to streamline your visual content production – from basic photo editing to AI-generated product visuals.

    Background Removal Made Simple

    PixelPanda’s background removal tool is designed to instantly strip away backgrounds, leaving you with a clean white or transparent backdrop. This feature ensures your product images meet marketplace standards and look polished, all without the hassle of manual editing. The result? A consistent and professional product gallery with minimal effort.

    Sharper Images and Versatile Visuals

    Got a low-resolution photo? PixelPanda can upscale it into a crisp, high-quality image perfect for web or print. Beyond that, its AI tools can create lifestyle scenes, virtual model shots, and outfit variations. This means you can showcase your products in diverse contexts without the cost or complexity of organizing multiple photoshoots. It’s a practical way to enhance your product presentation while keeping expenses manageable.

    Flexible Pricing for Growing Businesses

    PixelPanda offers three subscription plans designed to grow with your business:

    • Starter: $39/month for 7,000 credits
    • Growth: $59/month for 15,000 credits
    • Pro: $89/month for 35,000 credits

    All plans include features like one-minute video creation, support in 35 languages, and commercial usage rights. These options make it easy to scale your visual content as your business expands.

    2. Claid.ai

    Claid.ai

    Claid.ai is a platform tailored specifically for e-commerce product photography, processing over 200 million images for more than 10,000 businesses. Designed to tackle the unique challenges of online marketplaces, it ensures every image adheres to strict platform standards. It handles tasks like background removal, color correction, and automating workflows for extensive product catalogs.

    Background Removal Capabilities

    Claid.ai’s background removal tool quickly eliminates backgrounds while adding precise padding to ensure product images meet marketplace requirements. Unlike general-purpose tools, it’s trained specifically for product photography, making it highly effective at handling intricate edges and textures. Businesses using Claid.ai report an 80% drop in editing costs and onboard sellers five times faster compared to traditional methods.

    Alain Abud, Ops Manager at Rappi, shared: "We saved 42% of time on editing and 28% on managing sellers 🤩".

    The platform also features an AI-powered eraser brush that allows users to remove specific unwanted objects from images with ease, making it one of the best AI tools for photo editing available today.

    Lighting and Color Correction Features

    Claid.ai includes a content-aware HDR filter that automatically fine-tunes white balance, exposure, and colors to achieve studio-quality results. This feature is especially useful for improving low-quality supplier photos or user-generated images. Mixtiles, for example, turned to Claid.ai to address quality issues with customer uploads. Engineering Team Lead Ido Grosberg explained:

    "Using Claid API, we’ve basically taken a shortcut. We don’t have to worry about image quality".

    These adjustments ensure consistent branding and accurate product colors across thousands of images, setting the stage for Claid.ai’s advanced upscaling and optimization tools.

    Image Upscaling and Optimization

    With Claid.ai, users can upscale images by 2x or 4x (up to 16 MP), sharpening details and enhancing resolution for zoom-in views. The platform also reduces noise and removes compression artifacts, converting images into modern, fast-loading formats. This combination of upscaling and optimization transforms blurry supplier images into sharp, professional-grade listings without requiring manual intervention.

    Pricing and Scalability for Businesses

    Claid.ai is built to accommodate businesses of all sizes, from small shops to large enterprise marketplaces, with its scalable API capable of processing millions of images in seconds. New users can explore the platform with a free trial that includes 50 credits and 5 image uploads. Paid plans start at $9 per month, with the Basic plan priced at $19 per month and the Professional plan at $49 per month, which includes custom template uploads. For businesses with high-volume needs, API bundles begin at $59 for 1,000 credits. Rappi utilized Claid.ai’s scalability to boost the number of restaurants on their platform by 33%, thanks to faster image processing.

    3. Photoroom

    Photoroom

    Photoroom has achieved over 300 million downloads, proving its effectiveness in boosting performance for e-commerce businesses. This platform uses AI-powered tools to turn ordinary product photos into professional, marketplace-ready visuals, tailored specifically for e-commerce needs.

    Background Removal Capabilities

    Photoroom’s AI background remover is designed to handle even the trickiest products, like those with transparent or intricate edges. It can instantly create white backgrounds that meet marketplace standards or generate AI-crafted lifestyle scenes. For businesses with large inventories, the Batch Mode can process hundreds of images at once, and the background removal API allows seamless automation for managing extensive catalogs.

    Alexandra Mahl, founder of APM FINDS, LLC, shared that using Photoroom’s clean white backgrounds led to a 500% increase in sales. This was largely due to improved visibility in Google search results. The tool also ensures that product listings maintain a consistent look across various marketplaces.

    Lighting and Color Correction Features

    Photoroom’s Product Beautifier enhances photos by adjusting lighting, sharpness, and angles, delivering studio-quality results. Its AI Shadows feature adds realistic depth, preventing images from looking flat. Additionally, the "Describe a Change" tool lets users request specific edits, like "make the lighting warmer", and the AI applies the changes automatically.

    GoodBuy Gear, a secondhand marketplace, used Photoroom to standardize over 42,000 product images in 2024. By automating background editing and ensuring uniform lighting, they saw a 23% boost in conversion rates. Product Owner Audra Jones remarked:

    "Photoroom changed everything for us. It automated the background editing, making every photo consistent. This has considerably streamlined our process, giving us the freedom to innovate and improve the speed at which products are made available online".

    Image Upscaling and Optimization

    Photoroom also offers tools like free AI image upscalers and "Resize and Expand" to adapt images for platforms such as Amazon, Shopify, and Etsy. The AI Expand feature adjusts aspect ratios without cropping, keeping products centered and formatted correctly for each channel. These tools ensure businesses maintain visual consistency while meeting the technical requirements of multiple marketplaces.

    Pricing and Scalability for Businesses

    Photoroom’s pricing is designed to grow with businesses. Plans start at $7.50 per month (billed annually) for the Pro plan, $20.99 per month for the Max plan, and $82.50 per month for the Ultra plan. API image edits range from $0.02 to $0.10 per image.

    Valuence Japan Inc. uses the Photoroom API to process 24,000 photos monthly, saving 600 hours of manual work and about $80,000 annually in editing costs. Deputy General Manager Takanori Hirai shared:

    "Photoroom has significantly reduced cost for us while improving quality. This is the kind of solution that’s well-suited for companies selling through e-commerce platforms, handling a large volume of products, and aiming for high image quality".

    Photoroom users have reported a 72% increase in click-through rates and a 60% reduction in cost per acquisition, highlighting its ability to improve both operational efficiency and sales performance.

    4. Flair.ai

    Flair.ai

    Flair.ai serves as a virtual design studio, offering a drag-and-drop canvas where users can craft product scenes using 3D assets, props, and digital backdrops. With an impressive monthly visitor count of around 577,100 as of early 2026, the platform has gained traction among e-commerce brands. Independent evaluations have awarded Flair.ai a perfect 10/10 for both its ability to preserve intricate product details – like textures and labels – and its extensive customization options.

    Background Removal Capabilities

    Flair.ai goes beyond basic background removal by focusing on scene staging. It allows users to place products in AI-generated environments, such as "emerging from water" or "floating on a cloud". For apparel brands, the AI Fashion Models feature is particularly handy, enabling clothing and jewelry designs to be fitted onto AI-generated models while keeping patterns and logos intact. Additionally, the Custom Human Builder lets brands tailor specific model features, like hair color and body type, ensuring a consistent look across their product catalogs.

    Lighting and Color Correction Features

    Flair.ai automatically adjusts lighting across scenes, ensuring that products, props, and backgrounds blend seamlessly as though photographed together. The tool also adds natural shadows and reflections, enhancing the realism of staged environments. This attention to detail earned it an 8/10 rating for product blending. With the ability to regenerate compositions in just three seconds and access to a library of pre-built templates and 3D elements, users can produce professional-grade designs quickly, without requiring advanced design expertise. These features make Flair.ai an efficient and cost-effective solution for scalable design workflows.

    Pricing and Scalability for Businesses

    Flair.ai provides flexible pricing options to suit different needs. The Free Tier includes 100 designs per month and supports up to 10 projects. For $10 per month, the Pro Tier unlocks unlimited designs and projects, along with access to the latest features. For larger businesses, the Enterprise plan offers custom pricing, API access, and team collaboration tools, allowing companies to scale their design operations and seamlessly integrate AI photography into their workflows. The platform also supports real-time collaboration, enabling multiple team members to work on the same design canvas simultaneously.

    5. WizStudio

    WizStudio

    WizStudio promises up to 20x cost savings and 10x faster product launches compared to traditional photography methods. It operates on a credit-based system, allowing businesses to create unlimited images for free and only pay when they download the final versions. Companies using WizStudio have also reported a 33% boost in conversion rates on their websites and marketplaces.

    Background Removal Capabilities

    WizStudio’s background removal tool is designed to simplify image editing. It effortlessly isolates products to produce clean, white-background images. But it doesn’t stop there. Users can generate lifestyle images by simply describing a scene – like “a vase in a cozy bedroom” – and the AI creates a visually appealing setting around the product. For businesses with multiple SKUs, the multiproduct staging feature arranges several items into a single styled image. Bulk editing capabilities let users process thousands of SKUs in minutes, while the Magic Eraser tool removes unwanted text and distractions, keeping the focus on the product.

    Lighting and Color Correction Features

    The platform’s AI relighting tool helps users adjust the lighting or mood of an image instantly, while the AI Shadows feature adds realistic depth to avoid flat, lifeless visuals. WizStudio also automatically refines colors and adjusts tones in raw images, ensuring a polished, professional look across entire product catalogs. Michael Pyle, VP of Ecommerce, shared his thoughts:

    "WizStudio is fast, affordable, and always high-quality. It has completely changed how we handle imagery".

    These tools work seamlessly alongside WizStudio’s advanced upscaling options.

    Image Upscaling and Optimization

    WizStudio’s Image Upscaler can upgrade images from 1K to 4K resolution in seconds. Additionally, the Generative Fill feature allows users to add custom props to images without the need for extra photoshoots. One client reported an impressive 20% increase in online revenue within just three months of enhancing their product visuals.

    Pricing and Scalability for Businesses

    WizStudio operates on a prepaid credit model. New users can start with a Free Trial that includes 5 credits. Paid plans range from the Starter package ($250 for 20 credits, valid for 2 months) to the Studio plan ($1,125 for 150 credits, valid for 6 months). Standard downloads in 1K/2K resolution cost 1 credit, while 4K upscales require 2 credits. Meredith Fingarson, Director of Marketing, shared her experience:

    "We got 300+ lifestyle images in just a few days at a fraction of the cost. No endless back-and-forths like with agencies, the team just understood our needs and delivered".

    6. Snapshot

    Snapshot

    Snapshot takes product photography to the next level with its Shopify-native AI app. Designed specifically for Shopify stores, this tool automates the process of creating professional product images by transforming backgrounds while keeping the product front and center. Since it integrates directly into your Shopify admin dashboard, you can attach AI-generated images seamlessly – no extra downloads needed. With over 1,000 customers and a perfect 5-star rating on the Shopify App Store, it’s a trusted solution for merchants looking to enhance and optimize their images for the web.

    Background Removal and Customization

    Snapshot makes background replacement effortless. It swaps out backgrounds for professional-looking settings, giving users the ability to reposition and resize products for creative, off-center compositions. The app offers two unique perspectives – 3D (angled) and bird’s-eye view – and includes a library of themes like Beach, Studio, and Cafe for quick, polished results. For those who want more control, advanced features like custom prompts and negative prompts let users fine-tune the image generation process. Each credit generates four image variations, and the tool supports bulk processing, making it perfect for stores with large product catalogs.

    Cost-Effective and Scalable for Businesses

    Snapshot significantly reduces the cost of product photography, producing images at just $0.45 each – an impressive 86× cheaper than the typical $39 cost of a physical photoshoot. The pricing structure is designed to suit businesses of all sizes:

    • Free Plan: Includes 5 credits.
    • $10 Plan: Offers 15 credits (around $0.67 per credit).
    • $50 Plan: Provides 100 credits (about $0.50 per credit).
    • $225 Plan: Includes 500 credits (roughly $0.45 per credit).

    Garrett from BULLDOG SNACKS shared his thoughts on the app:

    "The app is incredibly versatile and allows us to render retail-ready product images across our lineup in at least 5X shorter timelines than previously – at a fraction of the cost."

    Huttonian Designs also praised Snapshot, saying:

    "There’s lots of apps out there that will do AI backgrounds, but this is the only one that I’ve ever found which does them in bulk, and does a good job with them."

    With its combination of affordability, ease of use, and advanced features, Snapshot is a game-changer for businesses aiming to elevate their product photography.

    7. Pebblely

    Pebblely

    Pebblely’s AI platform has created an impressive 25 million images for over a million creatives worldwide. This tool is designed with e-commerce in mind, automatically removing backgrounds when you upload an image. By separating the product from its background, Pebblely allows users to reposition, resize, or rotate products with ease.

    Background Removal Capabilities

    Pebblely excels at background removal, automating the process upon upload while also offering tools for manual adjustments. With a brush tool, users can erase or restore parts of an image, adjusting brush size and zoom for precise edits. The platform also handles tricky elements like transparent parts of products. For instance, it can generate a realistic background to fill gaps between a bottle cap and the liquid inside. Additionally, you can remove unwanted objects or artifacts by brushing over them, and the AI will regenerate only the affected sections. This seamless separation of product and background pairs perfectly with advanced lighting adjustment features.

    Lighting and Color Correction Features

    Pebblely’s AI ensures products look natural in any setting by automatically generating reflections and shadows based on the chosen background or theme. If you already have marketing photos, you can upload them as references, and the AI will match the color palette to maintain brand consistency. As Robert Davidson shared:

    "The lighting, reflections, and shadows are all perfect and I got to create multiple pics for different occasions".

    The platform also includes a 2× upscaling feature, enhancing image dimensions to 2,048 × 2,048 pixels while sharpening product details and text.

    Pricing and Scalability for Businesses

    Pebblely offers flexible pricing to suit businesses of all sizes. The Free Plan includes 40 photos per month, access to over 40 themes, and standard background removal. For $19 per month, the Basic Plan provides 1,000 images, custom backgrounds, upscaling, and additional editing tools. The Pro Plan, at $39 per month, unlocks unlimited image generation and all premium features. Annual plans come with savings of about 20%, costing $179 per year for Basic and $379 per year for Pro. For businesses with higher demands, the Pebblely API can generate up to 200,000 images daily. Ewa Kwiatkowska from Eva Candles noted:

    "It effectively resolved the problem my business had been struggling with for many years, considering the dynamic nature of product changes and their variety".

    Conclusion

    AI-powered tools are reshaping e-commerce photography, slashing editing time by up to 70% while delivering professional-quality images. With 75% of online shoppers relying on product photos to make purchasing decisions, using AI tools is no longer just an option – it’s a competitive necessity.

    The seven tools highlighted earlier each bring practical benefits to businesses managing product catalogs of any size. These platforms handle tasks like AI-powered image editing tasks like background removal, lighting tweaks, and color correction with ease. For example, Shopify stores that have embraced AI automation have seen impressive results: a 35% boost in conversion rates and a 20-25% reduction in return rates, thanks to consistent, high-quality visuals. It’s clear that AI isn’t just about saving time – it’s about driving sales and streamlining operations.

    When choosing the right tool, consider factors like your catalog size, technical expertise, and output requirements. High-volume sellers should look for features like batch processing and API integration to handle large workloads efficiently. On the other hand, smaller businesses might prefer mobile-friendly tools with simple, one-click editing options. Take advantage of free trials to test how well each platform works with your specific products and style preferences.

    Traditional product photography, with its high costs and time demands, is becoming a thing of the past. According to Gartner, by 2026, 40% of e-commerce images will be AI-generated. As Ailee AI succinctly puts it:

    "If you’re still doing traditional product photography in 2025, you’re burning money".

    Now’s the time to choose the AI tool that best suits your needs and start transforming your product visuals into a powerful driver of sales and customer satisfaction.

    FAQs

    How can AI tools save time and reduce costs in e-commerce product photography?

    AI tools have transformed the way businesses handle tasks like background removal, lighting tweaks, and image optimization. These tools automate processes that used to require significant time and money. Instead of shelling out thousands for photographers, studio spaces, and post-production work, companies can now produce high-quality images with just a few clicks – cutting costs by as much as 90%.

    The time savings are just as striking. Traditional photoshoots can take days to plan, execute, and finalize. In contrast, AI-powered tools can deliver professional-grade images in mere minutes. This speed enables businesses to update product listings, roll out campaigns, or manage extensive catalogs without missing a beat – crucial in the fast-moving world of e-commerce.

    What features should I look for in an AI tool to improve my e-commerce product photos?

    When choosing an AI tool for e-commerce product photography, prioritize features that improve image quality and simplify your workflow. Look for options like automatic background removal, lighting and shadow adjustments, and AI-powered staging to create polished, professional visuals with minimal effort. For businesses managing extensive product catalogs, tools offering batch processing and API integration can save significant time and streamline operations.

    It’s also important to check for high-resolution export options and clear licensing terms, ensuring your images can be used across various platforms – whether for online marketplaces, advertisements, or print materials – without complications. If you’re planning to scale, features like team collaboration tools and branding options can help maintain a consistent look for all your product images. The right tool can elevate your product presentation and support stronger sales performance.

    Can AI-generated product images really help boost sales and reduce returns?

    AI-generated product images are a game-changer for boosting sales and cutting down return rates. Why? Because high-quality, lifelike visuals give shoppers a clear idea of what they’re buying, which helps build trust. When customers feel confident about their purchase, they’re more likely to hit “buy” and less likely to return items due to unmet expectations.

    These tools also make life easier for businesses. They handle tasks like removing backgrounds, adjusting lighting, and even creating lifestyle images – all automatically. This means companies can quickly refine and test visuals for product listings, ads, or social media. The result? Consistent, polished images that save time, reduce costs compared to traditional photo shoots, and leave customers happier with what they see.

    Related Blog Posts

  • How to Remove Backgrounds from Images in Seconds

    How to Remove Backgrounds from Images in Seconds

    Removing image backgrounds doesn’t have to be complex or time-consuming. With tools like PixelPanda, you can achieve professional results in just three steps:

    1. Upload your image: Drag and drop or select files (up to 40MB) for processing. Batch processing is available for handling multiple images at once.
    2. AI background removal: The tool automatically isolates the subject, preserving details like hair or fur.
    3. Edit and download: Refine edges if needed, then download as PNG (transparent) or JPG (solid background).

    PixelPanda is a practical solution for e-commerce sellers and content creators, offering features like high-resolution outputs, batch processing, and AI-generated backgrounds. Plans start at $39/month, making it an efficient choice for businesses of all sizes. Save time and effort while maintaining sharp, polished visuals.

    BEST Ai Bulk Background Remover Ever?! (FREE)

    How PixelPanda Removes Backgrounds

    PixelPanda

    PixelPanda takes the hassle out of background removal by fully automating the process. Using AI trained on millions of real-world images, the platform quickly identifies and isolates your subject – whether it’s a product, person, car, or even an animal – from the background. The entire process takes just 3 seconds, saving you from the time-consuming task of manual tracing. This efficiency is a game-changer for modern e-commerce, where polished images are a necessity.

    PixelPanda’s Background Removal Features

    With just one click, PixelPanda’s AI pinpoints the subject in your image and removes the background. Its advanced edge detection excels at handling intricate details like hair, fur, and feathers, delivering clean and precise cutouts.

    "I’m surprised how accurate and smooth the cut-out edges are. I always wanted a super fast background remover." – Andrea Mangano, Product Designer

    PixelPanda supports high-resolution outputs of up to 25 megapixels, ensuring your images remain sharp and professional whether they’re used online or in print. For areas that require extra attention, such as low-contrast edges, the platform includes refinement tools that let you make manual adjustments while the AI handles the heavy lifting.

    For those managing large volumes of images, PixelPanda offers batch processing, allowing you to upload and edit up to 1,000 images at once. This feature is perfect for maintaining consistent quality across product catalogs. Developers can also take advantage of API integration to seamlessly incorporate PixelPanda’s background removal into their workflows. These tools make it easier to elevate both e-commerce listings and creative projects.

    Benefits for E-commerce and Content Creators

    PixelPanda solves a major problem for e-commerce sellers by enabling them to process entire catalogs in minutes. This ensures compliance with the clean, white background standards required by leading marketplaces. Research shows that high-quality AI-enhanced imagery can boost sales by 96% and improve sell-through rates by 56%.

    Content creators also gain from PixelPanda’s flexibility. Transparent PNGs integrate effortlessly into various platforms and designs, giving creators more freedom to experiment. Businesses using PixelPanda report cutting photo editing costs by up to 93%, freeing up resources for other creative endeavors. Whether you’re a seller or a creator, PixelPanda offers a fast and efficient way to achieve professional results.

    How to Remove Backgrounds with PixelPanda

    How to Remove Image Backgrounds with PixelPanda in 3 Steps

    How to Remove Image Backgrounds with PixelPanda in 3 Steps

    PixelPanda makes it easy to turn your photos into professional cutouts, even if you’re not a tech wizard. With its advanced tools, you can upload, process, and download your images in just three simple steps. Here’s how you can get started:

    Step 1: Upload Your Image

    First, log in to your PixelPanda account and head to the background removal tool. You can either drag and drop your image into the upload area or click the "Upload" button to browse your files. PixelPanda supports standard image formats, with a maximum file size of 40MB. If you’re on a mobile device, you can upload directly from your camera roll.

    To get the best results, use high-resolution images where the subject has clear, defined edges and minimal overlapping elements. The better the quality of your image, the easier it is for the AI to separate the subject from the background. If you have multiple images, PixelPanda’s batch processing feature allows you to handle them all at once.

    Step 2: Let the AI Do the Work

    Once your image is uploaded, the AI takes over. It uses CNN-based analysis to separate your subject from the background, carefully preserving details like hair strands, fur, shadows, and other intricate edges.

    "The visual quality of a clipping mostly comes from the quality of the edges." – Aurélien Houdbert, Data Scientist at Vestiaire Collective (September 2023)

    This advanced processing ensures that even complex details are handled with precision.

    Step 3: Review, Edit, and Download

    After the AI finishes processing, you’ll get a preview of your image. If you notice any areas that need adjustment, use the Erase and Restore tools to fine-tune the edges. For even more precision, try the Magic Brush feature – it allows you to brush over areas while the AI refines the edges automatically.

    Before downloading, decide whether you’d like to keep the background transparent or replace it with a solid color, gradient, or even an AI-generated backdrop. To maintain transparency, save your image as a PNG file. If you save it as a JPG, it will automatically add a solid white background. For marketing materials or large-scale prints, opt for the high-resolution download to ensure your image looks sharp and professional. And just like that, your edited image is ready to shine!

    Additional Features for Better Visuals

    PixelPanda doesn’t just stop at quick background removal – it also brings tools that give you more creative control while streamlining your workflow.

    Batch Processing and High-Resolution Outputs

    Editing a large number of photos one by one can be a huge time sink. That’s where PixelPanda’s batch processing comes in. It lets you process over 1,000 images at once, removing backgrounds from all of them in one go. Each image is processed in just about 3 seconds, and the results are packed into a single ZIP file for easy downloading. This is a huge time-saver, especially for tasks like seasonal product launches or updating large catalogs.

    Need your images to meet platform standards like Amazon or Google Shopping? This feature automatically applies clean, white backgrounds to your photos. And if you’re working with smaller images, PixelPanda’s AI Image Upscaler has you covered. It can enlarge photos by 2x, 4x, 6x, or even 8x using the best AI image upscaler tools without losing quality, making them perfect for print materials or high-resolution digital use.

    But PixelPanda doesn’t stop at efficiency – it also helps you create visuals that stand out.

    Adding AI-Generated Backgrounds

    After removing the background, why not take it a step further? With PixelPanda’s AI Background Generator, you can replace the empty space with a custom scene. All you need is a simple text prompt – something like "marble table with soft sunlight" or "wooden table with flowers in warm tones" – and the tool creates a photorealistic background that matches your product’s lighting and angles.

    This feature is perfect for creating lifestyle images without the hassle of booking a studio or setting up props. You can even tweak your visuals for seasonal promotions or holidays, with the AI automatically adjusting shadows and perspectives to ensure everything looks natural. Save your final images as PNG files to keep transparency or as JPGs for immediate use.

    PixelPanda combines speed, precision, and creativity to make your visuals not just functional, but striking.

    PixelPanda Pricing and Plans

    PixelPanda uses a credit-based subscription model, giving users monthly credits for tasks like background removal, batch processing, AI-created backgrounds, and image upscaling tools. Here’s a breakdown of how the plans are designed to suit different business needs.

    Plans for Different Users

    • Starter Plan: Priced at $39/month (billed annually), this plan provides 7,000 credits. That’s enough for 7,000 images or 350 videos, making it a great choice for small e-commerce businesses or individual creators.
    • Growth Plan: At $59/month, this plan includes 15,000 credits, which can be used for 15,000 images or 750 videos. It’s tailored for businesses that are expanding their operations.
    • Pro Plan: For $89/month, users get 35,000 credits, covering 35,000 images or 1,750 videos. This plan also unlocks additional features like batch processing, AI background generation, and multi-language support.

    Flexible Pricing for Small Businesses

    PixelPanda’s pricing model is designed to be budget-friendly while offering professional-grade tools. Whether you’re a solo entrepreneur or managing a larger business, you can enjoy predictable monthly costs without worrying about high per-image fees. Start with the Starter plan and easily upgrade as your needs grow. Plus, every plan includes commercial usage rights, so you can confidently use your edited images for product listings, ads, social media, and even print materials.

    Conclusion

    PixelPanda takes the hassle out of image editing, making background removal quick and effortless. With its AI-powered tools, you can process images in just seconds while maintaining intricate details. Whether you’re running a small e-commerce business or scaling up your content production, PixelPanda is equipped to handle large projects with ease.

    The platform offers credit-based pricing starting at $39/month, which includes commercial usage rights, AI-generated backgrounds, and video processing – providing a complete toolkit for creating stunning visuals. This makes it a game-changer for e-commerce marketers and content creators aiming to produce high-quality imagery consistently.

    Accessible via web browsers, iOS, and Android, PixelPanda allows you to edit anytime, whether you’re on your desktop or mobile device.

    Looking to streamline your visual content creation? Try PixelPanda today and discover how its AI-powered background removal can save you valuable time while delivering studio-grade results.

    FAQs

    How does PixelPanda’s AI handle intricate details like hair or fur when removing backgrounds?

    PixelPanda’s AI is crafted to tackle the tricky details in images, like individual strands of hair or delicate fur, with impressive precision. Thanks to its advanced algorithms, it can meticulously detect and separate even the most intricate edges from their backgrounds, delivering a clean and polished finish.

    Whether you’re editing portraits, pet photos, or intricate product shots, PixelPanda’s technology ensures those fine details stay intact, giving your images a refined and natural appearance. It’s fast, efficient, and perfect for producing high-quality visuals without the hassle.

    Can I remove backgrounds with PixelPanda on my mobile device?

    PixelPanda works smoothly on mobile devices, offering a hassle-free way to remove image backgrounds. Whether you’re using a smartphone or tablet, the interface remains just as user-friendly as it is on a desktop.

    This means you can edit your images wherever you are, making it a convenient option for quick, on-the-go adjustments.

    What are the advantages of using AI-generated backgrounds with PixelPanda?

    Using AI-generated backgrounds with PixelPanda means you can work faster, more precisely, and with more creative options. The platform’s automated tools remove backgrounds from images in just seconds, delivering clean, transparent PNG files that are ready for you to customize. This saves you from the hassle of tedious manual edits, letting you focus on producing polished visuals in no time.

    PixelPanda also brings consistency and versatility to your projects. By isolating the subject, you can effortlessly add custom backgrounds – whether it’s a brand-specific color, a themed graphic, or a lifestyle setting. This makes it easy to align your visuals with your brand identity while keeping a professional, cohesive look for e-commerce listings, marketing materials, or social media content.

    Related Blog Posts

  • AI Photo Editing vs Traditional Editing: Which Wins?

    AI Photo Editing vs Traditional Editing: Which Wins?

    AI photo editing saves time and cuts costs, while manual editing ensures precision for high-end projects. Here’s the breakdown:

    • Speed: AI completes tasks in seconds, ideal for large batches (e.g., 1,000 images in an hour). Manual editing takes longer but allows detailed adjustments.
    • Cost: AI tools for photo editing reduce costs by up to 90%, with subscriptions as low as $8.33/month. Manual editing involves higher labor and equipment expenses.
    • Quality: AI delivers consistent results for repetitive tasks like background removal. Manual editing excels in areas requiring artistic judgment, such as luxury branding or intricate textures.
    • Best Use Cases: AI works well for e-commerce catalogs and marketplace compliance. Manual editing is better for premium campaigns, hero shots, and products with complex details.

    Quick Comparison

    Feature AI Editing Manual Editing
    Speed 2–5 seconds per image 10–30 minutes per image
    Cost $0.28–$15 per image $10–$100 per image
    Consistency High across large batches Depends on editor’s focus
    Creative Control Limited, relies on algorithms Full, allows for detailed choices
    Best For High-volume, repetitive tasks Luxury, intricate, or artistic work

    Takeaway: Combine both methods for efficiency and quality – let AI handle repetitive tasks, and use manual editing for refining key visuals.

    AI vs Manual Photo Editing: Speed, Cost and Quality Comparison

    AI vs Manual Photo Editing: Speed, Cost and Quality Comparison

    AI Photo Editing vs. Manual Edits – Which is better? (Real Workflow test)

    Speed and Efficiency Comparison

    When it comes to speed, AI-powered editing tools are in a league of their own. Take background removal as an example: AI tools can handle this task in just 2–5 seconds per image. Compare that to manual methods, which typically require 10–30 minutes per image – a staggering 40–70 times faster. For e-commerce businesses juggling hundreds or thousands of photos, this time savings is monumental, especially when processing large batches.

    The efficiency gap widens even further with batch operations. Cropping and resizing 1,000 images manually might take 70–80 hours of work. With AI automation, that same job can be completed in about an hour – cutting the time needed by roughly 98%. Portrait photographer Ernesto put AI retouching to the test against his manual workflow. He noted, "Both portraits looked good, but the AI version took a fraction of the time". For him, manually retouching 40 portraits took over 5 hours, while AI finished the same batch in under 7 minutes.

    Task Completion Time Breakdown

    Task Manual Method AI Method Efficiency Difference
    Background Removal 10–30 minutes/image 2–5 seconds/image 40–70x faster
    Portrait Retouching 10–20 minutes/image 5–10 seconds/image ~120x faster
    Batch Processing (1,000 images) 70–80 hours ~1 hour 98% time reduction
    Cropping & Resizing 5–8 minutes/image Seconds (automated) Up to 70x faster

    Another factor to consider is the learning curve. Traditional software like Photoshop can demand over 100 hours of training to reach a professional level. In contrast, AI editing tools are designed for ease of use, allowing users to produce results within minutes of starting, making it easier than ever to improve image quality online.

    Automation and Batch Processing

    AI doesn’t just accelerate individual tasks – it transforms entire workflows. Batch processing with AI applies preset edits across multiple images instantly, eliminating repetitive manual steps. Once you set parameters like white backgrounds, dimensions, or color corrections, the system applies them automatically to your entire catalog.

    This feature is especially critical for industries like fast fashion, where brands launch anywhere from 1,000 to 4,500 new products monthly. With 4–7 images required per SKU, teams face tight deadlines. Some AI tools can process over 100,000 images daily with a 95% success rate. PixelPanda, for example, uses an API-based system that delivers processing times under 5 seconds per image. What used to take 2–3 days of manual effort can now be done in about an hour, freeing your team to focus on creative strategies rather than repetitive tasks.

    Quality and Precision Analysis

    When it comes to maintaining your brand’s impeccable visual standards, quality is just as important as speed. Both AI and manual editing have their own strengths, and knowing when to use each can help you optimize your workflow.

    AI Editing Advantages

    AI image editing isn’t just about speed – it also delivers consistent, high-quality results. When you’re handling thousands of product images, AI ensures uniformity across the board, eliminating the risk of fatigue or human error.

    One area where AI shines is edge detection. Advanced AI tools can handle intricate details like hair, fur, and textured surfaces with remarkable precision, completing tasks in seconds that would take a human editor anywhere from 10 to 30 minutes. For instance, PixelPanda’s background removal tool can create clean cutouts in under five seconds per image.

    AI also excels at routine tasks. Whether it’s removing blemishes or reducing shine, AI delivers consistent results in a fraction of the time – what might take 15 to 45 minutes manually is done in mere seconds.

    Manual Editing Advantages

    On the other hand, manual editing brings a level of artistic judgment that AI simply can’t replicate. Take portrait photographer Ernesto, for example, who explained his deliberate choices in retouching:

    "I’m leaving the under-eye line because it makes it look human. If I remove everything, it looks fake."

    This kind of decision-making preserves authenticity and requires a human touch.

    For high-end retouching, manual editing remains unmatched. Complex tasks like creating ghost mannequins (the "floating garment" effect), intricate body sculpting, and precise makeup enhancements demand human expertise. These tasks require creative control and pixel-perfect adjustments, which AI struggles to deliver. For luxury e-commerce, magazine covers, and editorial campaigns, manual editing is still the gold standard.

    AI can also falter in areas requiring extreme precision. For example, AI masks sometimes "bleed" into unintended areas, affecting teeth, hair, or beards when only skin tones need adjustment. In fields like medical, legal, or scientific photography, where accuracy is critical, manual tools provide the reliability AI can’t guarantee.

    Feature Comparison Table

    Feature AI Capability Manual Capability E-commerce/Content Example
    Background Removal 2–5 seconds; excellent edge detection for hair/fur 10–30 minutes; requires detailed masking High-volume product catalogs
    Skin Retouching Instant; consistent blemish and shine removal across batches 15–45 minutes; allows for subtle, natural-looking results Premium beauty ads
    Consistency Uniform results across all images in a batch Depends on editor’s focus; prone to fatigue and errors Social media content feeds
    Creative Control Limited; relies on preset algorithms or prompts Maximum; every detail can be fine-tuned for artistic vision Magazine covers and hero imagery
    Ghost Mannequin Limited; struggles with replicating garment shapes without a model High; achieves "floating garment" effects through compositing Apparel photography for web stores

    Interestingly, a 2025 photography report revealed that 99% of clients were satisfied with AI-assisted results, with only 1% raising concerns about authenticity. For most commercial projects, AI meets professional standards – but knowing when to switch to manual editing can elevate your workflow from good to exceptional.

    Next, we’ll dive into the cost and resource considerations to help refine your approach further.

    Cost and Resource Requirements

    Traditional photography comes with a hefty price tag, often ranging between $2,045 and $2,980 just for equipment. This includes camera bodies ($1,300–$1,600), lighting ($245–$380), and accessories ($500–$1,000). On top of that, ongoing costs like hiring photographers ($500–$3,000 per day), models ($300–$2,000), and studio rentals ($200–$1,000 per session) can quickly add up. A professional fashion shoot alone can cost anywhere from $2,000 to $15,000.

    In comparison, AI-powered photography slashes these expenses dramatically. Instead of large upfront investments, AI operates on predictable monthly subscriptions ranging from $8.33 to $299, bringing per-image costs down from $55–$160+ to as little as $0.28–$15. Companies using AI tools report savings of 70% to 90%, with fashion brands seeing an average cost reduction of 87%. For small businesses, the impact is even more striking – 76% report cutting visual content production costs by over 80% after adopting AI tools.

    Cost Breakdown

    The hidden costs of traditional photography make the gap even wider. Expenses like shipping product samples to studios, coordinating schedules, and dealing with reshoots (which happen 15–20% of the time on average) add significant overhead. Manual retouching, another costly element, ranges from $10 to $100 per image, with revisions costing an additional $50 to $150 each. In contrast, AI tools often include unlimited revisions in their subscription plans. Platforms like PixelPanda can handle tasks like background removal in seconds, a process that might take manual editors 10–30 minutes.

    Let’s look at a five-year comparison for a small business processing 100 images per month:

    • Free AI tools: $0
    • Adobe plans: Around $1,200
    • Manual labor: Over $10,000

    When you combine these savings with the time efficiencies AI offers, it’s clear why AI is becoming the go-to solution for high-volume e-commerce operations.

    Scalability for E-Commerce

    AI also shines when it comes to scalability. With traditional photography, costs rise proportionally with the number of products – double the catalog, and you’ll likely double the budget. AI platforms break this pattern by allowing businesses to create hundreds of image variations at nearly the same cost as a small batch. High-volume retailers can process entire catalogs in just one hour, compared to the two to three days required for traditional methods.

    Here’s a real-world example: In December 2025, Sarah Chen, founder of a sustainable fashion startup, used AI to create five lifestyle variations for 45 products. A traditional shoot was estimated to cost $35,000–$40,000, but with AI, she completed the project for under $500 in just two days. The result? A 23% increase in conversion rates.

    "I knew my product photos weren’t doing justice to the brand… But a lifestyle shoot for 45 products would have cost me USD 35,000-40,000 that I simply didn’t have."

    • Sarah Chen, Founder, Sustainable Fashion Brand

    For growing e-commerce brands managing thousands of SKUs or launching seasonal campaigns, AI eliminates the logistical headaches of studio scheduling and equipment rentals. Traditional workflows require a full team – photographers, stylists, models, and retouchers – while AI empowers a single designer or marketer to produce professional-quality results. This not only cuts costs but also provides the flexibility to scale content production without hiring more staff or booking lengthy studio sessions.

    Combining AI and Manual Editing

    Blending AI with manual editing strikes a balance between efficiency and quality. By allowing AI to handle the bulk of repetitive tasks, while leaving creative refinements to human editors, this hybrid approach maximizes both speed and precision. For instance, AI can take care of 80–90% of routine work, freeing up manual editors to focus on the finer details that demand a human touch.

    AI for Speed, Manual for Details

    AI thrives on repetitive tasks such as batch background removal, exposure adjustments, and surface cleanup. For example, it can process 1,000 images in less than 5 minutes, applying consistent edits like white balance adjustments, background removal, cropping, and cleaning up imperfections – all automatically. Once AI completes these tasks, manual editors step in to handle subjective decisions. This includes selecting the perfect "hero" shot that aligns with the brand’s identity, ensuring colors match specific palettes, and preserving natural textures to avoid an overly polished appearance.

    "AI replaces repetition and NOT craft. The constant masking, the zooming in and out… that’s the work photographers are happiest to offload." – Aftershoot

    For more complex projects, such as high-end e-commerce composites, a typical workflow might involve manually aligning product assets in Photoshop to ensure precise placement and perspective. AI tools like Generative Fill can then take over, harmonizing lighting, blending shadows, and creating seamless backgrounds. This combination ensures that the final product achieves pixel-perfect accuracy while saving time on labor-intensive tasks.

    Use Case: E-Commerce Product Photography

    A great example of this hybrid model in action is GoodBuy Gear, a secondhand marketplace that standardized over 42,000 product images using AI-driven workflows. They automated tasks like background removal API integration and image standardization across their catalog, which led to a 23% increase in conversion rates compared to their previous inconsistent imagery. However, manual quality checks were still performed on high-value items to ensure brand consistency and catch any AI-related errors.

    Here’s how their workflow looked: AI batch-processed images for background removal and marketplace-compliant cropping within minutes. Manual editors then refined premium listings to maintain brand standards. This approach slashed per-image costs from $2.00 to $0.25, an 80% savings, all while preserving the quality customers expect. For fast fashion brands that release anywhere from 1,000 to 4,500 new products each month, this hybrid workflow is essential to meet tight deadlines without compromising on visual appeal.

    This combination of AI and manual editing not only boosts efficiency but also ensures high-quality results, making it easier to determine the best use cases for each method.

    When to Use Each Method

    Deciding between AI and manual editing often comes down to the specifics of your project – how many images you’re working with, your deadlines, and the level of detail required. Here’s a closer look at when each method shines.

    Best Scenarios for AI Editing

    AI is a game-changer when it comes to handling large volumes of images quickly and consistently. If you’re processing anywhere from 500 to over 3,000 images a month, AI can cut timelines from days to just hours, achieving efficiency gains of 70–98% in the process. For instance, in 2025, the e-commerce platform Selency integrated Photoroom’s API to streamline its image processing. Within just 24–48 hours, they saw an 89% drop in costs compared to their previous manual workflow.

    AI is also perfect for marketplace compliance. Retailers on platforms like Amazon or eBay use AI to generate white backgrounds and standardized dimensions automatically, ensuring their listings meet platform guidelines seamlessly. Similarly, it’s ideal for social media and time-sensitive campaigns, where themed or seasonal backgrounds – like holiday or outdoor settings – can be created without the need for time-consuming photoshoots.

    Tools like PixelPanda are particularly effective at converting plain white-background product shots into engaging lifestyle images. When it comes to standardized retouching across high volumes, AI delivers unmatched consistency, a challenge for even the most skilled human editors. In fact, a 2025 photography report found that 99% of clients were satisfied with AI-assisted results, citing speed and quality as top priorities over concerns about authenticity.

    But not every project is suited for AI. Some require the human touch to achieve the desired artistic finesse.

    Best Scenarios for Manual Editing

    Manual editing is the go-to choice for high-end, detail-oriented projects where every pixel matters. Think magazine covers, premium brand campaigns, and hero portraits – these demand the precision and creative input that only human editors can provide. As Victoria’s Secret Fashion Director Priscilla Polley puts it:

    "Styling tells the story of the company. Without it, you just have products. It’s the part that actually makes the brand resonate with people".

    Certain tasks, like creating ghost mannequins, liquifying, or body sculpting, require the expertise and judgment of a skilled editor. Manual editing is also essential for correcting manufacturing flaws, such as misplaced logos, incorrect hardware colors, or garments sent in the wrong size or length.

    Products with reflective or highly detailed surfaces – like intricate fabrics, polished metals, or gemstones – benefit significantly from manual editing. Luxury brands, for instance, rely on manual retouching for 68% of texture-heavy items because AI often struggles with the nuances of reflections and fine details. Skilled editors can manage light, shadows, and reflections to ensure these products look flawless. Manual editing also ensures color consistency across materials like silk, wool, and cotton, which is crucial for reducing the 22% of e-commerce returns caused by products appearing differently in person than they do online.

    Conclusion

    Select the approach that aligns best with your goals. AI can cut background removal time from minutes to mere seconds, offering a huge boost in efficiency – perfect for high-volume catalogs, marketplace compliance, or businesses processing over 500 images a month on a tight budget. On the flip side, manual editing shines when working with luxury products, intricate textures, or creative campaigns that demand pixel-perfect precision and artistic judgment.

    Many successful workflows combine both methods for the best results. This hybrid approach reflects the comparisons outlined earlier. AI takes care of repetitive tasks like background removal, basic color adjustments, and batch processing, while manual editing adds the finishing touches to hero shots and flagship products.

    "AI replaces repetition and NOT craft"

    Cost is another key factor. Some AI tools can process images for as little as $0.02 each, while manual editing involves a higher labor cost. By strategically blending both methods, you can maintain the human touch where it truly matters.

    For those looking to streamline e-commerce workflows without compromising quality, PixelPanda offers tools to automate background removal, craft professional product photos, and create lifestyle images that drive conversions – all while freeing your team to focus on creative decisions that set your brand apart.

    FAQs

    When should businesses choose AI photo editing over manual editing?

    The decision between using AI photo editing or manual editing boils down to your project’s specific needs, including factors like volume, complexity, deadlines, and budget.

    • AI editing shines when speed and uniformity are critical. It’s an excellent choice for handling large batches of images, such as e-commerce product photos or fast-moving campaigns. Tasks like background removal, color corrections, or lighting adjustments can be completed quickly and consistently at scale.
    • Manual editing, on the other hand, is the go-to for projects that demand creativity, precision, or a tailored approach. If you’re working on visuals that need artistic flair, a distinct style, or intricate adjustments, manual retouching offers the level of control needed to bring your vision to life.

    When making your choice, think about the number of images you need to process, how tight your deadlines are, the complexity of the edits, your budget, and whether your brand requires a signature aesthetic. Matching your needs to the strengths of each method can help streamline your process and deliver the results you’re aiming for.

    How can AI photo editing save costs for small businesses?

    AI-powered photo editing is a game-changer for small businesses, helping them save money by automating tasks that once required skilled professionals or pricey photoshoots. Tasks like background removal, color adjustments, and image touch-ups can now be completed in moments, cutting down the need for freelance retouchers or dedicated in-house staff.

    These tools also speed up workflows by processing large volumes of images in just seconds, slashing the time and effort typically required. On top of that, they eliminate expenses like studio rentals, hiring models, or scheduling lengthy photoshoots. What used to cost hundreds of dollars per image can now be achieved in minutes with a budget-friendly monthly subscription.

    For small businesses, this means more than just cost savings – it offers predictable, flat-rate pricing for photo editing while still delivering the professional quality essential for thriving in e-commerce.

    When is manual photo editing better than AI-powered tools?

    Manual photo editing shines when precision, creative control, and subtle adjustments are needed. For instance, human editors excel at tackling complex details like strands of hair, translucent fabrics, or intricate product textures – areas where AI tools often fall short.

    This approach is also perfect for projects that demand a distinct, artistic touch, such as luxury branding or editorial photography. Experienced editors can carefully adjust tone, color, and style to align with a specific aesthetic, steering clear of the overly processed look that AI can sometimes produce. Manual editing becomes crucial for high-stakes retouching, like maintaining natural skin textures or crafting seamless composites, where even the smallest details make a huge difference. These capabilities make manual editing a go-to choice for delivering top-tier quality and personalized visual content.

    Related Blog Posts

  • 10 Ways AI Tools Cut Marketing Costs for Small Business

    10 Ways AI Tools Cut Marketing Costs for Small Business

    For small businesses, AI tools are saving time and money by automating repetitive tasks, reducing reliance on expensive services, and improving marketing results. Businesses adopting AI report saving up to $24,000 annually while freeing up resources to focus on growth. Here’s a quick look at how AI tools are helping:

    • Visual Content Creation: Tools like PixelPanda replace costly designers with affordable AI-generated visuals.
    • Content Writing: Jasper speeds up writing by 40%, cutting costs by up to 50%.
    • Email Automation: Mailchimp boosts click rates by 115% with AI-driven campaigns.
    • Ad Management: Adzooma optimizes ad spend with real-time adjustments.
    • Customer Support: ManyChat reduces support costs with AI chatbots handling 70% of inquiries.
    • Sales Optimization: HubSpot‘s AI automates lead scoring and saves hours on manual tasks.
    • A/B Testing: Optimizely simplifies testing and improves campaign performance.
    • Competitive Analysis: Crayon provides real-time market insights without expensive research.
    • Energy Efficiency: Google AI tools cut costs by automating workflows and improving ad targeting.
    • Workflow Automation: Zapier connects apps to eliminate manual tasks, saving up to 40% on marketing costs.

    These tools are affordable, easy to use, and designed to help small businesses compete effectively without stretching budgets. Whether it’s creating visuals, automating emails, or managing ads, AI tools offer practical solutions to cut costs and achieve better results.

    10 AI Tools That Cut Marketing Costs for Small Businesses - Cost Savings and ROI Comparison

    10 AI Tools That Cut Marketing Costs for Small Businesses – Cost Savings and ROI Comparison

    1. PixelPanda: AI-Powered Visual Content Generation

    PixelPanda

    Saving Money Without Sacrificing Quality

    For small businesses, every dollar matters. PixelPanda steps in as a game-changer by reducing the need for pricey designers or stock photo subscriptions. With its $39/month Starter plan, businesses can create original visuals and videos from simple text prompts, slashing design expenses significantly.

    On top of that, PixelPanda can churn out hundreds of ad variations in no time, making creative testing much more affordable. What used to be an advantage for companies with big budgets is now accessible to smaller businesses looking to optimize their marketing campaigns effectively.

    Tailored for Small Business Marketing

    PixelPanda delivers exactly what small businesses need for their marketing efforts: social media graphics, short-form videos, blog thumbnails, product photos, and even headshots – all without the hassle of a traditional photoshoot.

    E-commerce businesses, in particular, can benefit from its AI fashion studio and product placement tools, which allow them to display products on virtual models or in realistic settings. Plus, with voiceovers in 35 languages and built-in commercial rights, the platform is ready to support global marketing efforts.

    Simple to Use, Easy to Implement

    PixelPanda is designed for ease of use, seamlessly integrating into existing workflows without requiring technical know-how or major system changes. Even those with minimal design experience can create professional-quality visuals thanks to its user-friendly interface.

    For businesses just starting out, the platform offers a "start small" approach. The Starter plan includes enough credits – 7,000 images or 350 videos per month – to experiment and find what works best before committing to larger-scale use.

    Next, we’ll dive into other AI tools that are helping small businesses streamline their workflows and cut costs.

    2. Jasper: Automated Content Creation

    Jasper

    Cost Savings Potential

    Creating content can be expensive, but Jasper helps businesses cut those costs significantly – by as much as 30–50%. On top of that, it speeds up content delivery by about 40%. For companies that depend on regular blogs, social media posts, or ad copy, these savings can make a huge difference.

    Take Mongoose Media as an example. By using Jasper, they reduced the time spent on writing a single blog post from 8–10 hours to just 2 hours. This efficiency helped them achieve a 166% increase in organic traffic. Similarly, Spinta Digital leveraged Jasper in a 90-day campaign to lower marketing costs by 38%, boost ROI by 2.6x, and improve lead quality by 42%.

    Impact on Operational Efficiency

    Jasper isn’t just about saving money – it’s about working smarter. It simplifies workflows for small teams by analyzing brand assets. With over 50 pre-built templates for tasks like blog outlines, product descriptions, social media captions, and video scripts, Jasper can generate drafts in mere minutes. It even integrates seamlessly with SEO tools like SurferSEO to optimize content in real-time.

    Once you upload your business details, Jasper creates factually accurate, tailored copy for your products or services. Need to adjust the tone? You can do that with a single click. This streamlined process translates directly into better productivity for small business marketing.

    Relevance to Small Business Marketing Needs

    Small businesses often face the challenge of managing multiple marketing channels with limited resources. Jasper addresses this by not only reducing costs but also simplifying the content creation process. It’s versatile enough to handle emails, landing pages, ads, and social media content. Plus, with support for over 30 languages, Jasper enables businesses to expand into global markets without needing additional translation services.

    The Creator plan starts at $39 per month (when billed annually), making it affordable for budget-conscious businesses. A 7-day free trial is also available, so you can try it out before making a commitment. Considering that 72% of businesses now utilize AI for marketing and sales, Jasper gives small businesses a chance to compete effectively.

    Ease of Implementation

    You don’t need to be tech-savvy to get started with Jasper. Its user-friendly dashboard makes it easy to upload your brand data and begin creating content. Most users treat Jasper as a starting point – it generates the first draft, which can then be polished by a human editor.

    "AI tools now enable brands to produce high-quality, optimized content in a fraction of the time." – Spinta Digital

    Start small by using Jasper for one type of content, and then expand its use as you grow more comfortable with the platform.

    3. Mailchimp: Email and Social Media Automation

    Mailchimp

    Cost Savings Potential

    Mailchimp’s AI-powered automation delivers impressive results, offering up to 24X ROI and increasing email click rates by 115%. These numbers highlight the financial benefits Mailchimp brings to businesses.

    One standout feature is Intuit Assist, which drafts, edits, and refines emails instantly. This tool eliminates the heavy reliance on professional copywriters. Jack Tadd, Managing Director at Warm Glass UK, shared how it transformed his team’s workflow, cutting content creation time from 30 minutes to just a few minutes.

    "The copy is a perfect starting point, and making changes would take just a few minutes rather than taking half an hour. It’s like having that digital assistant that allows you to become an editor rather than a writer." – Jack Tadd, Managing Director, Warm Glass UK

    Impact on Operational Efficiency

    Mailchimp streamlines repetitive marketing tasks, allowing teams to focus on strategy rather than execution. Pre-built marketing flows like welcome sequences, abandoned cart recovery, and win-back campaigns are operational after a quick setup. Tools for optimizing send times and days analyze past engagement data to maximize delivery effectiveness.

    With features like integrated content creation, audience segmentation, and analytics, Mailchimp empowers small teams to handle tasks that would otherwise consume significant time. This efficiency opens up opportunities to prioritize broader marketing strategies.

    Relevance to Small Business Marketing Needs

    Mailchimp democratizes advanced marketing tools, making features like predictive segmentation and personalized campaigns accessible to small businesses – capabilities that were once reserved for larger companies.

    "AI as a service levels the playing field by giving small businesses access to sophisticated marketing capabilities that would otherwise be out of reach." – Mailchimp

    The Standard Plan includes advanced automation and optimization tools, while Intuit Assist (currently in beta) is available at no extra cost for Premium, Standard, and Legacy users in select countries. A free trial lets businesses explore these features before committing, making it easier to assess its value.

    Ease of Implementation

    Mailchimp’s user-friendly design is perfect for small businesses. You can start with a single automated flow – like a welcome sequence or an abandoned cart reminder – and expand as you see results. The Write with AI feature simplifies content creation by generating first drafts, letting you refine your brand’s voice without starting from scratch. This balance of simplicity and functionality makes Mailchimp a practical choice for businesses looking to enhance their marketing efforts.

    4. Adzooma: Analytics and Campaign Optimization

    Adzooma

    Cost Savings Potential

    Adzooma helps businesses cut down on unnecessary expenses by leveraging AI to predict spending patterns more accurately. Instead of relying on trial-and-error methods, the platform uses automation and real-time data to adjust bids, ensuring you get the most out of your advertising budget. Its AI-powered tools analyze audience behavior and adjust campaigns accordingly. Additionally, Adzooma’s rule-based management system allows users to set custom rules – such as pausing underperforming ads or increasing budgets for high-performing ones – minimizing wasted spend and improving overall efficiency. This smarter spending approach simplifies daily campaign management.

    Impact on Operational Efficiency

    Adzooma doesn’t just save money – it saves time. For small marketing teams, juggling multiple platforms like Google Ads, Microsoft Ads, and Meta Ads (Facebook/Instagram) can be overwhelming. Adzooma consolidates all this data into one user-friendly dashboard, eliminating the hassle of switching between accounts. Its automated analytics provide real-time insights, cutting down the hours spent on manual reporting. Features like One-Click Optimizations analyze your account data and highlight actionable "Opportunities" to improve performance. From adjusting bids to reallocating budgets and refining targeting, these automated tools take care of repetitive tasks, freeing up more time for strategic decision-making.

    Relevance to Small Business Marketing Needs

    Adzooma’s predictive analytics are especially valuable for small businesses, helping them navigate the complexities of digital marketing with confidence. By forecasting campaign performance before significant spending occurs, the platform reduces financial risks and eliminates guesswork. It also automates multi-platform advertising, allowing business owners to focus on big-picture strategies rather than getting bogged down in spreadsheets and platform-specific dashboards. This AI-driven, streamlined approach empowers small businesses to compete effectively in the fast-paced world of digital marketing.

    5. ManyChat: AI-Driven Customer Personalization

    ManyChat

    Cost Savings Potential

    ManyChat’s AI chatbots take the hassle out of round-the-clock customer support. They can manage up to 70% of routine inquiries, automate lead follow-ups, and handle email nurturing – all without requiring a 24/7 support team. Considering that 90% of customers expect immediate responses to their service questions, this level of automation isn’t just a convenience – it’s a game-changer. It slashes costs while keeping your daily operations running smoothly.

    Impact on Operational Efficiency

    By analyzing customer data like website activity and purchase history, ManyChat creates personalized offers that drive higher click-through rates and conversions. These chatbots don’t just answer questions; they qualify leads, set up meetings, and handle repetitive tasks so your team can focus on more strategic work. For businesses juggling multiple time zones or catering to global audiences, the 24/7 availability ensures you never miss a potential customer. Plus, its intuitive setup makes it easy to integrate into your workflow.

    Ease of Implementation

    ManyChat keeps things simple with a no-code platform that lets small business owners build functional chatbots in no time. Its plain-text interface allows you to create AI agents capable of qualifying leads and scheduling appointments using natural language instructions. This means you can start automating customer interactions right away, without needing a developer or spending weeks learning complex systems. It’s automation made easy.

    6. HubSpot: Automated Lead Scoring and Sales Optimization

    HubSpot

    Cost Savings Potential

    HubSpot’s AI platform, called Breeze, streamlines lead management and reduces the need for extra staffing. With tools like the Breeze Prospecting Agent, it identifies buying signals and researches prospects, cutting out the need for additional sales development reps. For example, Agicap saved an impressive 750 hours per week and increased deal velocity by 20%. Similarly, Sandler experienced a 4× growth in sales leads and a 25% boost in engagement. Thanks to predictive lead scoring built into the CRM, sales teams can zero in on high-value prospects, avoiding time wasted on manual qualification.

    Impact on Operational Efficiency

    Breeze ensures your pipeline stays organized by deduplicating contacts and logging call notes automatically. It focuses on high-intent actions, such as website visits and form submissions, so your marketing budget targets the leads most likely to convert. Additional features, like the Email Content Assistant, draft polished outreach messages, while the Reporting Assistant creates instant data visualizations, making specialized data analysts unnecessary. Rachel Nicholson from HubSpot highlights the platform’s efficiency:

    "Breeze takes the heavy lifting out of manual updates – from deduplicating contacts to capturing call notes – so your pipeline stays clean and your reps stay focused on revenue."

    Ease of Implementation

    HubSpot’s AI tools are designed to be user-friendly, even for non-technical users. The free CRM offers basic features for beginners, while paid Sales Hub plans start at $100 per month. The Breeze Studio allows customization of AI tools without requiring any coding skills, and it integrates effortlessly with your existing CRM data. For round-the-clock support, the AI Chatbot Builder can qualify leads and schedule meetings without the need for technical expertise. Small businesses looking for a straightforward solution can opt for HubSpot’s Starter Customer Platform, which bundles essential tools into one package. This setup lets you create lead capture forms and manage data storage in just minutes. Up next, discover how dynamic workflow automation can simplify your marketing even further.

    7. Optimizely: Dynamic Content and A/B Testing

    Cost Savings Potential

    Optimizely’s AI-powered tools streamline the creation of multiple content variations – like email subject lines and ad copy – for A/B testing. This automation can drastically reduce production time. Recent studies show that 75% of marketers see a clear return on investment from AI, largely because it saves time on routine tasks. Leah Messenger, Content Marketing Manager at Optimizely, captures this sentiment perfectly:

    "AI has real potential to supercharge how marketing teams work… from shaving hours off campaign production to automating the kind of low-value tasks that make your soul quietly leave your body."

    By automating these processes, teams not only save money but also improve their overall campaign strategies.

    Impact on Operational Efficiency

    Optimizely processes performance data at lightning speed, allowing even small teams to quickly spot which campaigns are hitting the mark. The platform can also generate campaign briefs and meeting summaries automatically, eliminating the need for specialized analysts. By taking over repetitive tasks like data entry and content tagging, Optimizely frees up your team to focus on creative and strategic work.

    Ease of Implementation

    Thanks to streamlined performance data, integrating Optimizely into your workflow is a simple process. The platform suggests starting with easy, "quick-win" A/B testing scenarios to ease adoption. By keeping your existing tools and processes intact, you can avoid unnecessary complexity. And as Leah Messenger wisely notes:

    "AI is only as good as the process it supports… and we’re here to help you build a damn good one."

    Before diving into automation, small businesses should first review their current marketing workflows. Fixing inefficiencies early ensures that you’re not scaling flawed processes and helps you get the most out of your investment.

    8. Crayon: Market Research and Competitive Analysis

    Crayon

    Cost Savings Potential

    Market research can often feel like a luxury for small businesses – it’s costly, time-intensive, and resource-heavy. Crayon changes the game by leveraging AI to gather competitive intelligence from sources like websites, review platforms, and industry publications. This eliminates the need for manual monitoring, which is both expensive and time-consuming. For small businesses without the budget for dedicated research staff, Crayon delivers insights at a fraction of the cost. Its AI engine filters through competitor data and sends alerts only when something relevant pops up, cutting down on unnecessary noise and improving operational focus.

    Impact on Operational Efficiency

    Crayon acts like an extra set of hands for your marketing team, taking over the labor-intensive tasks of tracking competitors. It integrates seamlessly with tools you’re probably already using – like Salesforce, HubSpot, and Slack – so you won’t need to overhaul your workflow. Instead of spending hours manually tracking competitor updates, your team gets real-time alerts about critical changes, such as pricing adjustments, new product launches, or shifts in customer sentiment. This allows your team to spend more time making strategic decisions and less time buried in data collection.

    Relevance to Small Business Marketing Needs

    Small businesses often struggle to balance the need for competitive intelligence with limited resources to gather it. Crayon bridges this gap by providing timely insights that help maintain a competitive edge. Its dynamic sales battlecards, powered by a real-time feed of competitive data, give your sales and marketing teams an always-updated resource to identify gaps in competitors’ offerings. This enables you to adjust your positioning quickly, which can make a big difference when you’re operating on a tight budget.

    Ease of Implementation

    Crayon is built with simplicity in mind. It offers native integrations with popular small business tools, so you can hit the ground running without overhauling your systems. Start small by tracking your top competitors, then expand as needed. By syncing Crayon with your CRM, your sales team gains instant access to competitive insights during live deals. With automated monitoring replacing manual data collection, your team can focus on crafting marketing strategies that deliver results.

    9. Google AI for Energy Optimization

    Cost Savings Potential

    Google AI tools are a game-changer for small businesses looking to cut costs. By automating labor-intensive tasks, these tools reduce the need for extra staff. For instance, Performance Max eliminates the guesswork in targeting high-value customers, saving time and money. Meanwhile, generative AI in Google Workspace allows businesses to produce more content without hiring additional team members using the best AI tools for marketing. The result? Lower labor expenses without sacrificing productivity, paving the way for smoother daily operations through AI marketing.

    Impact on Operational Efficiency

    Google AI tools, like Gemini in Workspace, are designed to help businesses "do more with less." They automate tasks such as organizing receipts, tracking project milestones, and summarizing lengthy documents. Features like Sheets’ "Help me organize" instantly generate tailored checklists and trackers, making tedious tasks a breeze. This frees up your team to focus on strategic planning and creative projects. Additionally, Google Analytics 4 leverages AI to provide predictive insights, giving even small businesses access to data-driven intelligence that rivals larger organizations.

    Relevance to Small Business Marketing Needs

    Google AI isn’t just about saving money and improving efficiency – it’s tailored to meet the core marketing challenges of small businesses. Small businesses make up 90% of all businesses worldwide and contribute to 50% of global GDP, so optimizing operations is critical. Selin Song, President of Google Customer Solutions, highlights this priority:

    "Whenever I meet small- and medium-size business (SMBs) owners across the globe, they continue to ask, ‘How can I find and keep the right customers and help my business grow with measurable results?’"

    By cutting down on wasted ad spend and streamlining labor, Google AI helps small businesses achieve cost-effective marketing results. It also identifies hidden inefficiencies, enabling smarter energy use and waste reduction – all without requiring major financial outlays.

    Ease of Implementation

    Getting started with Google AI is simple. Google provides free basic services and even offers an AI Essentials checklist to help you integrate these tools into your workflow. Start small – try upgrading to Google Analytics 4 to test its impact and value. And while AI can handle many tasks, maintaining human oversight ensures the decisions align with your brand’s vision and goals.

    10. Zapier: Workflow Automation and Integration

    Zapier

    Cost Savings Potential

    Zapier simplifies operations by connecting thousands of marketing apps into one streamlined system, reducing the need for time-consuming manual tasks. For small businesses, this means creating tailored solutions – like lead management, landing pages, and AI chatbots – without the need to hire specialized IT staff. The platform also includes built-in tools such as a form builder, database (Tables), and chatbot creator, which can replace multiple standalone subscriptions. By incorporating AI-driven automation, businesses can cut marketing costs by up to 40%. With a free plan for basic needs and premium options starting at $19.99 per month (billed annually), Zapier offers an affordable solution for small enterprises looking to maximize their budgets.

    Impact on Operational Efficiency

    Zapier excels at automating repetitive tasks like managing editorial calendars, scoring leads, and data entry. Its "Copilot" feature allows users to create custom automations just by describing their workflow in plain English, while the visual "Canvas" tool helps map out complex processes to identify and eliminate bottlenecks. According to marketing professionals, AI tools improve work quality by 43% and enhance creativity by 42%. Bryant Chou, Co-Founder of Webflow, captures this advantage perfectly:

    "It puts the tools into the hands of people who understand a task and lets them completely automate it away."

    Relevance to Small Business Marketing Needs

    For small businesses, automation can be a game-changer, especially when 25–30% of ad budgets are often wasted on underperforming campaigns. With 74% of marketers using AI to automate repetitive tasks and improve personalization, Zapier bridges the gap by connecting platforms like HubSpot, Slack, and Mailchimp – no technical expertise required. Its "Agents" feature can autonomously handle tasks like generating weekly campaign reports or managing lead engagement across multiple apps, allowing teams to achieve more without increasing payroll expenses.

    Ease of Implementation

    Zapier’s no-code design makes it incredibly easy to integrate into existing workflows. You can start with pre-made templates – such as linking Google Forms to your CRM – and see results almost immediately. The platform’s drag-and-drop "Canvas" editor simplifies workflow design, eliminating the need for programming skills. A smart approach is to begin by automating a high-effort, low-return task, like lead qualification or email scheduling, to quickly boost efficiency. Plus, with "AI by Zapier", you can add AI functionality to any workflow step, even if your connected tools lack native AI capabilities.

    How To Use AI to Start, Build & Grow Your Small Business (20 AI Marketing Tools!)

    Conclusion

    AI tools have become a game-changer for small businesses, offering solutions that save time, reduce costs, and improve efficiency. Today, marketers are heavily relying on AI marketing tools, and businesses that adopt these tools are gaining an edge over their competitors. Whether it’s creating visual content or automating workflows, AI is simplifying operations while keeping expenses in check. The examples shared earlier highlight how these tools can lead to practical and impactful strategies across digital marketing.

    The numbers speak volumes. For instance, Zoom cut communication costs by $210,000 using Grammarly Business, while PeakMade Real Estate saved $130,000 annually by speeding up content creation. BetterVet saw an astonishing 2,000% increase in organic traffic thanks to AI-powered SEO tools. Meanwhile, Ulta Beauty’s personalized, AI-driven marketing influenced a staggering 95% of their sales. These success stories show how small businesses can achieve big results by working smarter with AI.

    "AI allows small business owners to concentrate on achieving results rather than worrying about the work required." – Abílio Rodrigues, Content Editor, Pipedrive

    If you’re just starting, pick one repetitive task – like scheduling emails – and try an AI tool designed for that. Many platforms offer free trials or basic plans, making it easy to test their value and track ROI before committing to larger investments.

    While the immediate benefits of AI are clear, its long-term potential is even more exciting. With AI projected to contribute $15.7 trillion to the global economy by 2030, there’s no shortage of opportunities. The real question is: which tool will you try first to see fast results?

    FAQs

    How can AI tools help small businesses reduce marketing costs?

    AI tools are a game-changer for small businesses looking to cut marketing costs. By automating tasks like content creation, managing email campaigns, and handling social media, these tools free up valuable time and resources. Plus, with data-driven insights, they fine-tune targeting so your ads reach the right audience, cutting down on wasted ad spend.

    On top of that, AI-powered analytics offer real-time performance tracking. This means you can quickly tweak your strategies to avoid ineffective approaches. The blend of automation and precision allows small businesses to get more done with fewer resources, making marketing both efficient and impactful.

    What are some AI tools small businesses can use to improve marketing efficiency?

    AI tools offer small businesses a way to save both time and money while achieving better marketing outcomes. For instance, AI-driven content creation platforms can quickly produce blogs, social media posts, and ad copy, helping businesses maintain a consistent online presence. Similarly, social media scheduling tools automate posting and engagement, freeing up time for other tasks. Meanwhile, email automation software customizes campaigns, making it easier to connect with customers on a more personal level.

    Other useful tools include analytics platforms that leverage data insights to refine marketing strategies and AI-powered chatbots that deliver instant customer support, enhancing response times and customer satisfaction. By simplifying workflows and improving efficiency, these tools are a smart choice for small businesses working within tight budgets.

    How can small businesses start using AI tools without technical skills?

    Small businesses can now dive into the world of AI without needing any technical background, thanks to no-code platforms. These platforms come with pre-built templates and easy-to-follow workflows, making it simple to get started. For instance, you can create social media posts, draft email content, or even generate ad headlines just by typing in a short prompt. The best part? You’ll get results in minutes – no coding required.

    A smart way to begin is by applying AI to a single, repetitive task. Think of something like drafting blog outlines, segmenting email lists, or scheduling social media posts. Most tools are designed with beginners in mind, offering tutorials, searchable guides, and active user forums full of practical advice. By following these resources, you can quickly learn the ropes and see real results. Once you’re comfortable, you can gradually expand into more advanced areas, such as building analytics dashboards or creating personalized recommendations for your customers.

    To ease into it, take advantage of free trials and freemium plans. Many AI platforms allow you to test their features with no upfront investment, offering free usage limits each month. This way, you can evaluate their value before deciding to upgrade to a paid plan. By sticking to user-friendly, no-code tools and starting with simple, manageable tasks, small businesses can tap into the benefits of AI without needing any technical expertise.

    Related Blog Posts

  • How to Create Product Photos with AI in 2026

    How to Create Product Photos with AI in 2026

    Creating product photos is faster, easier, and more affordable than ever, thanks to AI tools like PixelPanda. With just a basic photo, you can generate professional-quality images in minutes – complete with perfect lighting, custom backgrounds, and even virtual models. This technology is changing the game for e-commerce sellers by reducing costs, saving time, and improving sales.

    Key Takeaways:

    • Cost Savings: AI-generated photos cost $0.10–$1.00 each, compared to $200–$500 per traditional photo.
    • Time Efficiency: Create polished images in 5–60 minutes instead of weeks.
    • Increased Conversions: High-quality visuals can boost sales by up to 64%, with lifestyle images increasing conversion rates by 67%.
    • Batch Processing: Edit up to 100 images at once for consistent results across your catalog.
    • Advanced Features: Tools include background removal, resolution upscaling, and AI-generated lifestyle scenes with virtual models.

    PixelPanda is a powerful solution for businesses of all sizes, offering plans starting at $39/month for thousands of images. Whether you’re a small seller or managing a large inventory, this tool simplifies product photography while delivering stunning results.

    How to Create Product Photos with AI

    Why Use PixelPanda for Product Photos

    PixelPanda

    PixelPanda offers e-commerce sellers a way to produce professional-quality product images without the hefty price tag or lengthy timelines of traditional photography. Typically, traditional product photography costs between $200 and $500 per image, while AI-generated images range from just $0.10 to $1.00. The time savings are equally impressive – what once required 2–4 weeks for planning, shooting, and editing can now be completed in just 5–60 minutes. For small businesses juggling tight budgets and rapid product launches, these savings add up quickly.

    The platform goes beyond simple photo editing. It can remove cluttered backgrounds, add lifestyle scenes with virtual models, and create multiple variations of a single product photo. Whether it’s seasonal themes, different backgrounds, or entirely new settings, you can generate dozens of options without reshooting. And this matters – a lot. 75% of online shoppers rely on product photos to make purchasing decisions. Plus, images featuring lifestyle contexts can boost conversion rates by up to 67% compared to plain backgrounds. These cost and time efficiencies make PixelPanda a game-changer for e-commerce sellers.

    PixelPanda Features for Product Photography

    PixelPanda’s features are designed to simplify and elevate product photography:

    • AI Background Removal tools: Quickly handles intricate edges, like hair and fur, offering options for transparent or pure white backgrounds that comply with marketplace standards.
    • Image Upscaling tools: Enhances resolution up to 4x, turning low-resolution images (as small as 64×64 pixels) into sharp, high-quality 4-megapixel photos with richer details, colors, and lighting.
    • Customizable AI Virtual Models: Create brand-specific virtual models to showcase apparel. You can display clothing on various body types and skin tones without the hassle of casting or coordinating physical photoshoots. This is especially helpful for fashion brands aiming to highlight inclusivity and variety.

    These tools not only save time but also provide creative flexibility, making it easier to meet the diverse needs of customers.

    Benefits for E-commerce Sellers

    PixelPanda eliminates many of the expenses that burden small businesses. Forget about renting studios, hiring photographers, coordinating with models, or investing in props and specialized equipment. The platform’s batch processing feature allows you to apply consistent backgrounds, lighting, and framing across thousands of products at once – something nearly impossible to achieve affordably with traditional methods.

    The pricing structure is another standout. Plans start at $39/month for 7,000 images, $59/month for 15,000 images, or $89/month for 35,000 images, billed annually. Compare this to traditional photography rates of $100–$300 per hour, and the value becomes undeniable. You can experiment with seasonal designs, test different visual styles, and create unlimited variations without worrying about reshoot costs or extra fees. For sellers aiming to grow quickly, these efficiencies translate directly into higher sales and a stronger competitive edge.

    How to Create Product Photos with PixelPanda

    5-Step Process to Create AI Product Photos with PixelPanda

    5-Step Process to Create AI Product Photos with PixelPanda

    PixelPanda makes creating professional product photos quick and easy. With features like background removal and lifestyle scene generation, you can produce studio-quality images without needing expensive equipment or professional photography skills. Here’s how to turn your raw images into polished product photos in just a few steps.

    Step 1: Sign Up and Choose a Plan

    Visit PixelPanda and pick a plan that suits your needs. Here’s a breakdown:

    • Starter Plan: $39/month (billed annually) for 7,000 credits, perfect for small catalogs or trial runs.
    • Growth Plan: $59/month for 15,000 credits, ideal for growing stores with regular launches.
    • Pro Plan: $89/month for 35,000 credits, tailored for high-volume sellers managing large inventories.

    All plans include tools like background removal, image upscaling, outfit swapping, and customizable AI models representing various body types and ethnicities. If you’re unsure of your needs, start small with the Starter plan – you can always scale up later.

    Step 2: Upload and Prepare Your Images

    Once you’ve selected a plan, prepare your product photos for enhancement. Use a smartphone or DSLR to capture high-resolution images. You don’t need professional equipment – natural light from a window works just fine. Make sure your shots are clear, centered, and in JPEG, PNG, or BMP format.

    After uploading, PixelPanda’s AI—one of the best AI tools for photo editing—will automatically remove the background with precision. If any areas need tweaking, manual tools like the draw tool, lasso, or tolerance sliders are available for fine-tuning. For issues like dust or scratches, the "Heal" tool can clean them up seamlessly. Need to process a large batch? You can upload up to 100 images at once and apply consistent settings across them.

    Step 3: Generate Scenes with AI Prompts

    PixelPanda’s AI makes creating custom scenes a breeze. Just type your vision into the prompt box, specifying details like background material (e.g., marble, rustic wood), lighting styles (e.g., soft morning light), and props (e.g., coffee mugs, plants).

    For lifestyle shots, try this formula: [Person Description] + [Action/Pose] + [Environment] + [Lighting/Mood] + [Camera Angle] + [Product Placement]. For example: “Young woman in athletic wear holding a water bottle, standing in a bright yoga studio, natural morning light, eye-level shot, product centered in frame.”

    If the results feel too artificial, refine your prompts with phrases like “authentic environment” or “lived-in details” to add realism. The AI generates professional-quality images in just 2 to 5 minutes, a massive time-saver compared to traditional studio photography, which can take days.

    Step 4: Enhance Your Photos

    After generating your images, PixelPanda’s enhancement tools allow you to refine them further. Some key features include:

    • Super Scale: Upscales images up to 5,000×5,000 pixels, ideal for print catalogs or high-resolution displays.
    • AI Shadows: Adds realistic depth to your products.
    • Outfit Swapping: Changes clothing colors or patterns without requiring new photos.
    • Sharpen Tool: Enhances fine details like textures and labels.
    • Dodge and Burn: Adjusts highlights and shadows for perfect contrast.

    These tools ensure your photos are polished and ready for use across various platforms.

    Step 5: Create Lifestyle Shots with AI Models

    PixelPanda’s AI models eliminate the hassle of hiring and coordinating with human models. Choose from a diverse selection of body types, skin tones, and poses to match your brand’s identity. Place your products in realistic settings, like a water bottle on a yoga mat, clothing worn in an urban environment, or skincare products arranged on a marble countertop.

    This feature allows you to test multiple variations quickly and cost-effectively. It’s a game-changer for driving higher conversion rates while maintaining a professional look.

    For example, a mid-size fashion retailer with a 250-product catalog adopted AI photography in 2025. They cut costs by 88%, reduced product returns by 23%, boosted conversion rates by 42%, and saw an additional $32,000 in monthly revenue.

    How to Optimize and Export Product Photos

    Once you’ve polished your product images with PixelPanda, the next step is to export and optimize them for your online store. This step is crucial to ensure your images load quickly, look great, and meet platform-specific requirements – all without compromising quality.

    Batch Processing for Large Product Catalogs

    PixelPanda makes handling large inventories a breeze by allowing you to process up to 100 images simultaneously. With its batch processing feature, you can apply uniform settings – like resizing, adjusting quality, and converting formats – across your entire catalog. The process is simple: pick your images, define export parameters (like dimensions and format), and let PixelPanda handle the rest. Once done, you can download everything as a ZIP file.

    For sellers managing extensive product lines, this automation is a game-changer. You can even create presets tailored to different platforms. For example:

    • Export one batch as 2,000×2,000-pixel JPEGs for Amazon.
    • Prepare another set at 2,048×2,048 pixels in WebP format for Shopify.
    • Resize a third batch to 1,080×1,080 pixels for social media.

    This flexibility ensures your images maintain a consistent look across platforms while saving you time and effort. Streamlined exports like these set the stage for optimized product images in your store.

    Image Optimization Tips for Online Stores

    Once your images are processed, fine-tuning them for your online store can improve loading times and visual appeal.

    • Resolution is key. Aiming for 2,048×2,048 pixels strikes a good balance between detail and speed. For Amazon, ensure the longest side is at least 1,000 pixels to enable zoom functionality. If you want to highlight textures and finer details, PixelPanda’s Super Scale can go up to 5,000 pixels.
    • Use the right file format. WebP is a smart choice, offering 30% smaller file sizes without losing quality. Stick to JPEGs (at 70–80% quality) for standard product photos, and reserve PNGs for images requiring transparency. Keep file sizes under 300KB to avoid slow loading times.
    • Stick to a 1:1 aspect ratio. Square images look uniform across store layouts and prevent awkward cropping, especially on mobile devices. Export your images in sRGB color space to ensure consistent colors across different screens. For Amazon listings, use a pure white background (RGB 255, 255, 255) and make sure your product occupies at least 85% of the frame.

    Conclusion

    Gone are the days when creating professional product photos required a studio, expensive gear, or a hefty budget. PixelPanda offers studio-quality photography starting at just $39 per month – making high-end visuals accessible at a fraction of traditional photoshoot costs. With plans that include 7,000 monthly credits, small businesses can produce thousands of polished images without needing to hire photographers or rent equipment.

    This affordability directly impacts AI-driven business growth. High-quality visuals inspire customer trust and drive higher conversions, giving businesses the edge they need in competitive markets.

    PixelPanda breaks down the barriers that once limited small businesses from competing with larger brands. Simply snap photos with your smartphone, upload them, and let the platform do the rest. Within minutes, you can create endless variations – think seasonal themes, lifestyle settings, or custom backgrounds – saving time and effort. The AI-powered tools ensure your entire catalog maintains a uniform and professional look.

    As Veruska Anconitano, AI Workflow Specialist, explains: "AI product photography isn’t about replacing creativity; it’s about scaling it with consistency, precision, and speed."

    Whether you’re managing a small product line or thousands of SKUs, PixelPanda’s batch processing and AI-driven customization make maintaining a cohesive and professional catalog effortless. Start transforming your product photography today and discover how its simplicity and scalability can elevate your visuals while keeping costs in check.

    FAQs

    How does AI make product photos better than traditional methods?

    AI is reshaping product photography by streamlining tasks that once demanded significant time, skill, and resources. With AI-driven tools, you can effortlessly remove backgrounds with over 99% precision, fine-tune lighting, add natural-looking shadows, and refine product details – all in just a few seconds. These tools can even create realistic scenes or virtual setups, eliminating the need for costly physical staging while ensuring every image looks polished and professional.

    Another game-changer is AI’s ability to maintain consistency across extensive product catalogs. It ensures uniformity in colors, lighting, and framing, making batch processing faster and reducing common errors like uneven exposure or mismatched backgrounds. The outcome? Sleek, high-quality visuals that elevate your e-commerce presence and contribute to increased sales.

    What are the key advantages of using PixelPanda for small e-commerce businesses?

    PixelPanda provides small e-commerce businesses with an easy way to produce professional, high-quality product photos without the usual hassle. By utilizing advanced AI tools, PixelPanda streamlines the product photography process, cutting down on time and costs typically tied to traditional photo shoots.

    The platform offers features like virtual staging, automated photo touch-ups, and AI-generated realistic visuals designed specifically for online selling. These tools help your products grab attention, draw in customers, and increase sales – all without needing costly gear or hiring professional photographers.

    Can I customize PixelPanda’s AI tools to match my brand’s unique style?

    While there isn’t any specific information confirming whether PixelPanda’s AI tools can adapt to various brand identities, many AI platforms are built to offer some level of flexibility. It may be possible to customize these tools to match your brand’s unique style and aesthetic. To get a clearer picture, it’s a good idea to contact PixelPanda’s support team directly. They can provide detailed insights into the platform’s features and customization options.

    Related Blog Posts

  • How to Remove Watermark from Images Online Flawlessly

    How to Remove Watermark from Images Online Flawlessly

    Let's be honest, getting rid of a watermark isn't just about making a picture look pretty—it's a smart business decision. If you're a developer or an e-commerce manager, the power to remove watermarks from images online is your secret weapon for keeping your brand looking sharp, making operations run smoother, and truly owning your visual content in a world that demands automation.

    Why You Can't Afford to Ignore Watermarks Anymore

    Seriously, the need to clean up images is more than just a preference for a tidy aesthetic. It's a direct response to the chaotic reality of juggling digital assets every single day. Think about the common frustrations your teams are dealing with right now.

    Maybe you're an e-commerce manager drowning in thousands of product shots from different suppliers, and every single one is stamped with a clunky logo. Or you're on the marketing team trying to pull together a campaign from user-submitted photos, but each image is a mess of social media handles and icons. These aren't just small annoyances; they're roadblocks that stall your projects and muddy your brand's image.

    Hand-drawn sketches of various bottle designs with labels and design elements on a white background.

    A Game-Changer for E-commerce and Marketing

    In the e-commerce world, speed and a consistent look are king. A product photo sporting a supplier's watermark just screams unprofessional and can chip away at a customer's trust. Going through and editing every image by hand? That's a soul-crushing task that just isn't feasible when you have hundreds or thousands of products. Automating the cleanup gets your products online faster and keeps your entire catalog looking polished and on-brand.

    Marketing teams are fighting the same battle. They're trying to tell a compelling, unified brand story. When you're reusing images across your website, social media, and ads, a random watermark from the original source sticks out like a sore thumb and ruins the whole vibe.

    Here are a few all-too-common situations where this becomes a lifesaver:

    • Wrangling Supplier Photos: Online stores have to get thousands of images from suppliers to look like they all belong to the same brand.
    • Cleaning Up User-Generated Content (UGC): Brands need to scrub social media logos and usernames from customer photos to create clean, professional marketing collateral.
    • Rescuing Old Assets: It happens. The original, clean files get lost, and you have to salvage a usable image from a watermarked version for a new campaign.
    • Fixing Stock Photo Downloads: Sometimes, even after you've paid for a stock photo, a faint watermark hangs around that you need to get rid of.

    The Rush Toward Automated Tools

    This shift isn't just a feeling; the numbers back it up. The market for watermark removal software was already worth around $300 million in 2023 and is expected to rocket to $650 million by 2028. We're talking about a 15% compound annual growth rate (CAGR), fueled by the explosion of digital content. If you're curious, you can dig into more market insights over at MarketReportAnalytics.com.

    That kind of growth is no surprise. As visual content becomes the backbone of business, the headaches caused by watermarks become a bigger and bigger problem. Manual editing is a thing of the past—automation is the only way forward.

    In the end, being able to remove a watermark from images online is less about vanity and all about strategy. It’s about giving developers the tools to build slick, automated workflows and letting marketers launch campaigns without any visual noise. This is exactly why AI tools like PixelPanda exist—to turn a tedious, manual chore into a seamless, automated step in your content pipeline. It's about taking back control of your brand's visuals.

    The AI Magic Behind Clean Watermark Removal

    Ever tried to get rid of a watermark and ended up with a blurry, obvious patch? It's a common frustration. You might wonder how modern tools manage to remove watermark from images online so cleanly, it's almost like they were never there. It feels like a bit of digital sorcery, but the secret sauce is a really clever mix of AI and data science.

    This is a whole different ballgame from the old-school clone stamp tool in Photoshop. That was more like a clumsy cover-up job. Today's AI is far more sophisticated.

    A black and white sketch of a makeup brush with a luminous cosmetic product stream.

    Think of the AI as a world-class art restorer, but for your photos. It doesn't just make a wild guess about what’s hiding under a watermark. It meticulously analyzes the surrounding pixels—the textures, the subtle shifts in light, and the exact color gradients. It learns the unique "language" of your image and then intelligently paints in a perfect, context-aware replacement.

    Understanding Generative Inpainting

    The core tech making this happen is called generative inpainting. It sounds complex, but the idea is pretty straightforward: the AI generates brand-new pixels that blend in seamlessly with the rest of the image.

    This is what lets it tackle the really tough jobs. We're talking about a semi-transparent logo sprawled across a model's detailed hair or a watermark stamped over a complex fabric pattern. A manual edit would be a nightmare, requiring painstaking, pixel-by-pixel work and still likely looking fake. An AI, on the other hand, can reconstruct the entire scene in just a few seconds.

    It intuitively understands that the area under a watermark on a brick wall should have a rough, textured finish, while the skin on a person's face should be smooth and follow natural contours.

    The real game-changer is the AI's ability to infer what should be there. It's not just copying and pasting from another part of the image; it’s creating original, contextually perfect content to fill the gap. This turns what used to be a manual headache into an automated dream.

    This impressive performance comes from training these AI models on massive visual datasets. They’ve crunched millions of images, both with and without watermarks, learning to spot patterns, identify the exact boundaries of a watermark, and regenerate the missing pieces without degrading the original quality. The best platforms can now handle a ton of formats like JPEG and PNG, often supporting images up to 5000×5000 pixels.

    Old School vs. New School

    The difference between the old way and the new AI way is pretty stark. Here’s a quick breakdown to show you what I mean. If you want to go deeper into how AI is changing media creation, check out this modern guide to content creation with AI.

    Manual Editing vs AI Watermark Removal

    Feature Manual Methods (e.g., Photoshop) AI Tools (e.g., PixelPanda)
    Speed Slow and tedious. A single complex image can take 15-30 minutes. Lightning-fast. The process takes mere seconds per image.
    Consistency Highly variable. The result depends entirely on the designer's skill and patience. Consistently clean and professional. The AI delivers the same high-quality result every time.
    Skill Required High. Requires a deep understanding of editing tools and techniques. None. Just upload your image and click a button. It's designed for everyone.
    Scalability Non-existent. Manually cleaning a catalog of 1,000 product images is practically impossible. Built for scale. An API can automate the process for thousands or even millions of images.
    Common Issues Often leaves behind blurry patches, repetitive patterns, or other obvious artifacts. Produces a natural, seamless result that's hard to distinguish from the original.

    Honestly, it's a night-and-day difference. AI doesn't just make the process faster; it produces a fundamentally better result. By understanding the image as a whole rather than just a bunch of pixels to be pushed around, it ensures even the most obtrusive watermarks vanish without a trace.

    Navigating the Legal Side of Watermark Removal

    So, you've got a tool that can remove a watermark from images online with a single click. That’s powerful stuff. But just because you can do something, doesn't always mean you should. This is the part where we talk about how to use your new superpowers for good and stay out of hot water.

    Let's cut through the confusing legal jargon. Think of a watermark as a digital "I made this" sticker. It's how a creator signs their work. Ripping that sticker off without permission can lead to some seriously awkward conversations, from a spicy email to a lawsuit that’ll ruin your whole quarter. The problem isn’t the tool; it's about respecting the person who put in the work to create the image in the first place.

    But don't worry, it's not all doom and gloom. There are plenty of times when removing a watermark is totally fine—and legal.

    When You Get the Green Light

    You're generally in the clear in a few common-sense situations. These are the moments when a watermark remover becomes a lifesaver for your workflow, not a legal liability.

    Here’s when you can proceed without a second thought:

    • It’s Your Own Work: Ever lost an original file? It happens. All you have is that version you uploaded to a blog a decade ago, complete with your old, cringey watermark. Go ahead, zap it. It's your photo, your rules.
    • You've Paid for It: When you buy a stock photo, you're buying a license to use it. If the version you download still has a faint, "proof" watermark on it, your license usually gives you the right to remove it for your projects. Just give that license agreement a quick skim to be sure.
    • You've Got Permission: Did you reach out to the photographer and get a "yes" to use their shot without the watermark? Awesome. Do yourself a favor and get that permission in writing—an email is perfect—just in case you need to prove it later.
    • It's in the Public Domain: Images in the public domain are basically free for all. Copyrights have expired, so anyone can use, remix, and share them. If you find a cool historical photo with a library's archive stamp on it, you can usually remove it.

    Before you click that "remove" button, just ask yourself one simple question: "Do I have the right to mess with this image?" If the answer is a confident "yes," you're on solid ground. This little mental check can save you a world of pain down the road.

    The Red Flags You Can't Ignore

    Alright, now for the danger zone. The biggest no-go, the one that gets people into real trouble, is grabbing a copyrighted image you don’t own and scrubbing the watermark off. Lifting a shot from a professional photographer's portfolio or a news agency's site is a direct violation of copyright law. Period.

    AI tools have made watermark removal incredibly easy, but the law hasn't changed. In most places, removing a watermark from a protected image without permission is illegal. Major AI players are even putting their foot down; both Anthropic's Claude 3.7 Sonnet and OpenAI's GPT-4o will refuse to remove watermarks, with Claude calling the practice 'unethical and potentially illegal'. You can see more on how AI models are handling this issue on TechCrunch.

    The consequences aren't just a slap on the wrist. We're talking hefty fines for damages and any profits the creator lost. For a business, the hit to your reputation can be even more damaging. That's why we take this seriously at PixelPanda. You can read our full user guidelines in our terms of service.

    The bottom line is simple: always assume an image is copyrighted unless you know for a fact that it isn't. When in doubt, just find another image.

    A Practical Walkthrough with PixelPanda

    Alright, enough with the theory. Let's get our hands dirty and see how this actually works. We're going to walk through using PixelPanda to remove a watermark from images online, first with the easy-breezy web tool and then by diving straight into the code for some serious automation.

    The whole point here is to show you exactly how to get a clean image, whether you’re just fixing one photo for your blog or building an automated workflow to handle thousands for your app.

    The No-Code Way: Your Instant Fix

    Let's start with the quickest win. Picture this: a supplier just sent over a fresh batch of product photos, but every single one has their logo plastered in the corner. You need them live on your e-commerce site, like, an hour ago. This is where the web demo is your new best friend.

    It’s built to be ridiculously simple. You get a real taste of the AI’s power without touching a single line of code, making it perfect for those one-off jobs or just to see the magic happen before you commit.

    You can try this out for yourself right now. To see how PixelPanda handles different kinds of visual clutter, give our free text removal demo a spin. It’s powered by the same inpainting brain that handles watermarks, so the process is identical whether you're erasing a logo, a timestamp, or unwanted text.

    Here’s all you have to do:

    • Drop Your Image In: Just drag your watermarked photo right into the browser window.
    • Let the AI Cook: In just a few seconds, the model scans the image, finds the watermark, and intelligently rebuilds the pixels hiding underneath.
    • Download the Clean Version: You’ll get a neat before-and-after slider. Happy with the result? Just hit download and grab your shiny, watermark-free image.

    That's it. A task that could've easily chewed up 15 minutes in Photoshop is done in 15 seconds.

    The Developer Route: Using the API

    For developers, the real muscle is in automation. A web demo is handy, but it doesn't scale. When you’re staring down a mountain of images for your application, the PixelPanda API is what you need. It lets you plug this watermark-zapping power directly into your backend, web app, or data processing pipeline.

    Let's walk through a typical API call. You send an image to our watermark removal endpoint, and we send you back the cleaned-up version. We'll cover examples in both Python and Node.js—two of the most popular tools for this kind of job.

    First things first, you’ll need your API key. Grab it from your PixelPanda dashboard and keep it somewhere safe; it’s your golden ticket to the service.

    Python Example with Requests

    Python is the go-to for so many backend and scripting tasks. With the ever-reliable requests library, calling our API is a piece of cake.

    import requests

    Your secret API key

    API_KEY = 'YOUR_PIXELPANDA_API_KEY'

    Path to your local image

    IMAGE_PATH = 'path/to/your/watermarked-image.jpg'

    with open(IMAGE_PATH, 'rb') as image_file:
    response = requests.post(
    'https://api.pixelpanda.ai/v1/remove-watermark',
    headers={'Authorization': f'Bearer {API_KEY}'},
    files={'image': image_file}
    )

    if response.status_code == 200:
    # Save the cleaned image to a new file
    with open('cleaned-image.png', 'wb') as output_file:
    output_file.write(response.content)
    print("Watermark removed successfully!")
    else:
    print(f"Error: {response.status_code} – {response.text}")
    This script just opens your image file, posts it to the API with your key in the header, and saves the image data it gets back. Simple and effective.

    Node.js Example with Axios

    Building a backend service or a serverless function with JavaScript? You’re probably using axios for your HTTP requests. The logic here is pretty much the same as the Python version.

    const axios = require('axios');
    const fs = require('fs');
    const FormData = require('form-data');

    // Your secret API key
    const apiKey = 'YOUR_PIXELPANDA_API_KEY';
    // Path to your local image
    const imagePath = 'path/to/your/watermarked-image.jpg';

    const formData = new FormData();
    formData.append('image', fs.createReadStream(imagePath));

    axios.post('https://api.pixelpanda.ai/v1/remove-watermark', formData, {
    headers: {
    …formData.getHeaders(),
    'Authorization': Bearer ${apiKey}
    },
    responseType: 'arraybuffer' // Important for handling image data
    })
    .then(response => {
    fs.writeFileSync('cleaned-image.png', response.data);
    console.log('Watermark removed successfully!');
    })
    .catch(error => {
    console.error(Error: ${error.response.status} - ${error.response.data.toString()});
    });

    Pro Tip: Always check the response status code before doing anything else. A 200 OK means you're good to go. But if you see something like a 401 Unauthorized (check your API key!) or a 429 Too Many Requests, your code should be ready to handle it gracefully instead of just crashing.

    With just a few lines of code, you can build a fully automated system to remove watermarks from images online. This is how you save your team countless hours of tedious manual work and lock in brand consistency across the board.

    Automating Your Workflow with Batch Processing

    Cleaning up one image is a nice little win. Cleaning up a thousand? That's a business strategy.

    When you’re tasked with removing watermarks from a massive pile of images, doing it by hand just isn’t going to work. This is where batch processing comes in and saves the day, turning a soul-crushing chore into an automated, efficient production line.

    Think about it. If you're running a huge e-commerce store, managing a constant stream of social media content, or sorting through user uploads, you're probably looking at hundreds, if not thousands, of images. Clicking through them one by one is more than just slow—it's a colossal waste of time and energy. The real magic of a tool like the PixelPanda API is how it tackles this volume without breaking a sweat.

    The concept is beautifully simple: instead of dragging and dropping files yourself, you write a small script that does all the work for you. It can chew through an entire folder of images, send each one off to be cleaned, and neatly save the finished product.

    This whole automated process boils down to a super straightforward three-step cycle.

    Flowchart illustrating a three-step watermark removal process: upload, process, and download.

    This upload-process-download loop is the engine that will save your team countless hours. It’s how you get your visual content ready and out the door in record time.

    Building Your Automated Script

    Don't let the word "script" scare you off. You don't need to be a coding wizard to make this happen. A simple script in a language like Python or Node.js is all it takes. The goal is just to create a loop that grabs each file from an "input" folder, shoots it over to the API, and saves the clean version in an "output" folder.

    Let's say you just got a delivery of 500 product shots from a new supplier, but they all have a big, ugly watermark plastered across them. Here’s how you’d handle it:

    1. Prep Your Folders: First, just create two folders. Call them something obvious like watermarked_images and cleaned_images.
    2. Write the Loop: Your script will start by getting a list of every single file inside the watermarked_images folder.
    3. Process Each Image: Then, for each image in that list, the script makes an API call to PixelPanda to get the watermark removed.
    4. Save the Result: Once the API sends back the clean image, the script saves it into your cleaned_images folder. It’s a good idea to keep the original filename so you can easily match them up later.

    That's it. You've just built a visual assembly line. You can literally set it and forget it, letting it run in the background while you focus on work that actually requires your brain.

    This isn't just about shaving off a few hours. It’s about building a scalable, repeatable system that keeps your brand looking sharp and consistent across your entire image library, no matter how big it grows.

    Pro Tips for a Resilient Workflow

    When you’re processing images in bulk, a few smart practices can keep your script from falling over at the first sign of trouble. Building a little resilience into your code from the get-go will save you a world of pain later.

    Here are a few things I’ve learned to always keep in mind:

    • Hide Your API Key: Never, ever paste your API key directly into your script. It's like leaving your house key under the doormat. Use environment variables to keep your credentials safe and sound, especially if you're sharing code.
    • Respect Rate Limits: Most APIs have limits on how many requests you can make in a certain period. Be prepared for a 429 Too Many Requests error. A solid approach is to code in a "retry-with-backoff" plan, where your script waits a few seconds (and a bit longer each time) before trying again.
    • Log Everything: Keep a running log of which files were processed successfully and, more importantly, which ones failed. A simple text file can be a lifesaver for troubleshooting. It's way better than finding out a critical image is missing days after the fact.
    • Plan for Failure: What if the API is down for a minute or a file is corrupted? Your script shouldn't just crash and burn. Wrap your API calls in try-catch blocks to handle these hiccups gracefully, log the error, and move on to the next image.

    Putting these tips into practice turns a simple script into a robust system that can reliably churn through thousands of images without needing a babysitter. To take things even further, you can look into platforms that offer more advanced batch image processing workflows for all sorts of tasks beyond just watermark removal.

    Once your images are clean, you might find some of them are a bit low-res. Check out our image upscaling demo to see how AI can fix that, too.

    Frequently Asked Questions About AI Watermark Removal

    Diving into the world of AI editing tools can feel like stepping into a sci-fi movie. When you just want to remove a watermark from images online, you need straight answers, not tech jargon. Let's tackle some of the most common questions head-on and clear things up.

    Can AI Really Get Rid of Faint or Complicated Watermarks?

    You bet it can. This is actually where today's AI really flexes its muscles. The algorithms behind tools like PixelPanda have been fed a visual diet of millions of images, learning to spot more than just obvious logos. They're masters at identifying those tricky, semi-transparent watermarks that love to hide in busy backgrounds.

    Think about a faint copyright notice stretching across a detailed cityscape or a logo plastered over a person's patterned shirt. A lesser tool might just blur the area into a muddy mess. But a smart AI doesn't just erase—it reconstructs. It meticulously analyzes the surrounding textures, lighting, and patterns to convincingly recreate what was underneath.

    The magic isn't in erasing; it's in regenerating. The AI learns the visual 'language' of your image and then speaks it fluently, creating new pixels that blend in perfectly. What used to be a nightmare editing job is now a matter of seconds.

    Will Removing a Watermark Trash My Image Quality?

    Not if you use the right tool. This is probably the biggest fear, and it's a valid one. We've all seen the clumsy attempts that leave behind blurry patches or weird artifacts that scream "I was edited!" That’s old-school tech.

    Modern platforms like PixelPanda use what’s called generative AI. Instead of just smudging pixels around, the AI generates brand-new, high-resolution pixels to fill the space. The result? An image that looks crisp, clean, and completely untouched. You can often even combine watermark removal with AI upscaling to make the whole photo sharper than when you started.

    So, Is It Legal to Zap Any Watermark I See?

    Absolutely not, and this is the most important question of all. The whole issue boils down to one word: copyright. If you don't own the rights to an image, removing the watermark is a big no-no and constitutes copyright infringement.

    You're generally on safe ground when you're working with:

    • Your own photos. Maybe you lost the original file and are stuck with a watermarked version from your old website.
    • Stock images you've legally purchased. Your license usually gives you the right to use a clean version.
    • Images where the creator has given you explicit permission to make edits.

    When in doubt, don't do it. Always respect the creator's rights and find an alternative image if you're not sure.

    How Can I Clean Up Hundreds of Images Without Losing My Mind?

    This is where an API becomes your best friend. Manually uploading images to a web tool is fine for one or two photos, but it's a soul-crushing task when you're facing a folder with 500 product shots. That kind of volume demands automation.

    An API, like the one from PixelPanda, lets you plug this watermark-removing power directly into your own workflow. A developer can whip up a simple script that tells the API to process your entire image library while you grab a coffee. It's the go-to solution for e-commerce sites refreshing their catalogs, marketing teams managing digital assets, or anyone building a content-heavy application.


    Ready to see how this can transform your own workflow? The PixelPanda API can automate everything from watermark removal to image upscaling, saving you countless hours of tedious manual work. Start building for free today.