AI image upscaling transforms low-resolution images into sharper, high-quality versions by predicting and filling in missing details with advanced machine learning. Unlike older methods that stretch pixels, AI tools analyze patterns, textures, and edges to recreate details that were never in the original image. This makes it possible to enlarge photos by up to 600% while maintaining clarity.
Key Takeaways:
- What it is: AI predicts and reconstructs missing image details, improving sharpness and quality.
- Why it’s useful: Perfect for e-commerce, social media, and restoring old photos.
- Who benefits: Photographers, marketers, small businesses, and anyone working with visuals.
- How it works: Tools use AI models like CNNs and GANs to rebuild textures and reduce noise.
- Limitations: Over-processing can create unnatural textures, and results depend on the original image quality.
AI upscaling tools like PixelPanda offer user-friendly features such as batch processing, noise reduction, and support for various formats. Whether you’re enhancing product photos or preparing images for print, AI upscaling can save time and improve visual quality.
How To Upscale Images with AI (2025 Guide)
How AI Image Upscaling Works
AI vs Traditional Image Upscaling Methods Comparison
Let’s dive deeper into how AI image upscaling operates and what sets it apart. At its core, AI upscaling relies on deep learning models trained on vast datasets of high-resolution images to intelligently predict and fill in missing details.
The Role of AI Algorithms
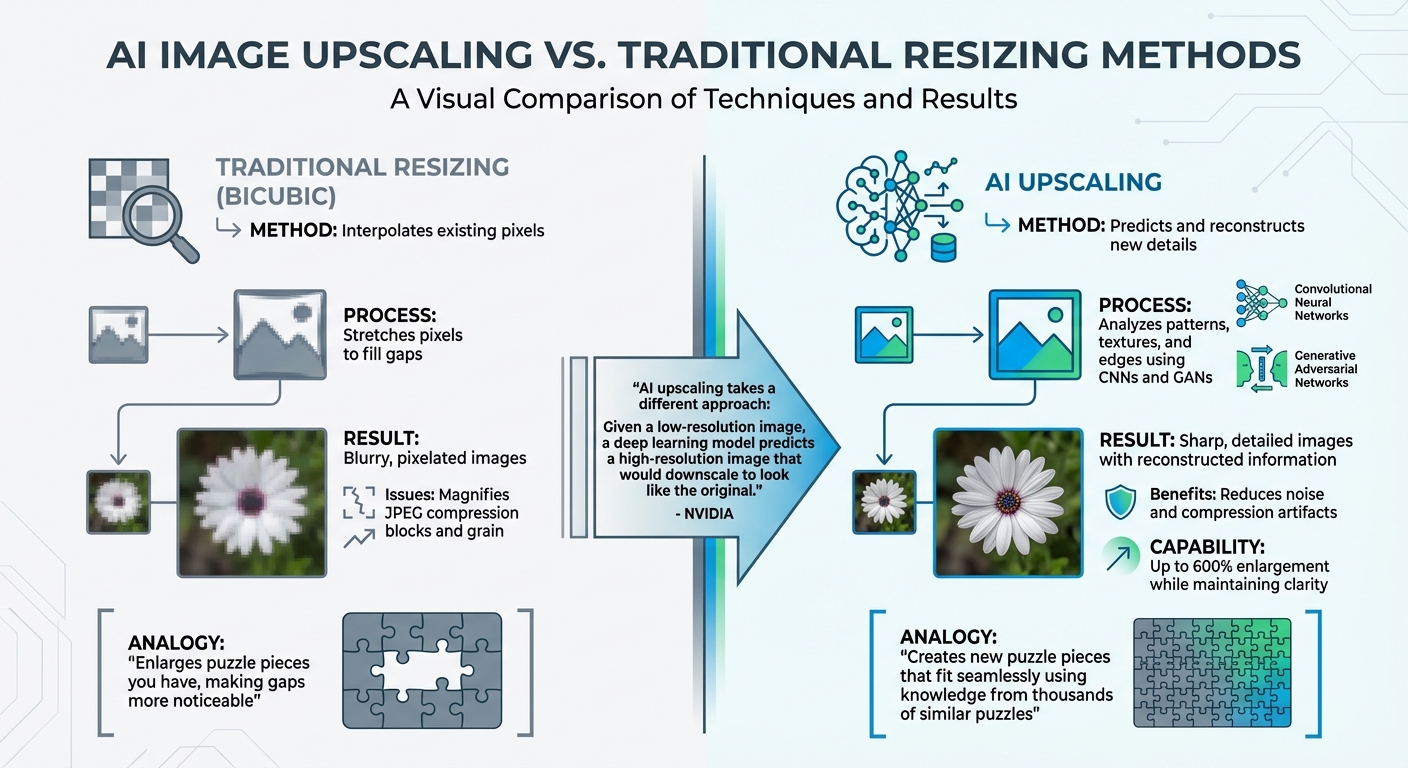
AI upscaling isn’t about simply stretching pixels. Instead, it analyzes patterns in textures, edges, and colors to reconstruct details intelligently. Convolutional Neural Networks (CNNs) play a key role in scanning image patches and rebuilding details, while Generative Adversarial Networks (GANs) take it a step further by refining textures to make the image appear more realistic.
By identifying features in blurred or low-resolution areas, the AI uses its training to recreate details that might have been lost. This is why AI can upscale images by as much as 600%, adding details that traditional methods like bicubic resizing can’t achieve.
AI vs. Traditional Resizing Methods
AI takes a fundamentally different approach compared to traditional resizing techniques. Instead of simply interpolating existing pixels, it predicts and reconstructs new details.
"Traditional upscaling starts with a low-resolution image and tries to improve its visual quality at higher resolutions. AI upscaling takes a different approach: Given a low-resolution image, a deep learning model predicts a high-resolution image that would downscale to look like the original, low-resolution image." – NVIDIA
This predictive capability also allows AI to handle issues like noise and compression artifacts far better. For example, while bicubic resizing might magnify JPEG compression blocks or grain, AI models reduce these flaws during reconstruction. Imagine trying to complete a puzzle: traditional methods simply enlarge the pieces you already have, making the gaps more noticeable. AI, on the other hand, uses its knowledge from thousands of similar "puzzles" to create new pieces that fit seamlessly.
However, AI upscaling isn’t without its challenges.
Limitations of AI Image Upscaling
AI upscaling has its shortcomings. One major issue is hallucination, where the AI fabricates details that weren’t in the original image. For instance, a blurry street sign might be rendered legible, but the AI could misinterpret and create incorrect characters. While this might work for artistic projects, it becomes problematic in scenarios where accuracy is critical.
Another potential drawback is over-processing. Enlarging an image beyond what’s necessary can result in an unnatural, "plasticky" look. Additionally, AI upscaling requires significant computational power, often needing a dedicated GPU for smooth performance. And if the source image is heavily compressed or extremely low resolution, the AI might introduce distortions or artifacts rather than improving the quality.
To get the best results, always start with the highest quality original file – preferably a RAW image – so the AI has more data to work with. Understanding these limitations is essential for making the most out of AI upscaling and integrating it effectively into your projects.
Choosing an AI Upscaling Tool
With so many options out there, picking the right AI upscaling tool means figuring out what features align with your specific needs and budget. Your decision will depend on factors like the number of images you’re working with, the quality of those images, and how much control you want over the process.
Key Features to Look For
Look for tools that use content-specific AI models. Why? Different types of images need different approaches. For instance, architectural photos might benefit from sharper edges, while compressed images require effective artifact removal. Tools offering tailored models for various scenarios can make a big difference.
Another important feature is scale flexibility. Some tools allow fixed multipliers (like up to 6×) or let you set custom dimensions. If you’re just looking to clean up compression artifacts without resizing, a "1×" scale option might be all you need.
Advanced tools also shine with detail recovery features. These include adjustable controls for noise reduction and deblurring, which help bring back fine details during the upscaling process.
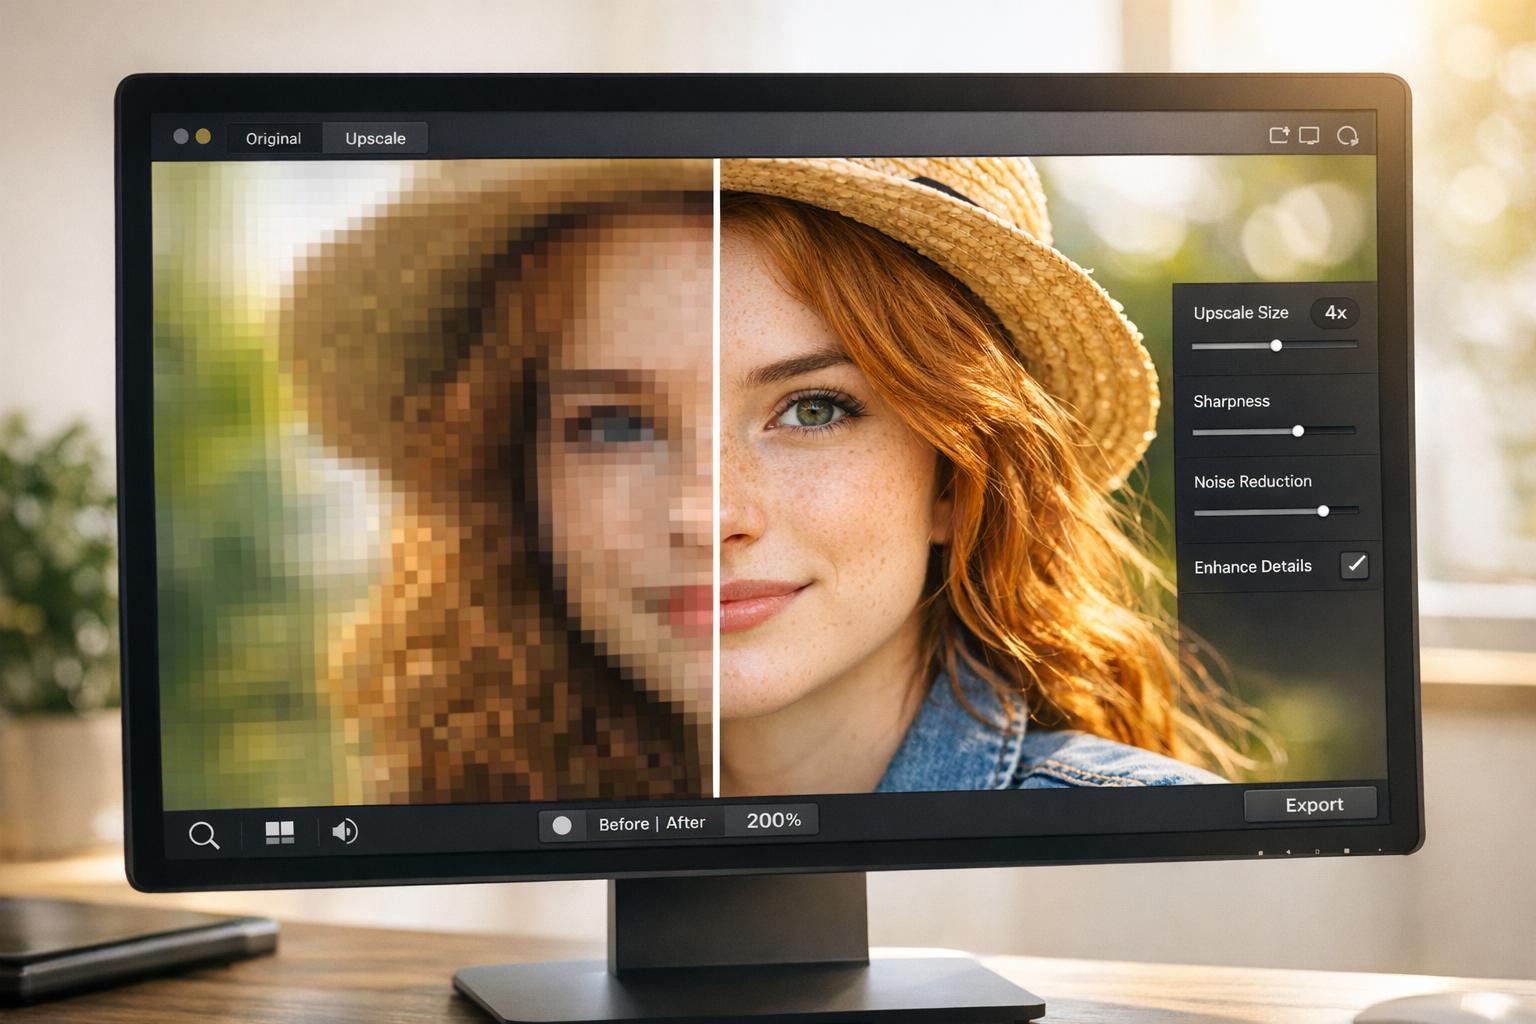
For beginners, comparison tools are incredibly helpful. Features like split-view or side-by-side comparisons let you see the original image next to the enhanced version, making it easier to evaluate results.
If you’re handling multiple images, batch processing is a must-have. This feature lets you upscale dozens of photos at once, applying consistent settings across all of them. It’s a huge time-saver, especially when working with large collections.
Lastly, consider tools that offer robust output customization options. Support for multiple file formats (like JPEG, PNG, and TIFF) and the ability to tweak color spaces or resolution (DPI/PPI) ensures your images are ready for both digital and print use. Some professional tools can even upscale images to as large as 32,000 pixels on the longest side – perfect for creating ultra-high-resolution visuals.
Understanding Pricing and Accessibility
AI upscaling tools come with a range of pricing models, so it’s worth taking a closer look to avoid paying for features you don’t need.
One factor to consider is local versus cloud processing. Tools that run locally on your computer typically require a one-time license purchase but demand robust hardware – think 16–32 GB of RAM and a GPU with at least 6–8 GB of VRAM. On the other hand, cloud-based solutions operate on a subscription model, providing remote computing power and access from any device.
Most tools offer free trials, though these often come with limitations like restricted export options. Testing a tool during its trial period can help you decide if it meets your quality standards before committing financially.
For e-commerce or professional use, it’s essential to calculate your output needs. For example, a 20-inch print at 300 DPI requires 6,000 pixels in one dimension, so upscaling beyond that isn’t necessary.
Next, let’s dive into how PixelPanda incorporates all these features into a streamlined upscaling experience.
Using PixelPanda for AI Image Upscaling

PixelPanda combines AI-powered upscaling with a suite of other visual tools, making it a versatile choice for users who need multiple image enhancement features in one place.
The platform uses a credit-based system for flexibility. Plans start at $39/month for 7,000 credits, and these credits can be used across PixelPanda’s other features, like AI background remover tools, AI-generated product photos, and video creation. This setup allows you to handle a variety of tasks without juggling multiple tools.
Another standout feature is its user-friendly interface. Designed with beginners in mind, PixelPanda delivers professional results without requiring you to master complex software. The upscaling process integrates smoothly into your existing workflows, letting you adjust resolution, remove backgrounds, and create product variations all within the same platform.
For e-commerce businesses, PixelPanda offers commercial usage rights, so you can use upscaled images immediately in your store, ads, or marketing materials. The platform supports a wide range of output needs, from web-ready images to high-resolution files for print catalogs. With batch processing and consistent quality, it’s a practical choice whether you’re enhancing a single image or an entire product catalog.
Step-by-Step Guide to AI Image Upscaling
Preparing Your Image
Start with the best-quality version of your image. Ideally, use the original RAW file or an uncompressed format instead of a copy that’s been compressed or downloaded. As noted by Topaz Labs, "Upscale from an original image whenever possible rather than a copy that has been compressed".
Check your file format and note the image’s dimensions. PNG or high-quality JPEGs (90% quality or higher) are ideal. For example, if you have an image at 1,000 × 1,500 pixels and need it to be 4,000 × 6,000 pixels, you’ll need a 4× upscale.
Before upscaling, clean up your image using photo editing software. Remove scratches, tears, or excessive noise, as AI tools can amplify these flaws. If you need to change the aspect ratio, crop the image at this stage. For images that are already the correct size but show compression artifacts, use a "1×" scale setting to improve quality without altering dimensions.
Once your image is ready, you can upload it and begin the upscaling process.
Running the Upscaling Process
Upload your prepared image by dragging it into a tool like PixelPanda or selecting it manually. You’ll typically have two options for upscaling: choose a Scale Factor (e.g., 2×, 4×, or 6×) or set specific Dimensions. Keep in mind that most professional tools cap the longest side at 32,000 pixels.
Next, select an AI model suited to your image type. Options often include "Standard" for general photos, "Graphics" for illustrations, or "High Fidelity" for detailed images. If your image is heavily compressed, look for models designed to handle compression artifacts. You can also enable noise reduction or deblurring, but use these features cautiously to avoid creating an unnatural appearance.
Process the image and use the preview feature to compare the upscaled version with the original. For extremely low-resolution images, consider upscaling in smaller steps (e.g., 2× twice) instead of a single large jump like 6×.
Reviewing and Exporting Your Results
Once the upscaling is complete, carefully review the results. Use comparison tools to ensure the details have been enhanced without introducing artifacts. The quality of the final image depends heavily on the original file. As Topaz Labs explains, "The AI models rely heavily on existing image quality. They may generate unwanted artifacts if the resolution of the starting image is too low".
Choose the appropriate export format based on how you’ll use the image. JPEG or PNG is suitable for web and social media, while TIFF is better for preserving detail in large files or for professional printing. If you’re unsure about color settings, select "Preserve input color space", or use sRGB for web content and ProPhoto RGB for high-quality printing.
Finally, save the file to your computer’s internal drive to ensure faster processing and avoid potential errors during export. If you encounter issues, such as failed exports, double-check the image dimensions and file size limits.
sbb-itb-76ad1b7
Applications of AI Image Upscaling
Improving Product Images for E-commerce
AI upscaling transforms low-resolution product photos into sharp, detailed visuals that meet the high standards of today’s online marketplaces. When shoppers zoom in on product images, they expect to see every detail clearly – and AI makes that possible, even with limited-quality source images.
This technology is particularly effective at reconstructing fine details, like printed text on packaging, such as watch dials or product labels, ensuring they appear sharp and easy to read. It also excels at restoring intricate textures, like brushed steel, woven fabric, or leather patterns, giving products a polished and professional look. Some advanced models even include specialized modes, like "Architectural" or "Low Res", which enhance product edges and prevent the blurriness often caused by traditional resizing methods.
Another useful feature is the ability to crop tightly into specific product features and then restore the resolution using a free AI image upscaler. This allows for creating close-ups that remain clear and detailed, even when working with compressed images from smartphones or social media. Some AI tools can enlarge images by as much as 600% while maintaining quality and adding back fine details.
And it’s not just for online stores – AI upscaling enhances visuals across various digital platforms.
Creating High-Quality Social Media Content
Social media thrives on high-resolution visuals, and the numbers don’t lie – high-quality images can boost engagement by 120%. For marketers and influencers, this means standing out in crowded feeds and achieving better campaign results.
AI upscaling is a game-changer for content that might otherwise be unusable. Marketing teams often work with images that are too small or compressed for professional use. By upscaling these files, they can meet the high standards required for modern social media campaigns.
This technology is also a boon for creators working with AI-generated art, which often starts at lower resolutions. To achieve the best results, it’s essential to pair the right AI model with the content type – using "Face" or "Portrait" models for influencer headshots, for example, or "Architectural" models for text-heavy graphics.
Restoring and Repurposing Old Images
AI upscaling isn’t just about improving new content – it’s also a powerful tool for breathing new life into older images. Many businesses have valuable visual assets from years ago that no longer meet today’s quality expectations. With AI, these archived images can be enhanced and repurposed for modern e-commerce, even if the original high-resolution files are missing or were never created.
The technology is adept at rebuilding textures like fabric, skin, and product details, which are often blurred by traditional resizing methods. This makes it possible to reuse older product photos on contemporary websites without the need for costly reshoots, helping businesses maintain a consistent visual identity while updating their digital presence.
For restoration projects, it’s best to start with the highest-quality source file available and clean up any visible damage to avoid amplifying imperfections during the upscaling process.
Best Practices for AI Image Upscaling
Avoiding Over-Upscaling
Upscaling too much can lead to unnatural, plasticky textures that ruin the image’s authenticity. Start by identifying your specific needs. For instance, if you’re printing a 20-inch photo, calculate the required resolution by multiplying the size by 300 DPI (the standard for high-quality prints). That means you’ll need 6,000 pixels – not 10,000. For most uses, a 2× to 4× upscaling factor strikes the right balance between improving quality and keeping the image looking natural. Going beyond that often just bloats the file size and increases processing time without adding any real visual benefit.
Keep in mind that a 4× upscale increases the pixel count sixteenfold, potentially turning a 2MB file into a massive 30MB one. If you’re starting with a very low-resolution image, it’s better to upscale incrementally in 2× steps rather than jumping straight to 4×. This approach helps maintain better quality.
Always review the results carefully to ensure the upscaling meets your expectations before finalizing your project.
Testing for Quality Across Tools
Once you’ve decided on the right scaling factor, take a close look at the results. Zoom in to 100% to catch subtle artifacts that might not be obvious at first glance. Pay special attention to details like eyes, hair, text, and foliage – these areas are particularly prone to issues like "demon eyes" or watercolor-like blurring when viewed at full resolution.
Different AI tools and models handle content in unique ways. For example, using a general-purpose photo model on a logo can result in blurry edges or lost details. As professional photographer Chase Jarvis explains:
"If you need to print a billboard from a crop… this is the tool. It respects the source material".
But not all tools respect the source material equally, so it’s crucial to test and compare results.
To counteract the overly smooth "AI look" that can sometimes appear, many professionals add a subtle layer of monochromatic noise at 3–5% opacity to the final image. This simple step restores texture and makes the image feel more natural.
Maintaining Workflow Order
The order in which you process your images matters. Start by ensuring your low-resolution original is preserved – use custom suffixes or prefixes when exporting to avoid accidental overwrites. Upscaling should be one of the first steps in your workflow, ideally done before making color corrections or heavy crops. As Chase Jarvis puts it:
"Upscaling noise just gives you high-definition noise".
To get the best results, make sure your image is free of noise before upscaling, and crop it beforehand to focus the AI’s processing on the subject.
For large batch exports, save files directly to your computer’s internal drive rather than an external one. This reduces the risk of write errors and speeds up processing.
Conclusion
AI image upscaling has changed the game for transforming low-resolution images. Instead of simply stretching pixels, it rebuilds missing details by recognizing patterns like skin texture, hair, or even blades of grass. This approach avoids the blurry, pixelated results of traditional methods and delivers more natural-looking enhancements. Whether you’re restoring old family photos, prepping product images for e-commerce, or creating standout social media content, this technology ensures your images are enlarged while maintaining – or even improving – clarity.
To get the best results, start with a high-quality source file and choose the right upscaling factor for your needs. For example, a 4× upscale increases your pixel count by sixteen times, so it’s crucial to only upscale to the resolution you actually require. If you’re working on professional-grade prints, remember that you’ll typically need 300 DPI. Planning your enlargement carefully ensures you achieve the perfect balance between quality and practicality.
Tools like PixelPanda make this process simple, even for beginners. It offers free ai image upscaler online options – 2×, 4×, and 8× – along with batch processing for up to 10 images and built-in editing features. Anwesha Dasgupta, a digital marketing enthusiast, highlights its ease of use:
"PixelPanda stood out for its speed, clarity, and affordability. It’s one of the simplest, fastest, and most user-friendly tools available."
PixelPanda combines the benefits of AI upscaling into a seamless, user-friendly platform. With free 4× and 8× upscaling credits available when you sign up, you can test it out on your own images. Whether you’re a professional or a beginner, this tool makes it easy to turn low-resolution images into polished, professional-quality visuals in just seconds – no technical expertise or costly software required.
FAQs
What makes AI image upscaling different from traditional methods?
AI image upscaling takes image enhancement to a whole new level, leaving traditional methods like bicubic or nearest-neighbor interpolation in the dust. Those older techniques work by enlarging an image through pixel duplication or stretching, which often results in blurry or pixelated visuals when the image is blown up.
AI-driven upscaling, on the other hand, relies on deep learning to fill in the gaps. A trained neural network analyzes the image, predicts what’s missing, and enhances it by sharpening edges, adding texture, and restoring fine details that weren’t apparent in the original. The result? A crisp, high-resolution image that feels like it was captured in its original quality, with minimal blur or unwanted artifacts.
What are the limitations of AI image upscaling?
AI image upscaling is a game-changer for improving image resolution, but it’s not without its challenges. While it does a great job of enhancing resolution, it can’t magically recreate details that were never there. This can sometimes lead to minor quality issues, such as blurring, odd textures, or inconsistencies – especially when scaling images significantly beyond their original size.
Another factor to consider is the hardware required. Producing high-resolution images, like 4K or 8K, can be demanding on your system. Without the right equipment, the process might slow down or become expensive. Plus, the effectiveness of the upscaling depends heavily on the AI model’s training data. In some cases, the AI might "fill in the blanks" with details that seem realistic but don’t accurately match the original, particularly with complex textures or patterns.
Even with these limitations, AI upscaling is a fantastic tool for enhancing image quality – provided it’s used with care and realistic expectations.
What should I consider when choosing an AI image upscaling tool?
Choosing the best AI image upscaling tool comes down to your specific needs and goals. First, think about how you plan to use it – whether that’s improving e-commerce product photos, enhancing personal snapshots, or refining digital art. Different tools are tailored to excel in different tasks.
Next, determine the resolution and quality you’re aiming for. Some tools can handle large-scale upscaling (up to 32,000 pixels) while preserving the original look and adding realistic details. If speed and ease of use are priorities, decide whether a desktop app with batch processing capabilities or an online service better suits your workflow.
Lastly, consider the cost. Many tools offer free trials or basic tiers, but premium plans may be necessary for higher resolutions or faster processing times. Testing a few tools with sample images can help you compare their quality, speed, and pricing to find the best fit for your projects.