Upscaling product images doesn’t have to mean losing quality. AI-powered tools now allow you to transform low-resolution photos into sharp, professional-grade visuals at a fraction of the cost of traditional photography. Unlike older methods that stretch pixels and blur details, AI predicts and rebuilds missing elements, creating clear, detailed images ideal for e-commerce, social media, and print.
Key Takeaways:
- Why it matters: High-quality product images can increase e-commerce conversions by 40% and reduce returns by 30%.
- How it works: AI uses advanced algorithms to reconstruct textures, edges, and details, delivering results far superior to traditional enlargement methods.
- Cost-effective: AI tools cost $5–$50 per image, compared to $50–$500 for professional photography.
- Best practices: Start with clean, high-resolution images (at least 2,048 pixels), fix imperfections, and choose the right format (JPEG, PNG, or WebP).
- Platform-specific tips: Optimize for Amazon, Shopify, Instagram, or print by tailoring resolution, file size, and format to each platform’s requirements.
AI upscaling tools like PixelPanda can quickly upscale images by up to 600% without quality loss, making it easy to create polished visuals for any platform.
NEW ai UPSCALING is HERE in Photoshop
What Is AI Image Upscaling?
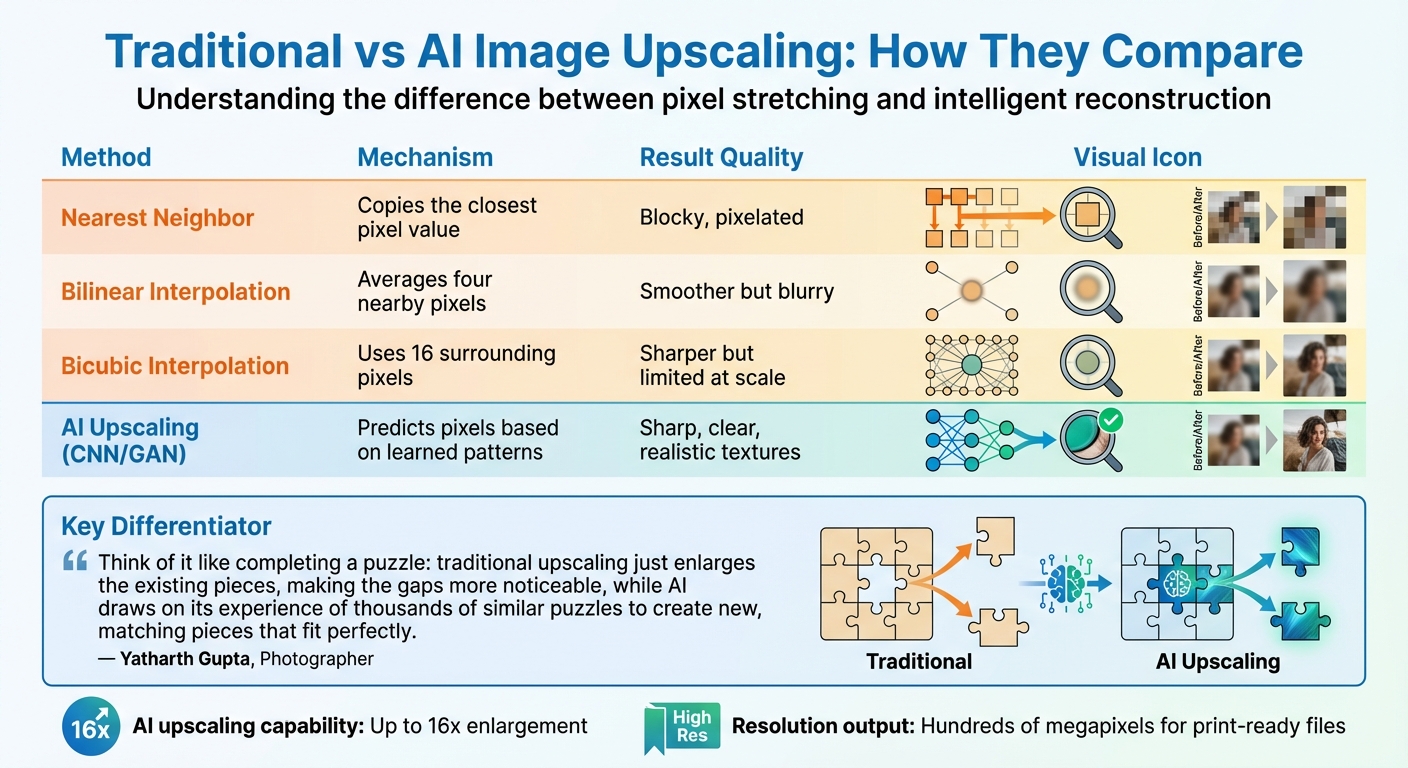
Traditional vs AI Image Upscaling Methods Comparison
AI image upscaling is a game-changer for delivering crisp, high-quality product images online. Instead of just stretching pixels like traditional methods, it uses deep learning algorithms to predict and reconstruct missing details, creating a sharper, more detailed image. This technique doesn’t just zoom in – it actually rebuilds the image, adding new details from scratch.
The process works by training AI models on massive datasets of paired high-resolution and low-resolution images. By studying these pairs, the AI learns to recognize textures, edges, and features. When applied to a low-resolution image, the AI predicts and generates new pixels that restore lost details, reduce noise, and sharpen edges.
Modern free AI image upscaler online tools can enlarge images by 2x, 4x, 8x, or even up to 16x. Some advanced models even produce print-ready files with resolutions in the hundreds of megapixels .
Traditional vs. AI-Powered Upscaling
To understand why AI upscaling is so effective, it’s helpful to compare it to traditional methods, which often fall short. Traditional upscaling relies on mathematical interpolation, filling gaps by averaging pixel values . Methods like Nearest Neighbor, Bilinear, and Bicubic interpolation simply stretch existing pixels and cannot create new details.
"Think of it like completing a puzzle: traditional upscaling just enlarges the existing pieces, making the gaps more noticeable, while AI draws on its experience of thousands of similar puzzles to create new, matching pieces that fit perfectly."
- Yatharth Gupta, Photographer and Writer, Shotkit
A great example of this difference comes from photographer Brian Matiash in May 2022. He cropped a 22.1-megapixel photo of a koala down to 2 megapixels and then upscaled it 6x. Using traditional Photoshop methods, the resulting 74.7-megapixel image lacked detail. In contrast, Topaz Gigapixel AI’s "Very Compressed" model restored the koala’s fur and facial features with remarkable clarity and realism.
What sets AI apart is its ability to use advanced techniques like Convolutional Neural Networks (CNNs) and Generative Adversarial Networks (GANs). These tools analyze patterns in the image and predict missing details, allowing AI to regenerate intricate elements like hair strands, skin pores, or fabric textures – details that traditional methods simply can’t replicate .
| Method | Mechanism | Result Quality |
|---|---|---|
| Nearest Neighbor | Copies the closest pixel value | Blocky, pixelated |
| Bilinear Interpolation | Averages four nearby pixels | Smoother but blurry |
| Bicubic Interpolation | Uses 16 surrounding pixels | Sharper but limited at scale |
| AI Upscaling (CNN/GAN) | Predicts pixels based on learned patterns | Sharp, clear, realistic textures |
Preparing Your Product Images for Upscaling
The quality of your source image is the foundation of successful AI upscaling. Always start with a clean, well-lit image that’s at least 2,048 pixels on its longest side. If your image is blurry or heavily compressed, it can lead to artifacts or unnatural textures during the upscaling process.
Selecting the Right Source Images
Resolution matters – a lot. For best results, use images with a minimum resolution of 2,048×2,048 pixels. This ensures compatibility with zoom features on most e-commerce platforms. Higher megapixel counts give the AI more data to work with, which translates into sharper edges and fewer distortions when enlarging. If you’re working with older photos, double-check that they haven’t been subjected to heavy JPEG compression, as those blocky artifacts will only become more pronounced after upscaling.
When saving your product photos, choose formats wisely. JPEG files saved at 85–90% quality work well for most product images, while PNG is better for graphics. To maintain consistent colors, convert your files to the sRGB color space. If you’re looking for modern alternatives, formats like WebP and AVIF are great options. WebP files are about 31.5% smaller than JPEGs, and AVIF can be up to 50% smaller. However, keep in mind that these formats may require more processing power.
Once you’ve ensured the resolution and format are on point, take time to address any imperfections before starting the upscaling process.
Fixing Common Image Problems
Before upscaling, clean up your images to eliminate distractions. Dust, scratches, lint, or even product stands and wires can all be amplified by AI upscalers. Tools like the Spot Healing Brush or AI object removers are excellent for tidying up these elements.
Lighting is another critical factor. Harsh shadows or overexposed highlights – especially on reflective or glossy surfaces – can confuse AI tools, leading to unnatural halos or edge artifacts. To avoid this, shoot your product photos with soft, diffused lighting. Position two softboxes at 45° angles to your subject for balanced illumination.
If your images suffer from blur or noise, look for AI tools for photo editing that include built-in noise reduction and sharpening features. These tools can effectively reconstruct edges and details, which is far better than simply stretching pixels. A poor-quality source will only result in blurry or artifact-heavy upscaled images.
Here’s a quick reference guide to common issues and their fixes:
| Issue | Fix | Tool/Method |
|---|---|---|
| Poor Lighting | Use softboxes; adjust brightness/saturation | Diffused lighting; image adjustment tools |
| Blurriness | Ensure high source resolution; use AI unblur | High-resolution source; AI sharpening |
| Noise/Grain | Apply AI noise reduction | Deep learning algorithms |
| Distractions | Remove dust, lint, and stand wires | Spot Healing Brush; AI object remover |
| Halos/Artifacts | Avoid overexposure and clipping | Exposure management; fringe cleanup |
sbb-itb-76ad1b7
How to Upscale Product Images Using AI
After preparing your images, the next step is upscaling. AI-powered upscaling works by using deep learning to analyze textures and add pixels, ensuring sharpness and detail are preserved. This process involves machine learning techniques like edge detection, noise reduction, and texture reconstruction to rebuild fine details without introducing unwanted artifacts.
From here, it’s important to determine the right upscaling factor for your specific needs.
Selecting the Right Upscaling Factor
The upscaling factor you choose depends on how and where your images will be displayed. Most AI models are optimized for a 4x enlargement, which is perfect for professional product listings and standard-sized prints.
For social media or web use, a 2x or 4x factor is generally enough to meet platform requirements while maintaining sharpness on high-resolution displays. If your images are destined for print, calculate the necessary pixel dimensions by multiplying the target print size (in inches) by 300 DPI. For instance, an 8×10 inch print would need 2,400×3,000 pixels to maintain a crisp, professional look.
Keep in mind that higher upscaling factors take longer to process and may sometimes result in a softer image. For extremely large resolutions, it’s often better to upscale in smaller steps – applying 2x twice instead of jumping straight to 4x.
Once you’ve decided on the upscaling factor, you’re ready to put the plan into action with a tool like PixelPanda.
Using PixelPanda‘s Image Upscaling Tool

With your settings in place, the next step is using the right tool. PixelPanda’s upscaling tool is designed to be both fast and user-friendly. Start by uploading your prepared image in JPEG, PNG, or WEBP format. The tool provides several enhancement modes – select "Photo Mode" for product images to ensure textures like fabric, plastic, or metal are accurately reconstructed.
Choose the upscaling factor based on your needs: 2x for social media, 4x for e-commerce platforms, or 8x for large-format prints. The tool processes your image in under 10 seconds. Afterward, inspect the result at 100% zoom and download the final image as a PNG to avoid additional compression. If the AI-enhanced image has shifted your color profile, you can use the built-in adjustment tools to fine-tune the saturation or brightness as needed.
Optimizing Upscaled Images for Different Platforms
Once you’ve upscaled your images, it’s essential to tailor them to the specific requirements of each platform. Properly optimized images not only highlight product quality but also maintain the clarity achieved through AI enhancement. Keep in mind that each platform has unique technical specifications, and failing to meet them can result in compression, cropping, or a noticeable drop in quality. Here’s how to prepare your images for e-commerce, social media, and print.
E-Commerce Platforms
For Amazon, the absolute minimum requirement is 500 pixels on the longest side. However, to enable the zoom feature, aim for at least 1,000 pixels, with 1,600 pixels or more delivering a superior zoom experience. The ideal resolution is 2,000 x 2,000 pixels in a square 1:1 ratio. Make sure your main image has a pure white background (RGB 255, 255, 255) and that the product fills at least 85% of the frame. Keep file sizes under 500 KB to ensure fast loading times – especially since 30% of U.S. shoppers may abandon a purchase if product images are missing or of poor quality.
Shopify recommends images be 2,048 x 2,048 pixels for retina displays, with a minimum size of 800 x 800 pixels to enable zoom functionality. Opt for the WebP format whenever possible, as it reduces file sizes by around 30% compared to JPEG while retaining quality. Since mobile devices account for roughly 70% of Shopify traffic, keeping file sizes small is critical – a delay of just 1 to 3 seconds in load time can increase bounce rates by 32%.
Now, let’s shift focus to social media platforms and digital advertising. You can also use AI-powered APIs to automate the generation of these assets.
Social Media and Digital Ads
Instagram automatically resizes images wider than 1,080 pixels down to exactly 1,080 pixels. For square posts, use 1,080 x 1,080 pixels, while portrait posts should be 1,080 x 1,350 pixels, and Stories or Reels should be 1,080 x 1,920 pixels. If your image width is under 320 pixels, Instagram will upscale it, which can lead to pixelation. For Stories ads, leave space at the top (250 pixels) and bottom (340 pixels) to prevent key elements from being covered by interface features.
For most platforms, JPEG at 85–90% quality strikes a good balance between file size and visual clarity. However, use PNG for images with logos or text to avoid compression artifacts. On platforms like Google Ads, WebP is ideal, as it reduces file sizes by about 30% without affecting color accuracy.
Digital requirements differ significantly from print, so here’s how to prepare images for physical media.
Print Marketing Materials
For print projects like catalogs, flyers, and posters, ensure your images are set to 300 DPI. To determine the resolution needed, multiply the desired print dimensions in inches by 300. For instance, a 24 x 36-inch poster would require 7,200 x 10,800 pixels. For designs with a lot of text, consider increasing the DPI to 400 for sharp edges and better legibility. Larger formats like billboards can use 150 DPI, as they’re typically viewed from a distance.
Before sending files to a printer, convert your images from RGB to CMYK to ensure accurate color reproduction. Save your upscaled images as high-quality JPEGs for a balance between quality and file size, or use PNG for graphics that need transparent backgrounds. Most professional printing services require at least 300 DPI, and improvements beyond 600 DPI are generally unnecessary for commercial projects.
Conclusion
AI-powered upscaling is changing the game for product photography. Instead of spending up to 20% of your revenue on reshoots or professional photography, you can instantly transform low-resolution images into high-quality visuals. Thanks to deep learning, this technology doesn’t just stretch pixels – it reconstructs missing details, delivering sharp textures and clean edges instead of blurry, pixelated results.
The efficiency is hard to ignore. Modern AI upscalers can process images in under 10 seconds, and with batch processing options, you can maintain consistent visuals across your entire catalog. This speed is a huge advantage, especially when managing large product inventories.
Take PixelPanda’s tool, for example. It lets you repurpose a single image for multiple platforms, whether you’re creating high-resolution print materials at 300 DPI or prepping images for social media and e-commerce listings. You can upscale images by up to 600% without any quality loss, turning older or supplier-provided images into versatile assets. And with subscription plans starting at just $9–$10 per month, it’s an affordable solution for small businesses looking to enhance their visual content.
FAQs
How does AI upscaling enhance image quality compared to traditional techniques?
AI upscaling tools, like those from PixelPanda, rely on advanced algorithms to study intricate image details – such as color, texture, and edges. These tools create new, realistic pixels to preserve sharpness and clarity, even when the resolution is increased.
Traditional methods, like interpolation, take a simpler approach by stretching existing pixels. Unfortunately, this often results in blurry or less detailed images. With AI upscaling, your product images maintain a polished, high-quality appearance, making them perfect for showcasing in online stores.
How can I prepare product images for AI upscaling to ensure the best results?
To achieve the best results when upscaling product images with AI, start with high-quality source images. The sharper and clearer the original image, the better. Avoid using blurry or overly compressed files, as they can introduce unwanted artifacts. Stick to formats like JPEG or PNG, but steer clear of heavily compressed versions.
Before uploading, ensure your images are cropped and centered on the product. Eliminate unnecessary backgrounds or distractions to keep the focus solely on the item. If needed, use tools for background removal to give your images a clean, polished appearance. These steps will help the AI generate sharp, high-resolution images that are ideal for showcasing products in online stores.
How can I choose the best image upscaling size for different platforms?
To figure out the right upscaling size, start by understanding the resolution requirements of your target platform. For example, YouTube 4K content requires 3840 × 2160 pixels, while e-commerce platforms often display images best in Full HD (1920 × 1080 pixels) or higher for crisp visuals.
Once you know the target resolution, check your image’s current dimensions. Calculate the scaling factor by dividing the desired resolution by the original size. For instance, if your image is 960 pixels wide and you need 3840 pixels, you’d need to upscale by 4× (3840 ÷ 960 = 4).
Choose an AI tool that suits your needs – some offer simple one-click options for 4K or 8K upscaling. After upscaling, double-check the final dimensions to ensure they match the platform’s requirements without unnecessarily increasing the file size.