Welcome to the eye-popping, pixel-packed world of 4K on YouTube. It’s where video quality goes from "pretty good" to "whoa, is that a real window?"
Think of it this way: 1080p is like a decent LEGO set. You can build something cool and recognizable. But 4K? That’s like getting four times the bricks. Suddenly, you’re not just building a car; you're building a hyper-realistic replica with every tiny detail, from the stitching on the seats to the reflection in the side mirror.
Why 4K on YouTube Is the New Gold Standard
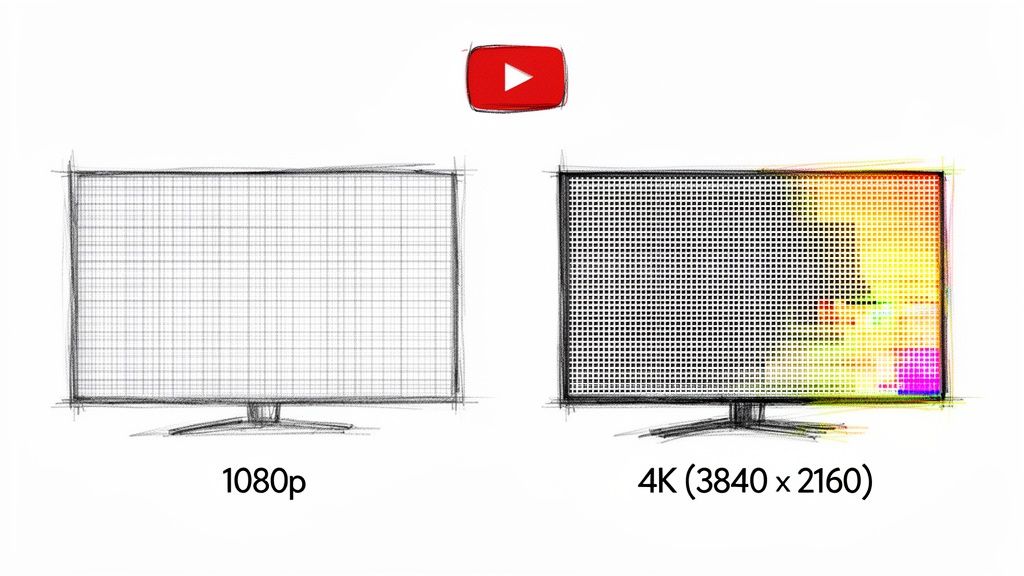
So, what does that massive jump in detail really mean for you? A 4K video is made up of a staggering 3840 x 2160 pixels, which adds up to over 8 million little dots of light. Your standard 1080p "Full HD" video? It's working with just over 2 million pixels. This isn't just a minor upgrade; it's a monumental leap in visual information.
That extra clarity completely changes the game. Whether you're watching a sweeping travel vlog where you can count the leaves on a distant tree or a chaotic gaming stream where you can actually read the tiny text on an in-game sign, 4K just feels more real. For anyone watching on a big-screen TV, the difference is night and day.
For creators, shooting and uploading in 4K on YouTube is a power move. It’s about future-proofing your hard work and giving your audience the absolute best version of your vision. Here’s a pro tip: even viewers on 1080p screens get a better experience, because YouTube's compression treats 4K source files better, resulting in a crisper downscaled image.
The Tangible Benefits of Ultra HD
The perks go way beyond just a sharper picture. Here’s what makes 4K such a big deal:
- Mind-Blowing Detail: Fine textures, background elements, and subtle expressions that would be a blurry mess in lower resolutions are suddenly crystal clear.
- Deeper, Richer Colors: 4K often goes hand-in-hand with a wider color gamut and High Dynamic Range (HDR), which means you get colors that pop, deeper blacks, and brighter whites. It's more true-to-life.
- Freedom in the Edit: Filming in 4K gives editors a massive canvas to play with. You can crop in, reframe a shot, or digitally stabilize shaky footage for a 1080p export without turning your video into a pixelated soup.
The big idea is simple: more pixels create a more convincing illusion of reality. When you watch a 4K video, your brain doesn't have to work as hard to fill in the missing details, which lets you sink into the experience and be truly captivated.
Resolution Quick View 1080p vs 4K
To put this all into perspective, let's break down the two most common resolutions you'll find on YouTube today. This little table really shows you how much of a jump 4K truly is.
| Feature | 1080p (Full HD) | 4K (Ultra HD) |
|---|---|---|
| Pixel Count | 1920 x 1080 (2.1 million) | 3840 x 2160 (8.3 million) |
| Detail Level | Good for phones and smaller screens | Excellent for all screens, especially big TVs |
| Typical Use | Vlogs, tutorials, standard streaming | Cinematic work, gaming, product reviews |
Ultimately, getting a handle on 4K is your first step toward mastering it. And don't worry if your entire workflow isn't 4K-ready just yet; amazing tools are popping up to close that gap. For instance, AI-powered software can breathe new life into existing footage. You can learn more about upscaling video with AI from our team at PixelPanda to see just how accessible top-tier quality has become. Now, let's dive deeper and get you ready to create some stunning content.
What's the Secret Sauce in YouTube's 4K Recipe?
Ever wondered how YouTube squeezes a gigantic 4K video through the internet's sometimes-creaky plumbing and onto your screen without it looking like a blocky mess from 1998? It's not magic, but it’s a pretty slick bit of digital trickery happening behind the curtain. The whole process is designed to make sure those gorgeous visuals you filmed actually make it to the viewer's eyeballs.
This journey from your camera to their laptop is a multi-step process, with a few key players doing the heavy lifting to make it all work seamlessly.
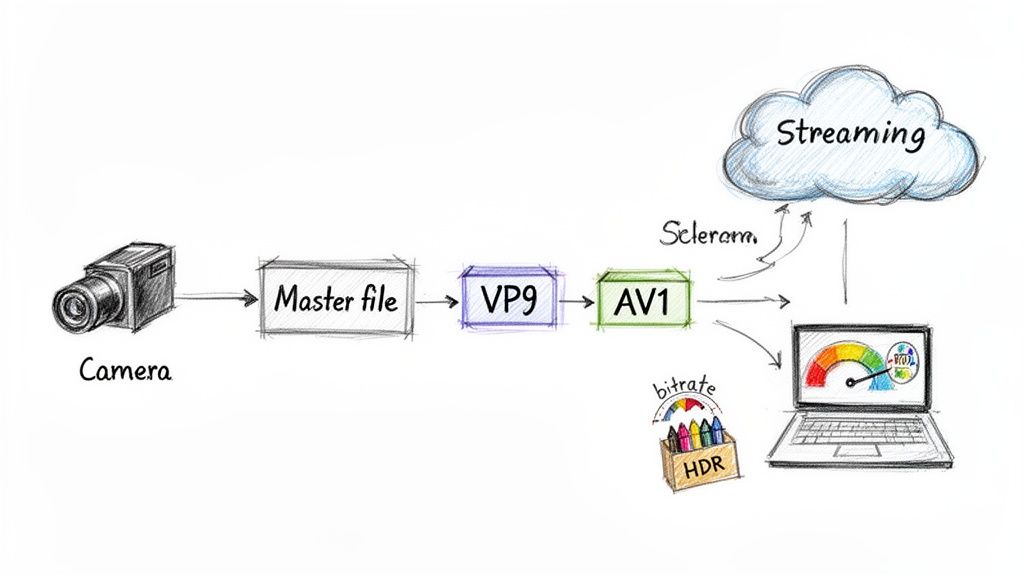
As you can see, once your masterpiece file hits YouTube's servers, a critical compression step happens before anyone can stream it. Let's break down who’s in charge of that.
Meet the Codecs: The Digital Origami Masters
The unsung heroes of this whole operation are video codecs. Think of a codec as a world-class packing expert who specializes in digital origami. When you upload a monster 4K video file, YouTube’s codecs—mostly VP9 and its even smarter younger sibling, AV1—get to work folding and compressing that data with incredible precision. They toss out all the redundant information the human eye won't miss, shrinking the file down so it can fly across the internet.
This is exactly why you need to feed YouTube a high-quality file to begin with. Give its codec a rich, detailed video, and it can work its magic to create a beautifully compressed stream. But if you upload a low-quality, muddy-looking file? Well, garbage in, garbage out. The codec has nothing to work with, and you'll end up with those ugly blocky artifacts we all hate.
Understanding Bitrate: The 'Data Paint' for Your Video
So, if the codec is the packing method, what's bitrate? Think of it as the amount of stuff you're giving the packer. Imagine you're painting a massive, detailed mural. Bitrate is the volume of "data paint" you get for each second of your video.
More paint (a higher bitrate) means you can add finer details, capture silky-smooth motion, and showcase vibrant, rich colors. A low bitrate is like trying to paint that same mural with a half-empty watercolor set. You have to stretch the paint so thin that everything looks washed out, blotchy, and just plain sad.
For 4K resolution YouTube videos, getting the bitrate right is non-negotiable. Here's a quick cheat sheet for what YouTube likes to see:
- 4K at 24/25/30 FPS: Shoot for a bitrate between 35-45 Mbps (megabits per second).
- 4K at 48/50/60 FPS: For that buttery-smooth high frame rate look, you need more data paint. Target 53-68 Mbps.
Uploading in these ranges gives YouTube's compression process enough information to chew on, ensuring your final video still looks stunning.
When you see a 4K video that looks absolutely pristine, it’s a tag-team effort. A powerful codec like VP9 was handed a high-bitrate source file, allowing it to intelligently preserve all the important visual data while ditching the rest. That’s how a crisp image makes it to the viewer.
Bringing Colors to Life with HDR
Alright, one last ingredient: the sparkle. That's High Dynamic Range (HDR). If resolution gives you more pixels and bitrate gives those pixels more detail, HDR hands them an entirely new box of crayons to play with.
Standard video is like working with a basic 8-color crayon set. It gets the job done. But HDR is like getting the giant 120-crayon box—the one with all the neons, metallics, and fifty shades of blue. This tech allows for blindingly bright whites and deep, inky blacks to exist in the same frame, creating contrast that makes the image practically pop off the screen.
The result is a level of color and realism that feels incredibly immersive. When you see a true 4K HDR video on a screen that can handle it, the difference isn't just noticeable; it's breathtaking.
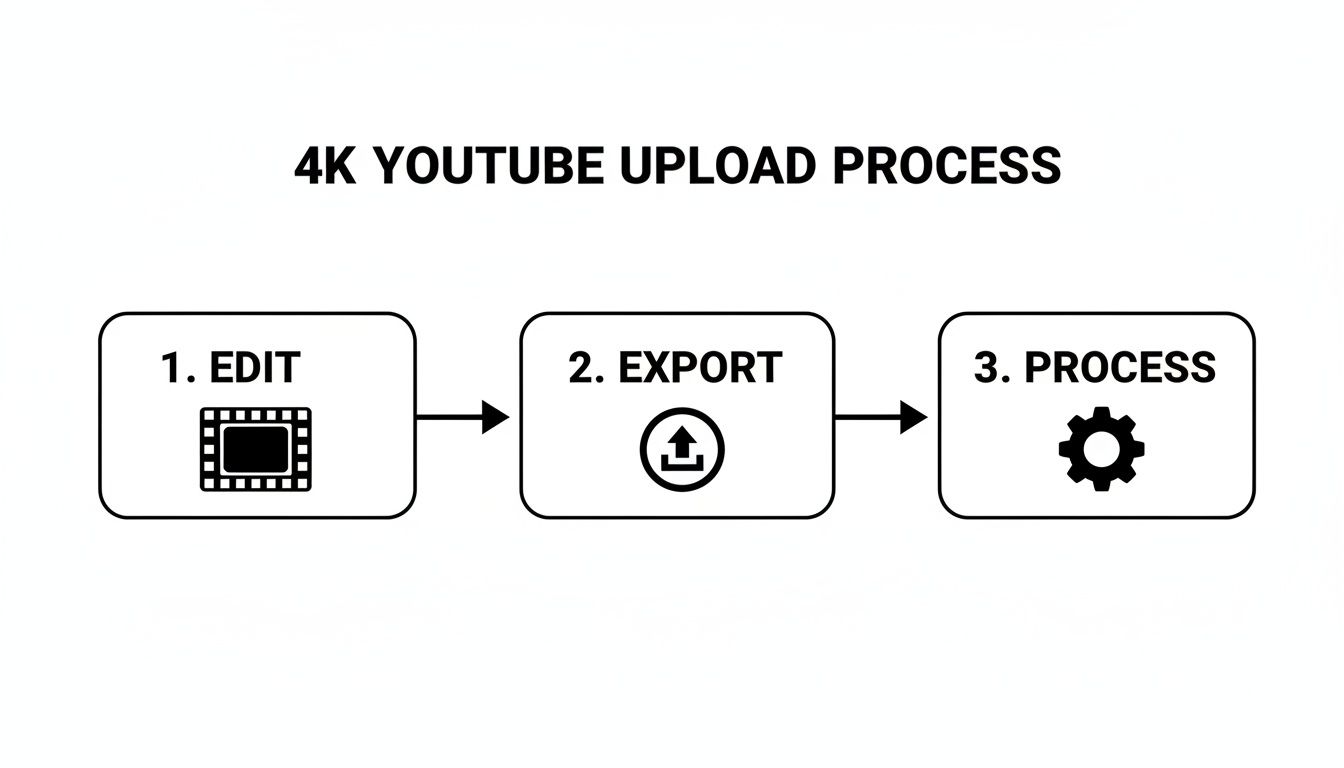
Getting Your 4K Masterpiece Ready for YouTube
Alright, this is it. The final, nail-biting step. After all the hours you've poured into shooting and editing, you’re about to hand your masterpiece over to the great and powerful YouTube algorithm. To make sure your video survives the journey with all its stunning clarity intact, you need a smart game plan. This is about more than just clicking "Export."
Think of your video file as a fragile, priceless vase you're shipping across the country. If you just toss it in a flimsy box with some newspaper, you can bet it's going to show up in a thousand pieces. But if you carefully wrap it in bubble wrap and secure it in a sturdy, well-padded box, it arrives looking perfect. Your export settings are the bubble wrap for your video.
Unlocking YouTube’s VIP Codec: The VP9 Secret
Your number one goal is to convince YouTube to process your video with its best-in-class VP9 codec. Why? Because VP9 is a wizard at compressing video without turning it into a blurry mess, which is exactly what you want for that crisp 4K stream. Upload a lower-quality file, and you'll likely get stuck with the older, clunkier AVC1 codec, which often leaves your video looking soft and artifact-ridden.
So, how do you get the VIP treatment? The secret is to feed the beast. Upload a master file with a ridiculously high bitrate—way higher than what YouTube actually streams at. This gives the VP9 encoder a mountain of data to work with, allowing it to preserve every last bit of texture and detail that would otherwise get squashed.
Sending YouTube a high-bitrate file is like giving a master painter a giant, high-resolution canvas. They have all the room and detail they need to create a masterpiece. A low-bitrate file is like handing them a napkin and a crayon. The final result is going to be limited by what you gave them to start with.
Nailing Your Export Settings
Whether you're a Premiere Pro wizard, a DaVinci Resolve guru, or a Final Cut Pro fanatic, the core principles are the same. Your mission is to create a master file that's as close to perfect as possible without being so massive it takes a week to upload.
While more creators are going 4K—uploads have jumped by 35%—the audience is a bit behind. Only about 15% of viewers consistently watch in 4K, often because it's a huge drain on their internet and device resources. It’s an interesting balancing act for any creator.
Here are the key settings that'll make your 4K video shine on YouTube:
- Container: Stick with MP4. It's the universal language of web video, and YouTube speaks it fluently. No compatibility headaches here.
- Codec: Export using H.264. While H.265 (HEVC) is technically newer, H.264 is still the most reliable and bulletproof choice for YouTube's processing pipeline.
- Bitrate: This is where the magic happens. For 4K video at 24-30fps, aim for 50-65 Mbps. Shooting at 60fps? Bump that up to 65-85 Mbps. You're intentionally "over-delivering" on data to force YouTube's hand and get that sweet, sweet VP9 encode.
- Color Space: For most content, Rec. 709 is your go-to. If you’ve gone through the trouble of shooting and grading in HDR, you can export using Rec. 2020, but make sure your entire workflow is HDR-compatible from start to finish.
Recommended 4K Upload Settings for YouTube
To make it even easier, here's a cheat sheet. Dial these settings into a preset in your editor, and you'll be set for every upload.
For developers and teams looking to automate this kind of high-quality encoding at scale, these settings are a fantastic starting point. You can build incredibly powerful media workflows using these parameters as a baseline; the PixelPanda API for developers provides deeper insights into building scalable video processing pipelines.
| Setting | Recommendation | Why It Matters |
|---|---|---|
| Container | MP4 | Ensures universal compatibility with YouTube's processing pipeline. |
| Codec | H.264 (High Profile) | The most reliable and widely supported codec for uploads. |
| Resolution | 3840×2160 | The standard pixel dimension for 4K UHD video. |
| Bitrate (24-30fps) | 50-65 Mbps (VBR, 2-pass) | Provides ample data to trigger the VP9 codec for superior quality. |
| Bitrate (60fps) | 65-85 Mbps (VBR, 2-pass) | Higher frame rates require more data to maintain clarity in motion. |
| Color Space | Rec. 709 (SDR) | The standard for most web video, ensuring accurate color reproduction. |
| Audio Codec | AAC-LC | High-quality audio codec preferred by YouTube. |
| Audio Bitrate | 384 kbps Stereo | Delivers rich, clear audio to complement your stunning visuals. |
By following this playbook, you're no longer just hoping for the best—you're taking control. You're ensuring that every single pixel of your hard-earned 4k resolution youtube video shines through, giving your audience the breathtaking experience they came for.
So, Why Isn't My 4K Video Playing in 4K?
You did it. You poured your heart and soul into shooting, editing, and exporting a masterpiece in stunning 4K. You’ve uploaded it to YouTube, hit publish, and… wait, what? The little gear icon is stubbornly stuck at 1080p.
It’s a classic creator nightmare, but take a deep breath. This is an incredibly common problem, and the culprits are usually pretty easy to round up. More often than not, the issue isn't your original file but the complicated journey it takes from YouTube's servers to a viewer's screen.
Let's play detective and figure out why your beautiful pixels are being held hostage.
This little flowchart shows the typical path your video takes. That last step, "Processing," is where most of the mystery begins.
Here's the key: "uploaded" doesn't mean "ready." That processing stage is where YouTube works its magic, creating different versions of your video for all sorts of devices and internet speeds. And that, my friend, takes time.
The Number One Culprit: The Processing Delay
By a long shot, the most common reason your 4K video isn't showing up in all its glory is that YouTube just isn't finished with it yet. When a video is first uploaded, YouTube hustles to get low-resolution versions (like 360p and 480p) out the door so it can go live quickly. The higher resolutions, especially the data-heavy 4K version, are way back in the queue.
Think of it like a restaurant kitchen. The 360p version is a simple appetizer that's ready in minutes. The 4K version is the slow-roasted, multi-course feast that takes hours to prepare perfectly. For a longer 4K video, this can easily take a few hours or even a full day.
Pro tip: Always upload your videos as "Unlisted" or "Private" first. Give YouTube a solid 24 hours to finish processing all the resolutions before you unleash it on the world. This way, the 4K option is there for everyone from the moment you go public.
Is Your Internet Connection Holding You Back?
The next big hurdle is bandwidth. Trying to stream 4K resolution YouTube content on a slow connection is like trying to drink a thick milkshake through a coffee stirrer—it's just not going to work. For smooth, buffer-free 4K, you need a stable internet connection of at least 25 Mbps.
Even if your plan is fast enough, other saboteurs might be at play:
- Wi-Fi Woes: A weak or congested Wi-Fi signal can throttle your speeds. Get closer to your router or, better yet, plug in with an Ethernet cable for a rock-solid connection.
- Household Traffic Jams: If the whole family is streaming, gaming, and Zooming at once, your 4K stream might get stuck in traffic. There’s only so much bandwidth to go around.
- The Digital Divide: Let's face it, not everyone has access to lightning-fast internet. It's a real issue. Data shows that only about 45% of urban users have connections consistently fast enough for 4K, and that number drops to just 20% in rural areas. It’s a stark reminder of the access gap among YouTube's 2.70 billion monthly users. You can explore more about this on the Data Globe Hub.
Checking Your Hardware and Software Limits
Sometimes, the bottleneck isn't YouTube or your internet—it's the very device you're watching on. Not all gear is built to handle the heavy lifting that 4K requires.
First, the obvious one: your screen. You can't watch 4K if your display doesn't have the pixels. Your monitor, TV, or phone screen needs a native resolution of at least 3840 x 2160 to show true 4K.
Next up is raw power. Older computers, phones, or smart TVs might just not have the processing muscle to decode and play 4K video without stuttering. Your browser could also be the problem. You'll need an updated version of a modern browser like Chrome, Firefox, or Edge that supports the efficient VP9 codec, which is what YouTube uses to serve up 4K.
And just to keep things interesting, strange bugs can pop up. Some creators have recently reported that brand-new 4K uploads play perfectly on a PC but are capped at 1080p on smart TV apps. This points to temporary glitches on YouTube's end, so sometimes a little patience is all that's needed.
Using AI to Upscale and Enhance Your Videos
What if you could deliver stunning 4K quality without ever shooting in 4K? It sounds like a gimmick, I know, but it’s fast becoming a go-to strategy for savvy creators, all thanks to the wild world of AI video enhancement. This isn't just about blowing up your video files; it's about making them smarter.
Picture this: you have a fantastic video you shot in 1080p. The old way of upscaling was like stretching a small photograph—sure, it gets bigger, but it also becomes a blurry, pixelated mess. You're just spreading the same data too thin, and the results are almost always a letdown.
AI upscaling completely torches that old-school method.

Instead of just stretching pixels, AI models dive into your 1080p footage frame-by-frame. Having been trained on millions of high-res images and videos, the AI has essentially learned what things should look like. It intelligently predicts and rebuilds the missing details, filling in the blanks to turn a standard HD video into something that looks shockingly close to a native 4K masterpiece.
How AI Breathes New Life into Your Content
This whole approach is a massive win for creators who might not have the budget for 4K cameras, the hard drive space for those enormous files, or the time to go out and reshoot everything. It levels the playing field, closing the gap between what you can afford and what your audience expects to see.
The applications here are incredibly practical and can make a real difference in how your channel is perceived.
Here are a few ways AI enhancement can become your secret weapon:
- Revitalizing Old Footage: Got some classic videos from a few years back, shot in 720p or 1080p? AI can breathe new life into them, making that content look fresh and sharp on today's high-resolution screens.
- Improving Smartphone Video: Modern phones shoot incredible video, but let's be honest, they still can't touch a dedicated cinema camera. AI can clean up digital noise, sharpen up the details, and upscale that phone footage to look way more professional.
- Enhancing Product Demos: If you run an e-commerce brand, detail is everything. An AI-enhanced product video can transform a standard demo into a stunning 4K showcase, letting customers see every last texture and feature with absolute clarity.
The real magic of AI upscaling isn't just about adding more pixels; it's about adding intelligence. By understanding context, lines, and textures, the AI generates new, believable details that trick your eyes into thinking the video was shot in a higher resolution all along.
This isn't some far-off future tech; it's here right now. If you want to see this process for yourself, check out an interactive image upscaling demo to get a real feel for how AI reconstructs details from a low-res source. The same exact principles are at play with video, and the results can be jaw-dropping.
When to Use AI Upscaling for YouTube
Now, while this tech is powerful, it’s not a magic wand you can wave at every video. It's a tool. And like any good tool, knowing when to use it is the key to getting that top-tier 4k resolution youtube quality.
Think about using AI enhancement in these situations:
- Your source footage is high-quality 1080p. The AI needs good material to work with. A crisp, well-lit 1080p file is going to upscale beautifully. A blurry, dark, shaky video? Not so much. Garbage in, garbage out.
- You want to trigger YouTube’s VP9 codec. We’ve talked about this already, but it’s a huge one. Uploading a 4K file—even an upscaled one—gives YouTube a nudge to use its better VP9 codec. The result is a cleaner video for everyone, even those watching at 1080p.
- You're mixing footage. If you’re editing a project with a mix of 4K and 1080p clips, upscaling the 1080p stuff helps everything look seamless and professional in the final cut. No more jarring quality shifts.
- You need to crop or reframe a shot. By upscaling a 1080p clip to 4K, you give yourself a ton more room to punch in on a shot for a 1080p export without it turning into a pixelated mess.
By using AI strategically, creators can finally deliver that premium 4K experience audiences are hungry for, without being held back by their gear or budget. It’s an exciting new frontier that’s making incredible video quality more accessible than ever.
Got Questions About 4K on YouTube? We've Got Answers.
Alright, we've waded through the deep end of codecs, bitrates, and AI magic. But let's be honest, you probably still have a few questions rattling around. When it comes to something as detailed as 4K resolution YouTube videos, that’s perfectly normal.
This is where we clear the air. No jargon, no fluff—just straight answers to the most common questions we hear from creators and viewers alike. Think of it as the final piece of the puzzle, your go-to FAQ for mastering the ultra-HD world.
Is It Really Worth Uploading in 4K?
This is the big one, isn't it? The question that keeps creators staring at their export settings at 2 AM. With those beefy file sizes and agonizingly long processing times, is 4K actually worth the hassle?
The answer is a massive, unequivocal YES. And it comes down to two huge advantages.
First, you’re playing the long game. You're future-proofing your art. Every day, more people are bringing 4K TVs and monitors into their homes. Uploading in 4K ensures your content will look just as crisp and impressive years from now as it does today.
Second—and this is the secret weapon—uploading in 4K makes your video look better for everyone, even those watching on a 1080p screen. Why? Because a 4K upload forces YouTube to use its superior VP9 codec. When YouTube downscales that high-quality file for a 1080p viewer, the result is dramatically sharper and more detailed than if you’d just uploaded a 1080p file in the first place.
Simply put, a 4K upload gives a premium viewing experience to your entire audience, no matter what screen they're on. It's the single most effective way to guarantee your video looks its absolute best.
How Much Data Does Streaming 4K Gobble Up?
If you’ve ever been hit with a surprise data overage bill, this question is for you. Streaming in 4K is a data-hungry beast, and it’s smart to know what you’re signing up for before you binge-watch in glorious ultra-HD.
As a general rule of thumb, here's what you can expect to burn through:
- 1080p (Full HD): Around 3 GB of data per hour.
- 4K (Ultra HD): A hefty 7-10 GB of data per hour.
That number can wiggle a bit depending on the video's frame rate and on-screen action, but it’s a solid estimate. That’s a serious leap, which is why a stable, unmetered internet connection is your best friend for enjoying 4K resolution YouTube without that dreaded data-anxiety.
"Help! Why Does My 4K Video Look Blurry at First?"
You did it. You uploaded your masterpiece, clicked the link, and… it looks like it was filmed with a potato. Don't panic! This is completely normal and all part of YouTube’s processing workflow.
YouTube is all about speed. It first spits out the low-resolution versions (like 360p and 480p) to get your video online as quickly as possible. The massive 4K version is at the very back of the processing queue, and it can take anywhere from a few hours to over a day for longer videos to finish cooking.
Here's a pro tip to sidestep that awkward, blurry debut:
- Upload as "Private" or "Unlisted." Never, ever publish it immediately.
- Give it 24 hours. Let YouTube’s servers do their thing without an audience watching.
- Check your work. Once you confirm the 2160p (4K) option is live and kicking, then you can switch the video to "Public."
This simple process guarantees that the moment your video hits your subscribers' feeds, the stunning 4K version is ready to shine.
Can I Watch 4K YouTube on Just Any Device?
The short answer? Nope. Getting true 4K playback requires a perfect chain of command where every piece of hardware and software is up to the task.
For starters, your screen—whether it's a TV, monitor, or phone—needs a native resolution of at least 3840 x 2160 pixels. You can't see 8 million pixels if your screen only has 2 million to show. It’s that simple.
Next, your device’s processor needs the muscle to decode that massive 4K video stream without breaking a sweat. Older computers, budget phones, and even some smart TVs might choke, resulting in that awful stuttering or constant buffering.
Finally, your app or browser must support YouTube's modern VP9 or AV1 codecs. Thankfully, most current web browsers and official YouTube apps are good to go. But if you're hitting a wall, especially on a smart TV, a codec compatibility issue might be the sneaky culprit.
Ready to stop worrying about manual edits and start producing stunning visuals at scale? PixelPanda offers a powerful API that automates everything from background removal to AI-powered 4K upscaling. See how our developer-friendly tools can transform your visual content workflows by visiting the official PixelPanda website today.