Let's be real—the days of needing a minivan full of expensive gear to capture the world in 3D are over. The real magic now happens in the software, right on the phone in your pocket. This guide is my developer-to-developer brain dump on how to build a seriously cool 3D camera app from scratch. We're going to skip the fluff and get right into the nitty-gritty of what actually works in the wild.
Your Blueprint for the Next Great 3D App
So, you're thinking about jumping into the 3D app space? Smart move. You're not just building a niche tool; you're tapping into a market that's absolutely exploding. We're talking a projected leap from USD 8.45 billion in 2025 to a staggering USD 35.25 billion by 2034. That’s not just growth; it’s a gold rush. The demand for rich, immersive experiences is through the roof.
This isn't going to be some dry, academic exercise. I've been in the trenches, and I'm here to share the practical, actionable stuff that actually turns a good idea into a great app. We’ll cover how to get a regular smartphone camera to "see" in 3D using photogrammetry—the clever process of stitching multiple 2D pictures together to build a 3D model.
Before we dive deep, let's get a bird's-eye view of the project. Building a 3D camera app isn't a single sprint; it's a marathon with distinct stages. Each phase presents its own unique puzzles to solve and requires a different set of tools.
Here’s a high-level look at the core development phases, what each stage demands, and the technologies you'll be working with.
Key Development Stages for Your 3D Camera App
| Development Phase | Primary Goal | Key Technologies Involved |
|---|---|---|
| Capture & Depth Estimation | Extract 3D information from 2D images. | Stereoscopic Vision, Structure from Motion (SfM), LiDAR (if available) |
| Data Fusion & Processing | Combine multiple scans into a single, cohesive 3D model. | Point Cloud Registration, Volumetric Fusion, Mesh Generation |
| Cleanup & Enhancement | Fix imperfections and make the final 3D model look amazing. | AI-powered APIs, Mesh simplification, Texture upscaling, Inpainting |
This table maps out our journey. From figuring out how to capture depth to making the final product shine, we've got a lot of exciting ground to cover.
The real secret sauce isn't just capturing a 3D model. It's making the whole process feel seamless for the user and delivering a result that looks absolutely stunning. Your app's success will come down to how well you solve the messy problems of noisy data, missing pieces, and slow performance.
The Tools of the Trade
To pull this off, you'll need the right toolkit. We’ll get our hands dirty with libraries like manifold-3d for generating the geometric mesh and Three.js for rendering beautiful, interactive 3D scenes right in a mobile or web app.
But what about all the post-processing work? Raw 3D scans are always a bit rough around the edges. This is where a powerful image processing API becomes your best friend. Instead of building complex enhancement features from the ground up, you can automate things like depth-aware sharpening, background removal, and smart inpainting.
If you want to fast-track that part of the process, checking out an API built for this, like the PixelPanda API, can give you a massive leg up.
Alright, enough talk. Let's start building.
Mastering 3D Capture and Depth Estimation
Alright, let's get into the guts of a 3D camera app. The real magic isn't just snapping a photo; it's about making a flat, 2D lens see the world in three dimensions. This is where we stop being photographers and start becoming computational geometers, turning pixels into objects with real depth and form.
The classic approach here is stereoscopic vision, which is just a fancy way of saying we're copying how human eyes work. You take two pictures from slightly different angles, and your app crunches the numbers on the differences—the "disparity"—to figure out how far away everything is. It's old-school but incredibly reliable.
But what about the billions of phones with just one main camera? That's where Structure from Motion (SfM) struts onto the scene. Instead of two simultaneous shots, SfM uses a whole video or a series of photos as the user pans their phone. The software is smart enough to spot the same points across all those frames, and from there, it reverse-engineers both the camera's movement and the 3D shape of the object. Think of it as leaving a trail of digital breadcrumbs to build a 3D model.
Hardware vs. Software: Picking Your Path
Your first big decision is dictated by the hardware you're targeting. Does the user have a shiny new phone with dedicated depth sensors, or are we working with a standard camera and a whole lot of clever code?
This decision tree lays out how the tech in a user's pocket shapes your development strategy right from the get-go.
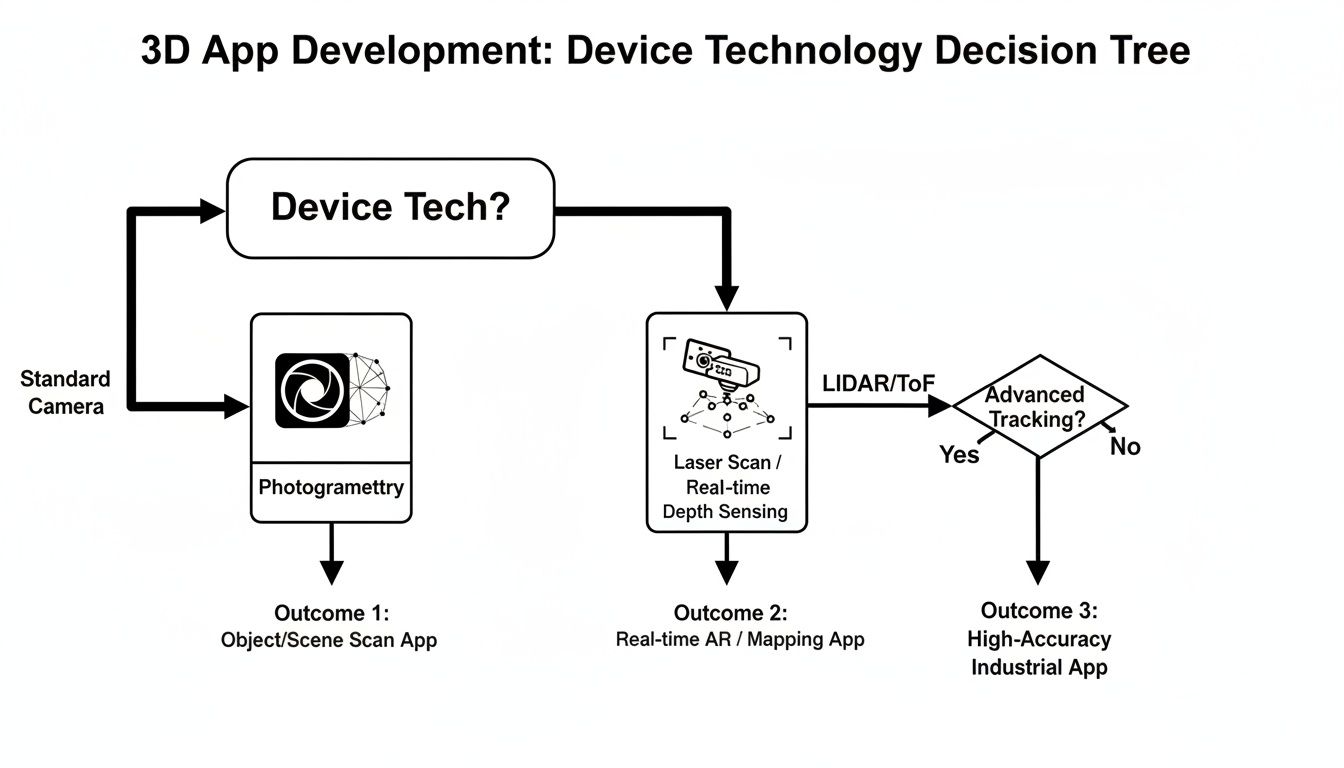
As you can see, if you're lucky enough to have LiDAR or ToF data, you get a clean, direct depth map. For everyone else, you're heading down the photogrammetry route, which means more heavy lifting on the software side.
The Raw Power of Specialized Sensors
Newer high-end phones are often packed with Time-of-Flight (ToF) or LiDAR sensors, and frankly, they're game-changers. Instead of just guessing depth from a picture, these sensors actively measure it. They shoot out tiny, invisible beams of infrared light and time how long it takes for the light to hit something and bounce back.
The result? A direct, accurate, and near-instantaneous depth map of whatever you're pointing at. This isn't just some gimmick; it's a market that's blowing up. The Time-of-Flight (ToF) sector is projected to grow at a staggering 19.7% CAGR, pushing 3D experiences into the mainstream. You can dig into the research behind these 3D camera market trends to see just how big this opportunity is.
For us developers, a phone with a ToF sensor is a dream. It hands you a reliable depth map on a silver platter, which means way less cleanup and fewer headaches down the line. This is absolutely critical if you're building anything that needs to work in real-time, like an AR filter or a measurement tool.
AI to the Rescue on Single-Camera Phones
So, what about the vast majority of phones that don't have these fancy sensors? This is where AI makes a heroic entrance with something called monocular depth estimation. At its core, this is a deep neural network that has been trained on millions of images to do one thing: predict depth from a single 2D photo.
The AI essentially learns all the subtle visual cues that we humans use to perceive depth—things like perspective, how shadows fall, and the relative size of objects. It’s not quite as tack-sharp as a LiDAR scan, but it's good enough to bring 3D capture to billions of devices that would otherwise be left out.
- The upside: You get massive device compatibility. No special hardware or user actions needed.
- The downside: It’s less precise than hardware-based methods and can sometimes get confused by weird objects or tricky lighting.
So, which capture method is right for you? It all boils down to your app's purpose. Are you building a hyper-accurate scanner for professionals, or a fun AR effect for the masses? Let’s lay them out side-by-side.
Comparing 3D Capture Techniques
Choosing your primary capture method is one of the most important architectural decisions you'll make. Each has distinct advantages and trade-offs that will impact everything from user experience to processing load. Here's a quick breakdown to help you decide.
| Technique | How It Works | Pros | Cons |
|---|---|---|---|
| Structure from Motion (SfM) | Reconstructs 3D geometry from a sequence of overlapping 2D images taken from different viewpoints. | Can produce highly detailed, photorealistic, and textured models from standard cameras. | Requires the user to move the camera deliberately and carefully. It's also very computationally heavy. |
| Time-of-Flight (ToF) / LiDAR | Actively measures depth by firing infrared light and timing its return trip to the sensor. | Incredibly fast, provides an accurate depth map in real-time. Perfect for AR and instant scans. | It's a hardware-dependent feature, limited to higher-end devices. |
| Monocular Estimation | A trained AI model analyzes a single 2D image and infers a depth map based on learned visual cues. | Works on almost any device with a camera. Simple for the user—just point and shoot. | The least accurate method. Depth maps can be noisy, less detailed, and prone to artifacts. |
Ultimately, the smartest 3D camera app doesn't just pick one method; it builds a flexible, hybrid system. Start by checking for a ToF sensor. If it's there, use it! If not, fall back to a monocular AI model for a quick preview, and then guide the user through a more detailed SfM capture if they need higher quality. This kind of adaptable logic is key to delivering a fantastic experience to everyone, regardless of what phone they have in their pocket.
Alright, you've managed to wrangle a stream of images and depth data from the phone. Nicely done. Now comes the million-dollar question that will shape your app's entire architecture: where does all the heavy lifting happen?
Welcome to the main event: the classic showdown between crunching numbers right on the device versus sending it all up to the cloud.
This isn't just a technical debate; it's a fundamental user experience decision. Get it wrong, and you're stuck with a sluggish app that eats batteries for breakfast or a cool tool that's completely useless without a five-bar Wi-Fi signal.
The Case for Keeping It Local: On-Device Processing
Processing everything directly on the user's phone has some huge advantages, especially for a 3D camera app that needs to feel snappy and immediate.
The most obvious win is speed. No network lag. Period. When a user is trying out a real-time AR filter, it needs to stick to their face instantly, not three seconds later after a round trip to a server farm in another state.
But it’s not just about latency. Going on-device gives you:
- Offline Superpowers: Your app just works. On a plane, in the subway, or hiking in the middle of nowhere. This is a massive boost for usability and makes your app feel incredibly reliable.
- A Privacy Fortress: User data—which could be images of their home, their face, or personal stuff—never leaves their device. In an era where everyone's (rightfully) paranoid about privacy, this is a powerful selling point.
- Zero Server Bills: You're not paying for server uptime, data transfer, or beefy GPU instances every time someone scans a coffee mug. The processing cost is neatly offloaded to the user's hardware.
Of course, this path isn't all sunshine and rainbows. You’re completely at the mercy of the phone's hardware. Running complex photogrammetry algorithms can turn a phone into a pocket-sized space heater and drain the battery faster than you can say "thermal throttling." You're also limited in the sheer complexity of the 3D models you can generate, thanks to tight memory and CPU ceilings.
Unleashing the Beast: Cloud Processing
When you need sheer, unadulterated power, you look to the cloud. Server-side processing means you can throw entire fleets of high-performance GPUs at a problem, running algorithms that would make a smartphone curl up and cry.
This is the path you take when quality is king.
If your app’s mission is to produce high-fidelity, professional-grade 3D models for e-commerce or architectural visualization, the cloud is your best friend. It lets your 3D camera app tackle incredibly demanding tasks that are simply impossible on a phone:
- High-Resolution Mesh Reconstruction: We're talking detailed, multi-million polygon models generated from hundreds of photos.
- Advanced Texture Mapping: Think crisp, beautiful 4K or 8K textures that look genuinely photorealistic.
- AI-Powered Magic: Running sophisticated AI models for denoising, filling holes, and object segmentation that are far too large or slow for a mobile chip.
The catch? It all comes at a price—literally. You’re now on the hook for server maintenance, scaling infrastructure, and paying for every single compute cycle. More importantly, the user experience is now chained to an internet connection. Uploading dozens of high-res images on a shaky cell signal is a recipe for user frustration.
My advice? Don't fall into the trap of thinking it's a strict "either/or" choice. The most sophisticated and successful apps rarely pick just one. They get clever and blend the two approaches.
The Hybrid Approach: A Winning Strategy
Honestly, the most elegant solution is almost always a hybrid model. This strategy uses the phone for what it's good at (quick, responsive tasks) and the cloud for what it's good at (brute-force number crunching). It’s a delicate dance, but when you get the choreography right, the user experience is unbeatable.
Here’s what a smart hybrid workflow can look like:
- Instant Gratification (On-Device): As the user captures images, the app performs a quick, low-poly reconstruction right on the device. This gives them an immediate preview to check if they’ve covered all the angles. No more guessing.
- Smart Culling (On-Device): Before uploading anything, the app can be a bouncer at the club door. It can compress images, automatically toss out blurry frames, and roughly align the camera positions. This slashes the amount of data you have to send over the network.
- The Heavy Lifting (Cloud): The pre-processed, curated data is sent to your servers. This is where your cloud GPUs earn their keep, handling the full-scale, high-quality 3D model generation.
- Final Delivery (Both): The final, optimized 3D model is sent back to the device. You might send a lightweight version for quick mobile viewing while providing a link to the glorious, high-resolution version for desktop use.
This hybrid architecture gives users the snappy feel of on-device processing while delivering the jaw-dropping quality of a cloud pipeline. It’s the kind of thoughtful balance that separates a fun tech demo from a truly powerful and usable 3D camera app.
Turning Raw Scans into Polished Art with AI
Let's be honest. Raw 3D captures are a hot mess. They're like a first draft—full of potential but riddled with noisy point clouds, weird floaty bits, and gaping holes where your camera just couldn't peek. This is the moment your 3d camera app either becomes a cool tech demo or a tool people genuinely can't live without. It all comes down to the cleanup, and thankfully, AI is ready to be your digital janitor and art director rolled into one.
Forget the soul-crushing drudgery of manual mesh editing. We're talking about plugging in smart, automated pipelines that take a rough-and-tumble scan and spit out a polished, professional-grade asset. This isn't just about patching up errors; it's about adding a layer of magic that makes your users go, "Whoa, how'd it do that?"
The Magic of Depth-Aware Enhancements
The first big brain move is to stop thinking in 2D. Your app has a superpower that most image editors don't: the depth map. Using this data unlocks depth-aware enhancements, where the AI actually understands the 3D structure of the scene and applies effects with a mind-blowing level of realism.
Think about a sharpening filter. A basic 2D filter just cranks up the contrast on every edge, making everything look harsh and fake. A depth-aware AI, on the other hand, knows to sharpen the person in the foreground more than the mountains in the back, perfectly mimicking how a real camera lens focuses. It’s a subtle shift that adds a layer of professional gloss users can feel, even if they can't quite put their finger on why.
This pipeline shows just how powerful this can be, taking a simple sketch and using AI to create a stunning final image.
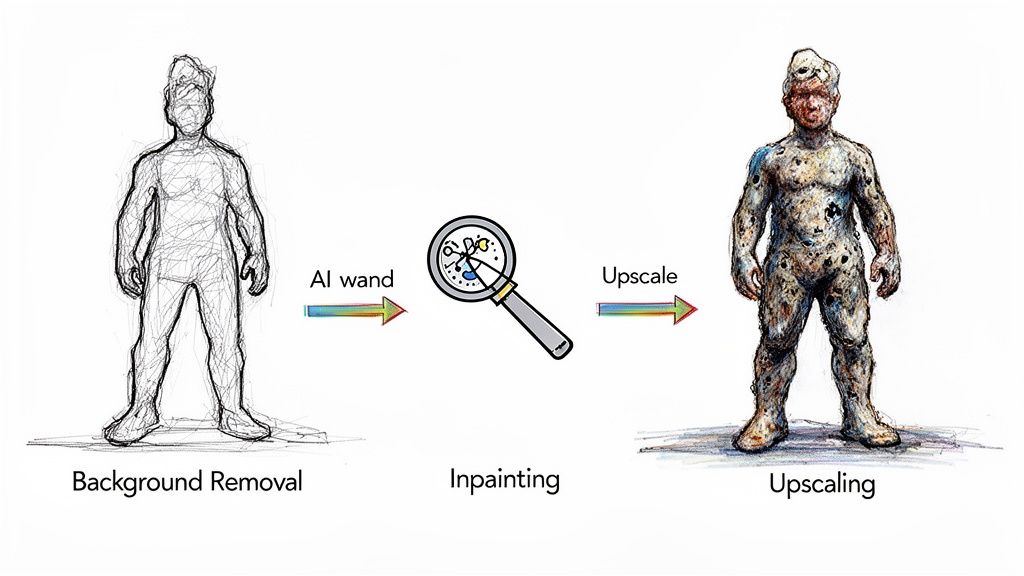
From isolating the subject to intelligently filling in the blanks, each step builds on the last to create something far beyond what the initial capture could offer.
This same logic applies to all sorts of other cool effects:
- Realistic Lighting: Don't just blast the whole scene with brightness. Add virtual light sources that cast believable shadows based on the actual 3D geometry.
- Artistic Styles: That "oil painting" filter you want to add? It looks a million times better when the AI makes the brush strokes follow the 3D contours of the object.
Here's the bottom line: your app isn't just taking pictures, it's capturing context. Using that 3D context during the enhancement phase is what separates a gimmick from a seriously powerful creative tool. It makes the final output feel real.
Let AI Handle the Dirty Work
Now for the nitty-gritty. Let's talk about the cleanup jobs that can rescue a user's scan from the brink of frustration. Integrating an AI-powered image processing API like PixelPanda can automate these tedious tasks, freeing you up to focus on the fun parts of your app.
AI-Powered Background Removal
One of the first things users will want to do is cut their scanned object out from its messy real-world background. Doing this by hand is a special kind of torture. An AI, however, can look at the image and its depth map and perform a pixel-perfect cutout in seconds. It can distinguish between the foreground subject and the background with surgical precision, even with fuzzy or complex edges. Want to see for yourself? You can test a live background removal demo and see just how clean the results are.
Intelligent Inpainting and Hole Filling
No scan is ever perfect. Reflections from shiny surfaces or just plain awkward angles will always leave holes in your mesh and textures. This is where AI inpainting swoops in to save the day. Instead of leaving an ugly black void, a smart inpainting algorithm analyzes the surrounding texture and fills the gap with new pixels that make perfect sense. It's like Photoshop’s Content-Aware Fill, but fully automated and baked right into your app.
Text and Watermark Removal
What if a user scans something with a logo on it, like a soda can or a book cover? An AI trained on object recognition can spot and remove that text, seamlessly painting over it with the underlying texture. This is a massive win for users who want to create clean, generic assets they can use in other projects.
Crank Up the Quality with AI Upscaling
Finally, let's talk resolution. The textures you generate from a phone's camera are often… fine. But "fine" doesn't drop jaws. They can look a bit blurry or pixelated, especially up close. This is where AI upscaling delivers the final knockout punch.
An AI upscaler doesn't just make the pixels bigger; it intelligently hallucinates and adds new detail, effectively bumping the image resolution by up to 4x or even more. It can transform a soft, 1024×1024 texture into a razor-sharp 4K texture, making the final 3D model look absolutely stunning. This single step can be the difference between an asset that looks "scanned" and one that looks photorealistic.
Building these AI cleanup and enhancement features directly into your 3d camera app is how you create an experience that’s not just polished, but downright addictive.
Making Your App Actually Usable: Performance and User Experience
Alright, let's be real. A 3d camera app with a million features is completely worthless if it runs like a slideshow, crashes every five minutes, or turns the user's phone into a space heater. Performance isn't just another item on a feature list; it's the bedrock of the entire experience.
This is where you separate the professional-grade apps from the clunky tech demos that get deleted immediately. Your mission is to build something that feels snappy and responsive, even when it's wrestling with massive 3D datasets. The user doesn't know or care about your fancy algorithms—they just want an app that feels fast and doesn’t nuke their battery life.
Taming the Memory Monster
Working with 3D data is a memory-hogging nightmare. A single high-res scan can easily spit out a point cloud with millions of vertices, each packed with position, color, and normal data. If you’re not careful, your app will devour all the available RAM and get unceremoniously killed by the OS.
Smart memory management isn't optional; it's survival. You have to think like a minimalist, only ever loading what is absolutely essential into memory at any given time.
Here are a few battle-tested strategies that actually work:
- Stream, Don't Gulp: Instead of trying to load the entire point cloud at once, process it in smaller, manageable chunks. Think of it as sipping data, not chugging it.
- Use the Right Tools for the Job: Ditch generic lists and arrays. Opt for data structures built for spatial data, like octrees. They make it much faster to query and cull data that isn't even visible to the user.
- Compress Everything: Before you send data to the GPU or save it to disk, squeeze it down. Compression cuts down your memory footprint and drastically reduces load times.
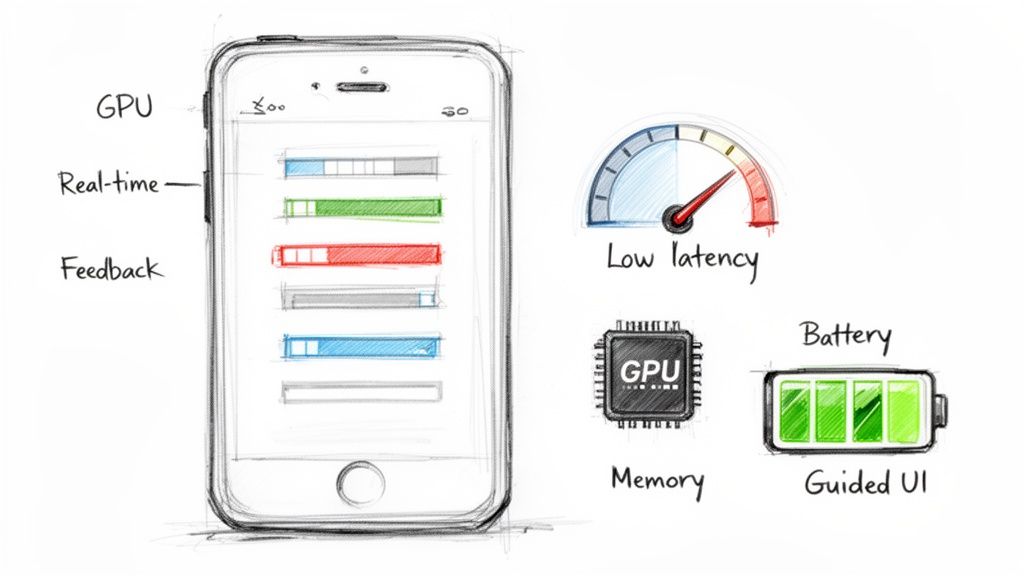
Let the GPU Do the Heavy Lifting
Your phone’s CPU is a generalist, but the GPU is a specialist—a beast built for massively parallel number crunching. For silky-smooth, real-time rendering, you have to offload as much work as possible to the GPU. I’m not just talking about drawing the final model; use it for complex calculations during the reconstruction process itself.
Your goal is a tight feedback loop. When the user moves their phone, the 3D preview should update instantly. This real-time feedback is crucial for guiding them to a successful capture. Lag kills the experience and leads to bad scans.
This obsession with user experience is precisely why this space is exploding. Smartphone 3D camera technology is on a massive growth trajectory. Valued at USD 13.8 billion in 2025, the market is projected to rocket to an insane USD 230.1 billion by 2035, growing at a 32.5% CAGR. You can explore the full forecast on smartphone 3D camera trends to see just how big this wave is.
Designing an Interface That Doesn't Suck
A great UI is your app's co-pilot. It needs to actively guide the user through what can be a really intimidating process. Don't just slap a "record" button on the screen and call it a day.
Your interface should provide clear, actionable feedback in real-time. For example, if the user is waving their phone around too fast, show a visual warning. If they’ve missed a spot, overlay a heatmap on the model to show them which areas need more attention. A well-guided experience turns potential frustration into a fun, almost game-like process, which dramatically improves the quality of the final scan.
Finally, think about the finish line. Once the user has created a beautiful 3D model, make it ridiculously easy for them to share it. Exporting to standard, web-friendly formats like GLB or USDZ is non-negotiable. These formats bundle the model, textures, and animations into a single, compact file that works everywhere.
And to make sure those textures really pop, you can even check out an AI image upscaling demo to see how you can automatically boost their resolution and detail before you package everything up.
Got Questions? We've Got Answers
Alright, let's get real. Even with the best blueprint in hand, building a 3D camera app from the ground up will test your patience. You're going to hit snags. Every single developer does.
So, let's dive into the questions that pop up most often. Figuring this stuff out now will save you a world of hurt later on.
Do I Really Need a Phone with LiDAR or ToF?
Short answer: Nope.
It’s easy to think you need the latest and greatest hardware, but phones with dedicated depth sensors like LiDAR or Time-of-Flight (ToF) are still a sliver of the market. While they're great for getting squeaky-clean depth data, requiring one is like putting up a "VIPs Only" sign at your app's front door. You'll massively shrink your potential audience.
The truth is, many of the slickest apps out there are pure software plays. They work their magic using the standard RGB camera that’s on literally every smartphone.
You've got a couple of solid software-based paths to choose from:
- Photogrammetry: This is the classic approach. Techniques like Structure from Motion (SfM) chomp through a series of photos to painstakingly reconstruct a 3D scene. It's a real workhorse, computationally speaking, but the level of detail you can get is often mind-blowing.
- AI Estimation: This is the new kid on the block. A trained neural network takes one look at a single 2D image and just… predicts the depth. It’s not as surgically precise as photogrammetry, but it's blazing fast and way easier for a user to handle.
You're essentially trading a tiny bit of precision for a massive gain in device compatibility. For most apps, that's a trade worth making every single time.
Where Are the Performance Gremlins Hiding?
When your app starts to chug and feel like it's wading through molasses, the problem is almost always one of three usual suspects. These are the performance killers that can bring your user experience to a screeching halt.
First up, data transfer. We're talking about moving mountains of high-res image data from the camera sensor to the processor. It's a firehose of information that can easily clog the pipes. Then comes the actual processing. The number-crunching involved in 3D reconstruction is brutal and can easily redline a phone's CPU, causing it to overheat and slow down.
And finally, you have rendering. Trying to display a complex, high-polygon 3D model on the screen in real-time puts a huge strain on the GPU.
The only way to win this fight is to optimize from start to finish. Think efficient data formats, offloading the heavy lifting to background threads (or even a server), and using level-of-detail (LOD) systems so you’re only rendering what you absolutely have to.
How Do I Deal with Messy, Imperfect Captures?
Let’s be brutally honest: there's no such thing as a "perfect" 3D scan out in the real world. It just doesn't happen.
Users will move too fast. The lighting will be awful. They'll try to scan a chrome toaster, which is basically a sensor's worst nightmare. Your app has to be built to expect chaos and handle it with grace.
Your first line of defense is a smart UI. Give people clear, real-time feedback while they're scanning. Help them avoid the most common mistakes before they make them. But even with a great guide, you're going to get flawed data.
This is where AI becomes your secret weapon. A solid post-processing pipeline is what separates a frustrating gimmick from a tool people actually want to use.
- AI Inpainting: Intelligently fill in the missing holes in your 3D model's mesh or textures by looking at the surrounding data. It's like magic Photoshop for 3D.
- Denoising Algorithms: Clean up the fuzzy "static" and other sensor noise that’s unavoidable, especially in dim light.
- Texture Enhancement: Use AI to sharpen and upscale the textures captured from the phone's camera, turning a blurry mess into a crisp, professional-looking result.
Baking these automated cleanup and repair features right into your app isn't just a nice-to-have; it's essential for delivering a polished product people will trust.
Ready to skip the soul-crushing part of building all those AI enhancement features from scratch? PixelPanda wraps up everything from background removal to 4x upscaling and smart inpainting into a dead-simple API. You can integrate it in minutes and start delivering studio-quality results. Explore the docs and start your free trial at PixelPanda.